Blueprint: Difference between revisions
Added 0.15 blueprint creation note, it moved from normal crafting to the blueprint panel. |
m →Parameterisation: Typos |
||
| (66 intermediate revisions by 18 users not shown) | |||
| Line 1: | Line 1: | ||
{{Languages}} | {{Languages}} | ||
{{:Blueprint | {{:Infobox:Blueprint}} | ||
Blueprints are | '''Blueprints''' are items that contain building layouts. Blueprints are used to 'copy & paste' parts of a factory. Built areas can be selected for inclusion in a blueprint. When a blueprint is placed, a [[ghost]] of the layout appears on the ground. This can be used as a guide for manually placing factory pieces, or, more commonly, handed over to [[construction robot]]s for automated completion. | ||
Blueprints can be stored in a [[blueprint book]] or [[blueprint library]] to prevent them occupying inventory space or for organization or sharing purposes. | |||
== Achievements == | == Achievements == | ||
{{ | {{Achievement|automated-construction}} | ||
{{Achievement|you-are-doing-it-right}} | |||
== Usage == | == Usage == | ||
Blank blueprints can be crafted | Blank blueprints can be crafted by clicking the ( [[File:Blueprint_button.png|20px]] ) button in the [[shortcut bar]]. The blank blueprint can now be used to 'copy' a set of buildings. For example, copying this small gun turret defense setup: | ||
The blank blueprint can now be used to 'copy' a set of buildings. | |||
For example, copying this small | |||
[[File:Blueprint-example-01.png]] | [[File:Blueprint-example-01.png]] | ||
| Line 24: | Line 19: | ||
=== Create a blueprint === | === Create a blueprint === | ||
To create a blueprint select the blueprint item out of the toolbar or the inventory. With the blueprint icon shown next to the mouse cursor, click and hold the left mouse button and drag a box as large as needed. All | To create a blueprint select the blueprint item out of the toolbar or the inventory. | ||
With the blueprint icon shown next to the mouse cursor, click and hold the left mouse button and drag a box as large as needed (which can be cancelled by pressing {{key|Q}}). | |||
All player-placed entities which will be included in the blueprint will be highlighted with a green square. | |||
Once everything you intend to 'copy' is inside the drag box, release the mouse button and the 'Blueprint icon setup' menu will open. | |||
[[File:Blueprint-example-02.png]] | [[File:Blueprint-example-02.png]] | ||
| Line 30: | Line 29: | ||
=== Blueprint icon setup === | === Blueprint icon setup === | ||
On the top left of the | On the top left of the "Setup new blueprint" menu there are four icon slots. These are displayed on the blueprint's icon and can be used to quickly identify a blueprint. When creating a new blueprint, the game automatically selects some of the icons representing the entities in the blueprint. | ||
These default icons can be changed by simply clicking on the icons to choose the desired ones. | |||
On the | On the left the 'Total' number of components included in the blueprint is shown. | ||
The purple "Parameterise" button in the top right is used to configure the settings of any buildings or [[circuit network]] entity within the blueprint. More on this feature below. | |||
The green "Create blueprint" button creates the blueprint. Additionally, blueprint creation can be cancelled by clicking the X in the top right corner. Canceling the blueprint does not consume the blueprint item. The created blueprint will replace the empty blueprint in the player's cursor. | |||
[[File:Blueprint-example-03.png]] | [[File:Blueprint-example-03.png]] | ||
| Line 42: | Line 43: | ||
=== Placing the blueprint === | === Placing the blueprint === | ||
To use/place the created blueprint select it from the tool belt or inventory. The whole building setup of the blueprint will be shown at your mouse cursor. | To use/place the created blueprint select it from the tool belt or inventory. The process of placing a blueprint is very similar to that of using [[copy and paste]] functionality. | ||
When you select a blueprint, the whole building setup of the blueprint will be shown at your mouse cursor. In this case the Blueprint was renamed to "Example blueprint". | |||
The blueprint can be rotated using the {{keybinding|R}} key. {{keybinding|H}} will flip it horizontally; {{keybinding|V}} will flip it vertically. Note that blueprints which contain [[rail signal]]s, [[rail chain signal|chain signals]], or [[train stop]]s cannot be flipped, only rotated. | |||
Placing a blueprint creates [[ghost]] entities. If these are within the green (or orange) 110×110 tiles area of a [[roboport]], or within range of a [[personal roboport]] installed in [[modular armor]] or [[spidertron]], construction robots may be able to build them using available materials. | |||
Holding {{keybinding|Shift}} will activate "Force Building" mode. This will mark all trees and rocks underneath the blueprint for deconstruction, as well as place ghosts for [[landfill]] if building over water. If playing in [[Space Age]]{{SA}}, it will instead place [[ice platform]]{{SA}} or [[foundation]]{{SA}}, depending on what is appropriate for the current planet. | |||
Holding {{keybinding|Control|Shift}} will activate "Super Force Building" mode. This acts the same as force building, but will also mark '''all''' other buildings for deconstruction. If building over [[transport belt]]s, the game will attempt to place ghosts for [[underground belt]]s of the same tier, if possible. | |||
[[File:Blueprint-example-04.png]] | [[File:Blueprint-example-04.png]] | ||
After the blueprint gets placed somewhere, the buildings are placed as ghost buildings. [[Construction robot]]s will now start to pick up the needed items from the construction network/the player inventory (if using a personal roboport) and place them at the ghost buildings. The required items need to be in the network in an [[ | After the blueprint gets placed somewhere, the buildings are placed as ghost buildings. | ||
[[Construction robot]]s will now start to pick up the needed items from the construction network/the player inventory (if using a personal roboport) and place them at the ghost buildings. | |||
The required items need to be in the network in an [[active provider chest]], a [[passive provider chest]], a [[buffer chest]] or a [[storage chest]]. | |||
[[File:Blueprint-example-05.png]] | [[File:Blueprint-example-05.png]] | ||
Blueprints can be placed from map view as long as the area has been explored. | |||
[[File:Factorio_Blueprint_MapView.jpg|250px]] | |||
=== Viewing and clearing a blueprint === | === Viewing and clearing a blueprint === | ||
Right clicking on a blueprint allows you to | Right clicking on a blueprint allows you to view, edit and clear it. | ||
By clearing it, it will become blank so it can be set again. | |||
=== Parameterisation === | |||
Nearly everything in the game that can be configured can also be parameterised within a blueprint. Settings which would have had to be changed manually one at a time can be set automatically with a single selection during blueprint construction. This allows for more generic blueprints which can be specifically configured for a particular need. | |||
Some settings which can be parameterised include, but are not limited to: | |||
* Recipes in buildings | |||
* Output control signals for the [[circuit network]] | |||
* Icons, their values, and constants within [[combinators]] and their descriptions | |||
* [[Rich text]] tags within the names of [[train stop]]s, among other buildings | |||
The following example will demonstrate parameterisation with a constant combinator: | |||
[[File:Parameter begin.png|300px]]{{clear}} | |||
In the above image, we have an [[iron plate]] signal with a value of 5, a [[copper plate]] signal with a value of 10, and a virtual signal "A" with a value of 1. By clicking the purple parameterisation button in the top right of the blueprint setup screen, we get the parameterisation GUI: | |||
[[File:Parameter gui2.png]] | |||
There is a separate parameter for each unique signal and their values. Hovering the mouse over each value will tell you the origin of each signal. The above image shows that the iron plate signal has a value of 5 in a constant combinator. This is very useful if the blueprint contains multiple buildings with many different parameters. If there are two different signals with the same value, or multiple sources of the same signal, that value or signal is treated as a single parameter. | |||
There are several ways we can play with the values of the combinator. In order to be able to be modified, the "Parameter" checkbox next to a signal or value must be ticked. Further, these parameters can be reordered by clicking and dragging the bars on the far right. Reordering does play an important part in more advanced uses. | |||
[[File:Parameter formulas.png]] | |||
In the above image, the iron and copper icons have been replaced with special parameter icons. These signals can be chosen upon building the blueprint. Whatever signals are chosen will inherit the original signal values of 5 and 10, respectively. Each parameter can be given a name, which will show up when building the blueprint. This is optional, but recommended. | |||
Clicking "Ingredient of" will allow us to select a parameter icon of an above parameter icon. This is why the order of the parameters is important. In our example, if Parameter 0 is set to, say, [[steel plate]], Parameter 1 will automatically set itself to whatever the ingredient of that item is: in this case, [[iron plate]]. It is important to have enough available parameters for the number of ingredients. If we were to set Parameter 0 to instead [[electronic circuit]], Parameter 1 would do nothing, as there are two ingredients to that item. A parameter will always choose the default recipe of an item as listed in the Factoriopedia. Alternate recipes such as those added in [[Space Age]]{{SA}} will not be considered. | |||
A parameter that is a constant can set as a parameter, and given an optional variable. In the above image, the Iron Value of 5 has been set as a parameter, which will be set separately from the signal itself. | |||
Giving a constant an optional variable allows itself to be used in a formula for a later constant. In the above image, the Copper Value of 10 has been set as a parameter, and given the variable "x". The variable can be anything, but it's best to keep it as something simple. Further, our "A Value" value of 1 is selected as a parameter, and the formula box is checked. | |||
There are several formulas available. Hovering the mouse over the formula box will show a list of available formulas given the current blueprint. In this example, the "A Value" constant can be set based on the stack size or rocket capacity of whatever Parameter 0 or 1 comes out to be. We can also use our variable "x" from above. We can type in basic mathematical operators like +, -, *, and /. This example uses the formula "x*2", meaning the A Value constant will be set to double whatever variable "x" turns out to be. | |||
Once finished configuring it, we press the green button, which saves our settings. The blueprint can now be placed. With our example, doing so will bring up the following box. | |||
[[File:Parameter build.png]] | |||
We are given options to configure both the original iron plate signal, and the value of the copper plate signal. The other signals are determined by what we input in these two boxes. This example goes with a steel plate and a value of 8. Building this will give the following result. | |||
[[File:Parameter final result.png]]{{clear}} | |||
Our original iron plate signal is now steel plate, with its original value of 5. | |||
Our original copper plate signal is now iron plate with a value of 8, as that is the sole ingredient of steel plates | |||
Our "A" signal has stayed the same, but its value is now 16, which is double the variable "x", which we set to be 8 | |||
Normally, the purple parameter icons are only available in the parameterisation GUI. Alternatively, if the "show parameters in selection lists" option is enabled under game Setting > Interface > Interaction, parameters 0 through 9 become available as [[Circuit network#Virtual signals|virtual signals]] under the "Unsorted" tab to expedite the process of setting up a parameterised blueprint. | |||
== Importing/Exporting blueprints == | |||
It is possible to export blueprints as a text string and import said text string to create a new blueprint. This makes sharing blueprints between players very easy.<br> | |||
Clicking the '''Export to string''' button ( [[File:ExportToString.png|25px]] ) in the top right of the blueprint edit window will pop up a window containing the '''Blueprint string'''. This string can be copied to the operating system clipboard, from where it could be saved to a text file or uploaded to a website. | |||
To import a blueprint, the player can click the '''Import string''' icon on the [[shortcut bar]] ( [[File:ImportString.png|25px]] ). A dialogue box will appear into which the string can be pasted. This will result in a blueprint appearing on the hand with the same setup as the one that was exported. | |||
The text string itself is a base64 encoded, compressed JSON string which contains all the information of the blueprint. It is therefore possible to decode/decompress the text string, change attributes of the blueprint in the JSON text and finally re-encode/compress it back to the known text string format. This basically allows blueprint editing outside of the game itself. | |||
A complete explanation of the blueprint JSON can be found on the [[blueprint string format]] page. | |||
== Additional information == | == Additional information == | ||
* Once a blueprint is created it can be used unlimited times. | * Once a blueprint is created, it can be used an unlimited amount of times. | ||
* To place a blueprint that is blocked by existing buildings you can hold | * To place a blueprint that is blocked by existing buildings, you can hold {{key|Shift}} to place the objects that aren't blocked. | ||
* Buildings marked for destruction will not block placing a blueprint. The building cannot be placed | * The above trick will also mark [[rock]]s and [[tree]]s for deconstruction. | ||
* | * Buildings marked for [[Deconstruction planner|destruction]] will not block placing a blueprint. The blueprinted building cannot be placed if there are any buildings in the way. This can cause an item outside the construction zone to block construction of a 2×2 building on the edge of the zone. | ||
* | * The maximum of size a blueprint is 10k by 10k [[Map_structure#Tile|tiles]]. | ||
== Trivia == | |||
* In [[Space Age]]{{SA}}, it is possible to get a [[quality]] blueprint by recycling them with [[Quality module|quality modules]]. Quality blueprints function identically to their normal counterparts | |||
== History == | == History == | ||
{{history|2.0.7| | |||
* Blueprint parametrisation. Allows to make more generic bluprints, which are configured upon building. | |||
* Added super forced building mode. Ctrl + Shift + Build marks for deconstruction player's colliding entities and replaces ghosts and tiles.}} | |||
{{history|0.17.10| | |||
* "Make blueprint" function is now accessible via keyboard shortcut.}} | |||
{{history|0.17.0| | |||
* Trains can be blueprinted.}} | |||
{{history|0.15.24| | |||
* In multiplayer, admins are allowed to modify other players' blueprints in the library, including deleting them.}} | |||
{{history|0.15.3| | |||
* Blueprints can be destroyed by clicking the trash can icon in the GUI.}} | |||
{{history|0.15.0| | |||
* [[Blueprint library]] introduced: Allows for keeping player's blueprints between individual game saves and allows sharing blueprints in multiplayer games. Also serves as unlimited inventory space for blueprints. | |||
* The build rotation of each blueprint is remembered independently of the general item build rotation. | |||
* Alternative select with blueprints (shift + select) skips the blueprint setup GUI. | |||
* Added ability to export and import blueprints, blueprint books, and deconstruction planners as strings. | |||
* Blueprints, blueprint books and deconstruction planners are obtainable from the library GUI with no crafting cost.}} | |||
{{history|0.14.15| | {{history|0.14.15| | ||
| Line 70: | Line 170: | ||
{{history|0.13.13| | {{history|0.13.13| | ||
* Added [ | * Added [[Types/EntityPrototypeFlags|entity prototype flags]] not-blueprintable and not-deconstructable, so these can be controlled by mod makers.}} | ||
{{history|0.13.9| | {{history|0.13.9| | ||
| Line 86: | Line 186: | ||
* Modules are now supported by blueprints. | * Modules are now supported by blueprints. | ||
* Optimized drawing of connections between [[roboport]]s in blueprints. | * Optimized drawing of connections between [[roboport]]s in blueprints. | ||
* [[Virtual signals]] can be used in blueprint icons. | * [[Circuit network#Virtual_signals|Virtual signals]] can be used in blueprint icons. | ||
}} | }} | ||
| Line 127: | Line 227: | ||
== See also == | == See also == | ||
* [[Deconstruction planner]] | * [[Deconstruction planner]] | ||
* [[Upgrade planner]] | |||
* [[Blueprint book]] | * [[Blueprint book]] | ||
* [[Logistic network]] | * [[Logistic network]] | ||
| Line 132: | Line 233: | ||
* [[Personal roboport]] | * [[Personal roboport]] | ||
* [[Construction robot]] | * [[Construction robot]] | ||
* [[Blueprint string format]] | |||
{{ProductionNav}} | {{ProductionNav}} | ||
{{C|Tools}} | |||
Latest revision as of 15:08, 31 January 2025
Object description
Blueprints are items that contain building layouts. Blueprints are used to 'copy & paste' parts of a factory. Built areas can be selected for inclusion in a blueprint. When a blueprint is placed, a ghost of the layout appears on the ground. This can be used as a guide for manually placing factory pieces, or, more commonly, handed over to construction robots for automated completion.
Blueprints can be stored in a blueprint book or blueprint library to prevent them occupying inventory space or for organization or sharing purposes.
Achievements

|
Automated construction Construct 100 machines using robots. |

|
You are doing it right Construct more machines using robots than manually. |
Usage
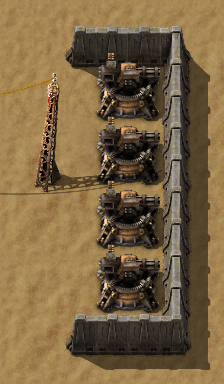
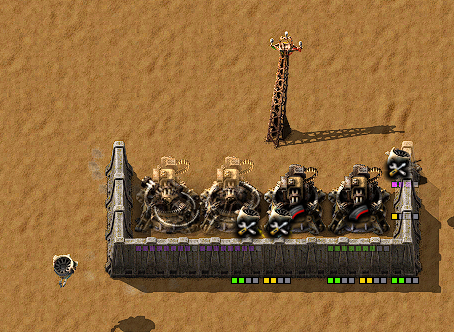
Blank blueprints can be crafted by clicking the ( ![]() ) button in the shortcut bar. The blank blueprint can now be used to 'copy' a set of buildings. For example, copying this small gun turret defense setup:
) button in the shortcut bar. The blank blueprint can now be used to 'copy' a set of buildings. For example, copying this small gun turret defense setup:
Create a blueprint
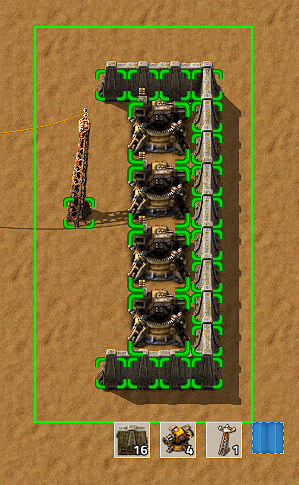
To create a blueprint select the blueprint item out of the toolbar or the inventory. With the blueprint icon shown next to the mouse cursor, click and hold the left mouse button and drag a box as large as needed (which can be cancelled by pressing Q).
All player-placed entities which will be included in the blueprint will be highlighted with a green square. Once everything you intend to 'copy' is inside the drag box, release the mouse button and the 'Blueprint icon setup' menu will open.
Blueprint icon setup
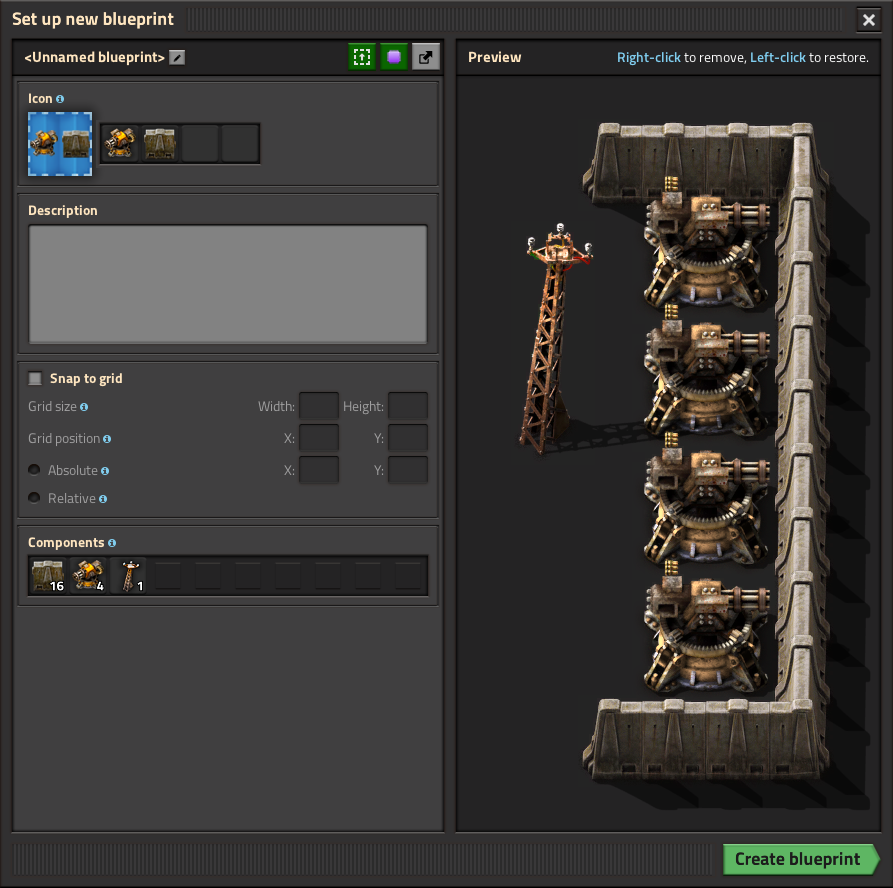
On the top left of the "Setup new blueprint" menu there are four icon slots. These are displayed on the blueprint's icon and can be used to quickly identify a blueprint. When creating a new blueprint, the game automatically selects some of the icons representing the entities in the blueprint.
These default icons can be changed by simply clicking on the icons to choose the desired ones.
On the left the 'Total' number of components included in the blueprint is shown.
The purple "Parameterise" button in the top right is used to configure the settings of any buildings or circuit network entity within the blueprint. More on this feature below.
The green "Create blueprint" button creates the blueprint. Additionally, blueprint creation can be cancelled by clicking the X in the top right corner. Canceling the blueprint does not consume the blueprint item. The created blueprint will replace the empty blueprint in the player's cursor.
Placing the blueprint
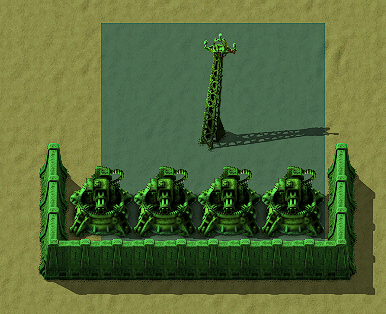
To use/place the created blueprint select it from the tool belt or inventory. The process of placing a blueprint is very similar to that of using copy and paste functionality.
When you select a blueprint, the whole building setup of the blueprint will be shown at your mouse cursor. In this case the Blueprint was renamed to "Example blueprint".
The blueprint can be rotated using the R key. H will flip it horizontally; V will flip it vertically. Note that blueprints which contain rail signals, chain signals, or train stops cannot be flipped, only rotated.
Placing a blueprint creates ghost entities. If these are within the green (or orange) 110×110 tiles area of a roboport, or within range of a personal roboport installed in modular armor or spidertron, construction robots may be able to build them using available materials.
Holding Shift will activate "Force Building" mode. This will mark all trees and rocks underneath the blueprint for deconstruction, as well as place ghosts for landfill if building over water. If playing in Space Age![]() , it will instead place ice platform
, it will instead place ice platform![]() or foundation
or foundation![]() , depending on what is appropriate for the current planet.
, depending on what is appropriate for the current planet.
Holding Control + Shift will activate "Super Force Building" mode. This acts the same as force building, but will also mark all other buildings for deconstruction. If building over transport belts, the game will attempt to place ghosts for underground belts of the same tier, if possible.
After the blueprint gets placed somewhere, the buildings are placed as ghost buildings. Construction robots will now start to pick up the needed items from the construction network/the player inventory (if using a personal roboport) and place them at the ghost buildings.
The required items need to be in the network in an active provider chest, a passive provider chest, a buffer chest or a storage chest.
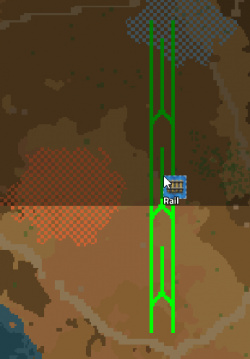
Blueprints can be placed from map view as long as the area has been explored.
Viewing and clearing a blueprint
Right clicking on a blueprint allows you to view, edit and clear it. By clearing it, it will become blank so it can be set again.
Parameterisation
Nearly everything in the game that can be configured can also be parameterised within a blueprint. Settings which would have had to be changed manually one at a time can be set automatically with a single selection during blueprint construction. This allows for more generic blueprints which can be specifically configured for a particular need. Some settings which can be parameterised include, but are not limited to:
- Recipes in buildings
- Output control signals for the circuit network
- Icons, their values, and constants within combinators and their descriptions
- Rich text tags within the names of train stops, among other buildings
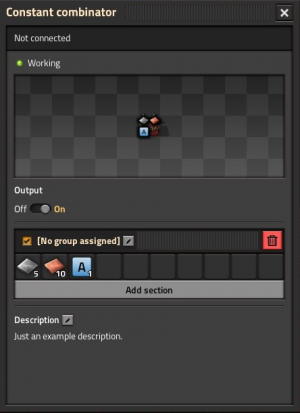
The following example will demonstrate parameterisation with a constant combinator:
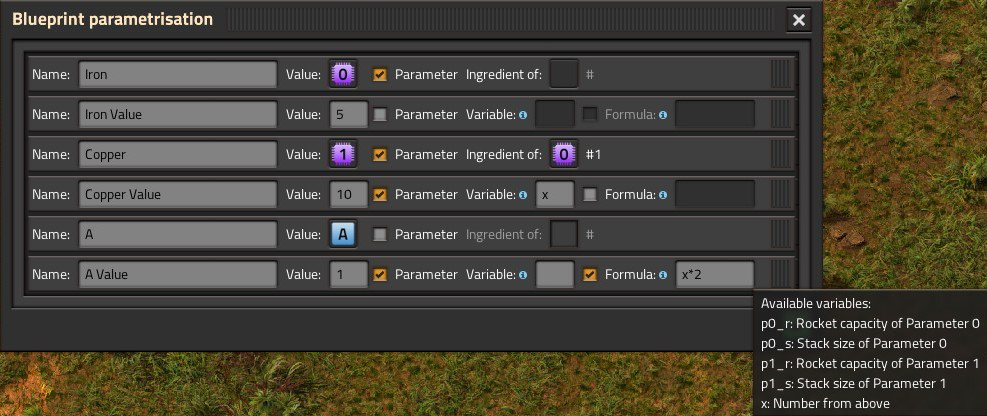
In the above image, we have an iron plate signal with a value of 5, a copper plate signal with a value of 10, and a virtual signal "A" with a value of 1. By clicking the purple parameterisation button in the top right of the blueprint setup screen, we get the parameterisation GUI:
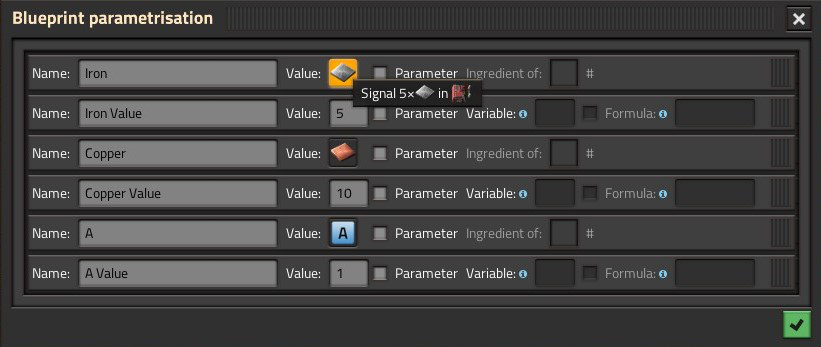
There is a separate parameter for each unique signal and their values. Hovering the mouse over each value will tell you the origin of each signal. The above image shows that the iron plate signal has a value of 5 in a constant combinator. This is very useful if the blueprint contains multiple buildings with many different parameters. If there are two different signals with the same value, or multiple sources of the same signal, that value or signal is treated as a single parameter.
There are several ways we can play with the values of the combinator. In order to be able to be modified, the "Parameter" checkbox next to a signal or value must be ticked. Further, these parameters can be reordered by clicking and dragging the bars on the far right. Reordering does play an important part in more advanced uses.
In the above image, the iron and copper icons have been replaced with special parameter icons. These signals can be chosen upon building the blueprint. Whatever signals are chosen will inherit the original signal values of 5 and 10, respectively. Each parameter can be given a name, which will show up when building the blueprint. This is optional, but recommended.
Clicking "Ingredient of" will allow us to select a parameter icon of an above parameter icon. This is why the order of the parameters is important. In our example, if Parameter 0 is set to, say, steel plate, Parameter 1 will automatically set itself to whatever the ingredient of that item is: in this case, iron plate. It is important to have enough available parameters for the number of ingredients. If we were to set Parameter 0 to instead electronic circuit, Parameter 1 would do nothing, as there are two ingredients to that item. A parameter will always choose the default recipe of an item as listed in the Factoriopedia. Alternate recipes such as those added in Space Age![]() will not be considered.
will not be considered.
A parameter that is a constant can set as a parameter, and given an optional variable. In the above image, the Iron Value of 5 has been set as a parameter, which will be set separately from the signal itself.
Giving a constant an optional variable allows itself to be used in a formula for a later constant. In the above image, the Copper Value of 10 has been set as a parameter, and given the variable "x". The variable can be anything, but it's best to keep it as something simple. Further, our "A Value" value of 1 is selected as a parameter, and the formula box is checked.
There are several formulas available. Hovering the mouse over the formula box will show a list of available formulas given the current blueprint. In this example, the "A Value" constant can be set based on the stack size or rocket capacity of whatever Parameter 0 or 1 comes out to be. We can also use our variable "x" from above. We can type in basic mathematical operators like +, -, *, and /. This example uses the formula "x*2", meaning the A Value constant will be set to double whatever variable "x" turns out to be.
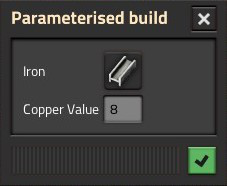
Once finished configuring it, we press the green button, which saves our settings. The blueprint can now be placed. With our example, doing so will bring up the following box.
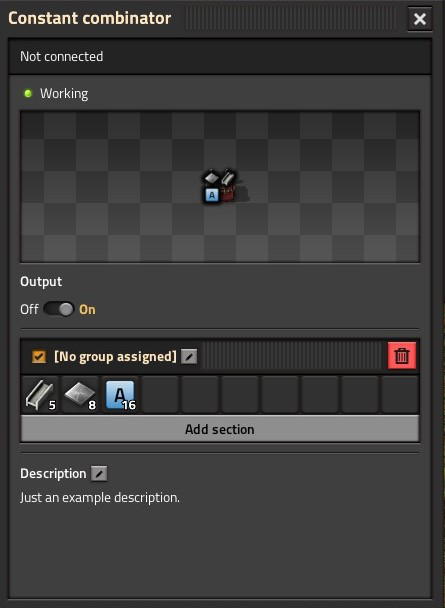
We are given options to configure both the original iron plate signal, and the value of the copper plate signal. The other signals are determined by what we input in these two boxes. This example goes with a steel plate and a value of 8. Building this will give the following result.
Our original iron plate signal is now steel plate, with its original value of 5.
Our original copper plate signal is now iron plate with a value of 8, as that is the sole ingredient of steel plates
Our "A" signal has stayed the same, but its value is now 16, which is double the variable "x", which we set to be 8
Normally, the purple parameter icons are only available in the parameterisation GUI. Alternatively, if the "show parameters in selection lists" option is enabled under game Setting > Interface > Interaction, parameters 0 through 9 become available as virtual signals under the "Unsorted" tab to expedite the process of setting up a parameterised blueprint.
Importing/Exporting blueprints
It is possible to export blueprints as a text string and import said text string to create a new blueprint. This makes sharing blueprints between players very easy.
Clicking the Export to string button ( ![]() ) in the top right of the blueprint edit window will pop up a window containing the Blueprint string. This string can be copied to the operating system clipboard, from where it could be saved to a text file or uploaded to a website.
) in the top right of the blueprint edit window will pop up a window containing the Blueprint string. This string can be copied to the operating system clipboard, from where it could be saved to a text file or uploaded to a website.
To import a blueprint, the player can click the Import string icon on the shortcut bar ( ![]() ). A dialogue box will appear into which the string can be pasted. This will result in a blueprint appearing on the hand with the same setup as the one that was exported.
). A dialogue box will appear into which the string can be pasted. This will result in a blueprint appearing on the hand with the same setup as the one that was exported.
The text string itself is a base64 encoded, compressed JSON string which contains all the information of the blueprint. It is therefore possible to decode/decompress the text string, change attributes of the blueprint in the JSON text and finally re-encode/compress it back to the known text string format. This basically allows blueprint editing outside of the game itself.
A complete explanation of the blueprint JSON can be found on the blueprint string format page.
Additional information
- Once a blueprint is created, it can be used an unlimited amount of times.
- To place a blueprint that is blocked by existing buildings, you can hold Shift to place the objects that aren't blocked.
- The above trick will also mark rocks and trees for deconstruction.
- Buildings marked for destruction will not block placing a blueprint. The blueprinted building cannot be placed if there are any buildings in the way. This can cause an item outside the construction zone to block construction of a 2×2 building on the edge of the zone.
- The maximum of size a blueprint is 10k by 10k tiles.
Trivia
- In Space Age
 , it is possible to get a quality blueprint by recycling them with quality modules. Quality blueprints function identically to their normal counterparts
History
- 2.0.7:
- Blueprint parametrisation. Allows to make more generic bluprints, which are configured upon building.
- Added super forced building mode. Ctrl + Shift + Build marks for deconstruction player's colliding entities and replaces ghosts and tiles.
- 0.17.10:
- "Make blueprint" function is now accessible via keyboard shortcut.
- 0.17.0:
- Trains can be blueprinted.
- 0.15.24:
- In multiplayer, admins are allowed to modify other players' blueprints in the library, including deleting them.
- 0.15.3:
- Blueprints can be destroyed by clicking the trash can icon in the GUI.
- 0.15.0:
- Blueprint library introduced: Allows for keeping player's blueprints between individual game saves and allows sharing blueprints in multiplayer games. Also serves as unlimited inventory space for blueprints.
- The build rotation of each blueprint is remembered independently of the general item build rotation.
- Alternative select with blueprints (shift + select) skips the blueprint setup GUI.
- Added ability to export and import blueprints, blueprint books, and deconstruction planners as strings.
- Blueprints, blueprint books and deconstruction planners are obtainable from the library GUI with no crafting cost.
- 0.14.15:
- Changed the clear blueprint icon to the trashcan icon and moved it to the left of the cancel button, to make it less confusing for users.
- 0.13.13:
- Added entity prototype flags not-blueprintable and not-deconstructable, so these can be controlled by mod makers.
- 0.13.9:
- Added tips and tricks for pasting wagon slots and cycling in blueprint book.
- 0.13.7:
- Rocks can be mined while holding blueprints.
- 0.13.5:
- Blueprints with labels will now show the label when holding them in the active hand.
- 0.13.0:
- Blueprints can now be edited.
- Added the blueprint book item, can hold multiple blueprints in one item.
- Modules are now supported by blueprints.
- Optimized drawing of connections between roboports in blueprints.
- Virtual signals can be used in blueprint icons.
- 0.12.2:
- Enabled swapping held blueprints with other blueprints directly.
- Force building blueprints will mark colliding trees for deconstruction.
- 0.12.0:
- Enabled mining trees/ghosts while holding blueprints to be built.
- Building blueprints over existing ghosts restores the ghost's life time.
- Proper blueprint centering.
- 0.11.18:
- Blueprints can be built over things marked for deconstruction.
- Blueprints can be force built by shift clicking.
- 0.10.2:
- The rotation of turrets in blueprints no longer matters when testing for entity collision.
- 0.10.0:
- Blueprints can copy circuit network connections.
- Miners in blueprints are now ignored if they are non-functional.
- An inserter's logistic conditions are copied when blueprinting.
- 0.9.4:
- Limit the size of the blueprint preview, so it is usable for very large blueprints.
- 0.9.2:
- The train stop and lab built from blueprints are now given dedicated names.
- 0.9.0:
- Introduced
