![]()
![]()
![]()
![]()
![]()
![]()
![]()
Beacon
| Beacon |
![]()
- Base game
- Space Age mod
|
Recipe |
|||||||||||||
|
|
|||||||||||||
|
Total raw |
|||||||||||||
|
|
|||||||||||||
|
Map color |
|||||||||||||
|
Health |
|
||||||||||||
|
Stack size |
20 |
||||||||||||
|
|
20 (1 stack) |
||||||||||||
|
Efficiency |
|
||||||||||||
|
Dimensions |
3×3 |
||||||||||||
|
Energy consumption |
|
||||||||||||
|
Mining time |
0.2 |
||||||||||||
|
Supply area |
9x9 tiles |
||||||||||||
|
Module slots |
2 slots |
||||||||||||
|
Prototype type |
|||||||||||||
|
Internal name |
beacon |
||||||||||||
|
Required technologies |
|||||||||||||
|
|
|||||||||||||
|
Produced by |
|||||||||||||
|
|
|||||||||||||
|
Overall effect stacks with multiple beacons covering the same machine. |
|||||||||||||
A beacon is a device that transmits module effects to nearby non-burner machines, in a 9×9 square, while also boosting the effects of said modules. A beacon allows transmitting the effect of a module to multiple machines, and multiple beacons can affect the same machine, albeit with diminishing returns. Additionally, beacons can provide boosts beyond the normal limits of internal module slots.
The beacon emanates an electrical charge at a steady interval, the color changes depending on which modules are placed into the beacon, or if it contains none at all.
Usage
Beacons are best in these scenarios:
- There are many compatible machines in a dense area
This allows the beacon's effect to reach multiple machines, allowing the player to save materials from crafting modules.
- There is one machine that must have an extreme speed of operation
Mining drills present an example of this usefulness. When an ore patch is small but rich, more speed per drill is necessary to meet demand, since adding more drills isn't possible. So, multiple speed module beacons around a mining drill (with modules in the drill itself) can be used to increase the speed of the individual drill several times, to make up for the low quantity of drills.
Beacons should not be used in these scenarios:
- The machine(s) being boosted operate infrequently
This leads to power waste as beacons will always consume power, even when the machines they're boosting are halted. This however can be circumvented with some planning, and using a power switch.
- Attempting to boost non-module-compatible machines
Only machines that have module slots will be affected by a beacon.
Limitations
- Only buildings with module slots can benefit from beacon effects (i.e. laser turret doesn't benefit). The only exceptions to this rule are beacons themselves which don't benefit from the modules inserted in themselves (or other beacons), so their energy cost can't be reduced.
- Currently, only speed and efficiency modules can be used in beacons, and productivity and quality
 modules cannot.
- Multiple beacons overlapping the same machine will have diminishing returns, so it's more efficient to surround buildings around beacons than surround beacons around buildings.
Transmission strength
The effect of modules placed in beacons is not equal to those placed in the machines themselves. Rather, it is multiplied by a factor called "transmission strength". This factor is applied to all stats affected by the module, both good and bad.
The transmission strength itself depends on two factors. One is the distribution efficiency stat of the beacon; For normal beacons, this is always 1.5, but quality![]() can increase it up to 2.5 for legendary beacons. The second factor is the square root of the number of beacons affecting the affected machine. For a machine affected by
can increase it up to 2.5 for legendary beacons. The second factor is the square root of the number of beacons affecting the affected machine. For a machine affected by n beacons, each beacon's transmission strength for that machine is calculated by the formula (Distribution efficiency) ÷ sqrt(n). Simplifying this formula for n normal quality beacons affecting the same machine results in a combined transmission strength of 1.5 × sqrt(n).
In practical terms, this means that there are diminishing returns on increasing the number of beacons affecting the same machine, as the effect per beacon decreases when more are added. This table shows the net effect of any given number of normal-quality beacons on a production building, and the marginal increase in effectiveness from adding the last beacon to that building.
| # Beacons | Total Effect | Marginal Effect |
|---|---|---|
| 1 | 150.00% | 150.00% |
| 2 | 212.13% | 62.13% |
| 3 | 259.81% | 47.68% |
| 4 | 300.00% | 40.19% |
| 5 | 335.41% | 35.41% |
| 6 | 367.42% | 32.01% |
| 7 | 396.86% | 29.44% |
| 8 | 424.26% | 27.40% |
| 9 | 450.00% | 25.74% |
| 10 | 474.34% | 24.34% |
| 11 | 497.49% | 23.15% |
| 12 | 519.62% | 22.12% |
| 13 | 540.83% | 21.22% |
| 14 | 561.25% | 20.42% |
| 15 | 580.95% | 19.70% |
| 16 | 600.00% | 19.05% |
| 17 | 618.47% | 18.47% |
| 18 | 636.40% | 17.93% |
| 19 | 653.83% | 17.44% |
| 20 | 670.82% | 16.99% |
Maximum number per building
The maximum number of beacons that can be built in range of a building depend on that building's footprint:
- Buildings from 2×2 to 4×4 size: 12 beacons, with an effect of 3.46 times that of a single beacon.
- Buildings from 5×5 to 7x7 size: 16 beacons, with an effect of 4 times that of a single beacon.
- Buildings from 8x8 to 10x10 size: 20 beacons, with an effect of 4.47 times that of a single beacon.
It should be noted that, because the space between a beacon and a machine can not be greater than two tiles without putting the machine outside of the beacon's range, belt routing can become a challenge. In some situations, use of the logistic network may be required in order to supply the machines.
The maximum number of beacons that can be built in range of a row of buildings:
- Row of 3×3 buidings: 8 beacons, with an effect of 2.83 times that of a single beacon.
- Row of 5×5 buidings: 10 beacons, with an effect of 3.16 times that of a single beacon.
Note that when buildings and beacons are arranged in parallel rows like this, the offset between buildings and beacons along the direction of the rows is important. For example, imagine placing a row of assembling machine 3s between two rows of beacons. If the sides of the beacons and the assembling machines line up, every assembling machine is affected by six beacons in total. Howevever, if either the beacons or the assembling machines are shifted by one tile relative to the other, then each assembling machine is affected by eight beacons in total.
-
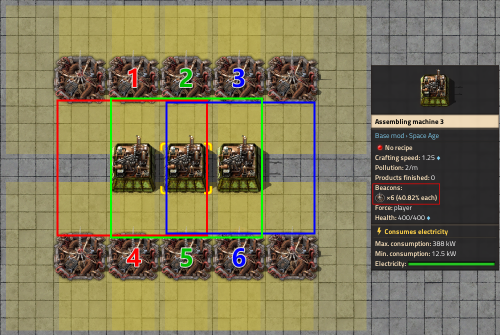 When the assembling machines are aligned with the beacons, each machine is affected by 6 beacons in total. (Click to enlarge)
 -
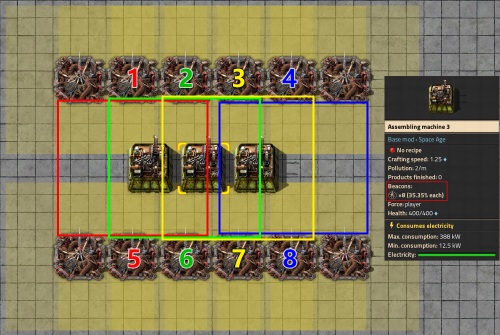 When the assembling machines are shifted by 1 tile relative to the beacons, each machine is affected by 8 beacons in total. (Click to enlarge)
In general, depending on the width of the machines modulo 3:
- If the width of the machines is divisible by three, then the arrangement is optimal when the sides of a machine do not align with the sides of a beacon on the axis perpendicular to the direction of the rows.
- If the width of the machines modulo 3 is 1 (such as a width of 4), then any offset leads to an optimal layout.
- If the width of the machines modulo 3 is 2 (such as a width of 5), then the arrangement is optimal when the center of a machine aligns with the center of a beacon on the axis perpendicular to the direction of the rows. Note that this requires a one-tile gap between the machines.
Beacon arrays
Beacons can boost the overall capabilities of a factory quite significantly. However, they consume a considerable amount of power (480 kW apiece), take up nontrivial space, complicate logistics, and also are relatively expensive to craft. Therefore, when building an entire production line with a high beacon boost, it is significantly more economical to build a row of production buildings surrounded by row(s) of beacons, rather than single buildings surrounded by the maximum number of beacons theoretically possible. This also simplifies logistics and makes the design more tiling-friendly.
The maximum possible benefits are reduced somewhat in row-array configuration (for 3×3 buildings, 8 beacons per building are possible instead of 12; for 5×5 buildings, 10 instead of 16), but the number of beacons required to achieve this boost level is considerably lower. For example, for a single row of 3×3 buildings surrounded by a double row of beacons so that each production building is in range of 8 beacons, the total number of beacons required is 2n + 6, where n is the number of production buildings.
The average number of beacons per building is then 2 + (6 ÷ n), which tends toward 2 (i.e., a 75% reduction in the number of beacons needed compared to isolated buildings with 8 distinct beacons each) when n goes to infinity. For e.g. n = 10 the formula evaluates to 2.6, which is still a reduction of 67.5% in beacons needed.
Multi-row arrays
For large numbers of buildings to be boosted, efficiency can be further improved by separating production buildings into multiple rows. In this case, the beacons in all but the edge rows of the array can be shared by the two rows of production buildings on either side. (Note that it does not matter if these are producing different recipes and / or are different buildings altogether.) The total number of beacons required, assuming 3×3 sized production buildings and rows of equal length, is B(r,c) = (r + 1)(c + 3) = rc + 3r + c + 3, where r is the number of rows of production buildings and c is the number of production buildings in a single row.
The number of beacons per boosted building is then (3 ÷ rc) + (1 ÷ r) + (3 ÷ c) + 1, which tends to 1 as both r and c go to infinity. For finite arrays, the optimum number of rows is given by r = -0.5 + sqrt[(n ÷ 3) + 0.25], where n is the total number of buildings to be boosted.
The formula above does not generally return integer results. If the r thus found is non-integer, iterate around it, i.e., calculate the number of beacons needed with floor(r) (the next lower integer) and ceiling(r) (the next higher integer) rows and compare the results. For each such integer r, calculate c as floor(n ÷ r), then calculate the number of beacons as B(r,c) + mod(n,r) + 1, where B(r,c) is given above and mod(n,r) is n modulo r, i.e., the remainder of (n ÷ r), equal to n - (r × c).
There will in either case be mod(n,r) buildings "left over"; these should be appended one per row to the ends of a contiguous block of neighboring rows for the total beacon count calculation above to be valid. Other configurations for the leftovers (e.g. all appended to the end of a single row, one each at the end of every second row, etc.) require a higher number of beacons to cover.
Optimal arrays
For 3×3 structures, arrays satisfying c = 3r are optimal, in the sense that they minimize the number of beacons required to cover the total number of structures (rc), therefore allowing the most use out of an individual beacon. Since structures may only be built in integer amounts, there are, below a reasonable cutoff on total array size, only a finite number of integer structure counts rc with which an optimal array such that c = 3r and c and r are integer may be built. The first few counts, along with associated array sizes and beacons-to-structures ratios, are summarized in the table below.
| Structures | Rows | Columns | Beacons | Beacons per structure | Dimensions (tiles)* |
|---|---|---|---|---|---|
| 3 | 1 | 3 | 12 | 4.00 | 18×11 |
| 12 | 2 | 6 | 27 | 2.25 | 27×19 |
| 27 | 3 | 9 | 48 | 1.78 | 36×27 |
| 48 | 4 | 12 | 75 | 1.56 | 45×35 |
| 75 | 5 | 15 | 108 | 1.44 | 54×43 |
| 108 | 6 | 18 | 147 | 1.36 | 63×51 |
| 147 | 7 | 21 | 192 | 1.31 | 72×59 |
| ... | ... | ... | ... | ... | ... |
| 3r^2 | r | 3r | (r + 1) (3r + 3) | 1 + 2/r + 1/r^2 | (9r + 9) × (8r + 3) |
Notes to table:
- Array dimension in tiles (last table column) assumes 2 tiles' space (e.g. inserter + chest) is left either above or below each row of structures, while no extra space is left anywhere else.
- The 5-row array (75 structures) is the largest that can be covered by a logistic network generated from roboports located outside its footprint. For larger arrays, at least a minimal number of roboports would need to be strategically placed in the interior to provide coverage, thereby worsening the beacons-to-structures proportion somewhat.
History
- 2.0.7:
- Increased beacon stack size from 10 to 20.
- Diminishing return of beacons effect. (FFF-409 - Diminishing beacons)
- 0.13.0:
- Renamed from Basic beacon to Beacon.
- 0.12.17:
- Update icon
- 0.12.0:
- Inserters can now extract from Beacons.
- 0.10.1:
- New beacon graphics.
- 0.9.0:
- Area of effect can now be seen on hover.
- 0.7.5:
- Deactivated beacons will not give bonuses.
- 0.7.3:
- Restricted use of productivity modules in beacons.
- 0.6.0:
- Introduced
See also
|
Production items |
|
|---|---|
|
Tools |
|
|
Furnaces |
|
|
Agriculture |
|
|
Environmental protection |
|