Tutorial:Quick start guide/es: Difference between revisions
No edit summary |
No edit summary |
||
| Line 91: | Line 91: | ||
:[[File:SimpleOre.PNG|center|thumb|150px]] | :[[File:SimpleOre.PNG|center|thumb|150px]] | ||
'''Recuerda que puedes presionar "ALT" para activar la vista detallada'' Esto facilita ver lo que está sucediendo. | '''Recuerda que puedes presionar "ALT" para activar la vista detallada'' .Esto facilita ver lo que está sucediendo. | ||
=== | === Alimentando con combustible === | ||
Ahora que ha colocado el taladro y el horno, necesitan '' '[[Fuel|Combustible]]' ''. | |||
Puedes alimentarlos con [[Wood|madera]] o [[Coal|carbon]]. Para recolectarlos, debes cortar árboles o extraer carbón; Esto se puede lograr manteniendo presionado el botón derecho sobre árboles o depósitos de carbón, respectivamente. | |||
Una vez que tenga algo de combustible en el inventario, haz clic izquierdo en el horno o taladro para abrir la interfaz. | |||
:[[File:Interface.PNG|center|thumb|upright=4]] | :[[File:Interface.PNG|center|thumb|upright=4]] | ||
Para colocar el combustible en la máquina simplemente haz clic izquierdo para recogerlo y clic izquierdo nuevamente para colocarlo en la ranura de combustible. | |||
Si deseas dividir una '' '[[Stack |pila]]' '' por la mitad, haz clic derecho en la pila. | |||
¡Ahora ambas máquinas deberían estar funcionando y automáticamente haciéndote algunas planchas de hierro! | |||
''' | '' 'También puedes hacer clic derecho con la tecla CTRL para insertar directamente la mitad de la pila' '' | ||
Puedes usar una configuración idéntica para el mineral de cobre y obtener placas de cobre. | |||
== Production upgrade! == | == Production upgrade! == | ||
Revision as of 16:52, 15 June 2020
Primeros pasos
Si aún estás perdido después de jugar a través de los niveles de tutoriales, esta guía está aquí para ayudarte.
Comenzando tu juego
Para comenzar desde el menú principal, debes seleccionar "Jugar", luego "Nuevo juego". Esto te llevará a un menú que permite la Personalización de tu Mundo. Si es tu primera vez, no tendrás que jugar con estas opciones. Si aún no has jugado el tutorial y los niveles de campaña, deberías jugarlos primero. En el menú principal, seleccione "Jugar", luego "Iniciar campaña", luego "Primeros pasos". La campaña "Primeros pasos" es un tutorial básico, la "Nueva Esperanza" enseña aún más los conceptos básicos del juego.
Generador de Mundo
Puede cambiar estas opciones para que el mapa se genere de diferentes maneras. Los cambios en la generacion del mundo pueden afectar en gran medida la dificultad del juego.
La primera pestaña en la pantalla de generador de mundo le permite al jugador elegir un preajuste para el mismo. Un ajuste preestablecido es solo una forma rápida de cambiar la configuración en las otras dos pestañas. Para los nuevos jugadores, se sugiere la configuración predeterminada o la configuración de recursos enriquecidos.
Si el modo pacífico está habilitado, los enemigos no atacarán al jugador a menos que el jugador ataque primero.
La pestaña Configuración de recursos permite cambiar la frecuencia y la fuerza de generación de recursos y enemigos.
Recursos y las bases enemigas están controladas por 3 valores: frecuencia, tamaño y riqueza.
- La frecuencia determina con qué frecuencia verás vetas de mineral o bases enemigas dentro del mundo del juego.
- El tamaño determina qué tan grandes son estas vetas o bases
- La riqueza determina cuántos recursos producirán las vetas de mineral antes de que se acaben y la densidad de las bases enemigas
Si deseas algo mas fácil para comenzar, considera el aumentar la frecuencia, el tamaño y la riqueza de los recursos mientras disminuye la misma para las bases enemigas. Ten en cuenta que se puede recomendar aumentar el tamaño y la frecuencia del petróleo crudo para los jugadores de nivel principiante, ya que el petróleo puede ser muy difícil de encontrar dependiendo de la semilla de la generación del mundo en comparación con la de otros recursos, combinado con el hecho de que el petróleo es una necesidad para progresar, también el hecho de que bombear petróleo disminuirá gradualmente su rendimiento, lo que requiere la necesidad de viajar aún más para encontrar aún más petróleo. También ten en cuenta que el juego se puede completar con enemigos completamente deshabilitados (establecer el tamaño en ninguno), sin embargo, tratar con enemigos suele ser una parte importante del juego.
Se puede encontrar más información sobre la generación de mundo en el articulo de Generación de Mundo
Controles básicos y UI
Vaya a Enlaces de teclado para obtener más información sobre las combinaciones de teclas y cómo configurarlas.
Movimiento
Mueve tu Personaje con las teclas de movimiento ("W", "A", "S", "D" por defecto).
Mapa
Presione la tecla del mapa (por defecto "M") para abrir y cerrar el mapa. Pasa el mouse sobre los recursos en el mapa para ver cuáles son.
Recoleccion de Recursos
Algunos recursos se pueden recopilar manualmente manteniendo presionado el botón derecho del mouse sobre ellos. Puede usar esto para recolectar madera, piedra, carbón, mineral de cobre, mineral de hierro y pescado crudo
Inventario y Elaboración
Presiona la tecla de inventario (predeterminado "E") para abrir y cerrar el inventario. La IU de inventario se divide en el inventario del jugador a la izquierda, y las recetas de elaboración a la derecha. Los cuatro botones grandes en la parte superior de las recetas de elaboración son las categorías de la elaboración. Si tiene los ingredientes requeridos por una receta, puede hacer clic en ella varias veces para elaborar tantos como desee. Vea el progreso de la elaboración en la esquina inferior izquierda de la pantalla.
Colocar y quitar estructuras
Algunos artículos son estructuras que puedes colocar en el suelo. Cuando tu inventario está abierto, puedes seleccionar una estructura de tu inventario haciendo clic en él. Debería ver que el cursor ha sido reemplazado por el icono de la estructura. Ahora puede presionar la misma tecla de inventario nuevamente (predeterminada "E") para cerrar su inventario. El icono de su mouse seguirá teniendo la estructura. Mueva el mouse para ver dónde puede colocar la estructura. Si el elemento aparece en rojo, no puedes colocarlo allí. Si es verde, se puede colocar. Puede cambiar la dirección de rotación de la estructura presionando la tecla de rotación (predeterminada "R") antes de colocarla, o después de colocarla al pasar el mouse sobre ella y presionar la tecla de rotación (predeterminada "R"). Haga clic izquierdo para colocar la estructura.
Después de colocar una estructura, puedes levantarla y volver a colocarla en su inventario manteniendo presionado el botón derecho del mouse sobre ella.
Interactuando con estructuras
Si una estructura es interactiva, clic izquierdo para abrir su IU. Lo más común es que uses esto para elegir qué receta debe usar una máquina, o para colocar objetos de tu inventario en un contenedor.
Cuando abras un contenedor, también podrás ver tu inventario. Haz clic en un objeto en tu inventario, luego haz clic en una ranura vacía en el contenedor, para transferir. También puede transferir simplemente manteniendo presionado el botón "transferencia de pila" (predeterminado "SHIFT") y haciendo clic en él. Si desea recoger solo la mitad de una ' pila' de objetos, haz clic derecho en la pila en tu inventario. También puede usar CTRL-clic derecho para transferir directamente la mitad de la pila. Si desea transferir TODOS los artículos de un tipo, mantenga presionada la tecla "transferencia de inventario" (valor predeterminado "CTRL") y haga clic en el objeto. Si deseas transferir TODOS los artículos de CUALQUIER tipo, mantenga presionada la tecla "transferencia de inventario" (valor predeterminado "CTRL") y haga clic en un espacio vacío.
Presiona la tecla "modo alternativo" (predeterminado "ALT") para alternar "vista detallada", que muestra información adicional sobre las estructuras.
Barra rápida y barra de acceso directo
En la parte inferior central de la pantalla, verá la Barra rápida a la izquierda y la Barra de acceso directo a la derecha. Clic izquierdo en la barra rápida para colocar un elemento en ella. Haga clic con el botón central (o Comando, clic con el botón derecho) en el elemento de la Barra rápida para eliminarlo.
Combate
Este juego contiene enemigos, aunque probablemente no te atacarán hasta que estés más preparado. Si necesitas defenderse, presiona la barra espaciadora para disparar al enemigo más cercano al cursor del mouse. Vigila la munición, que se puede ver en la esquina inferior derecha de la pantalla.
Los primeros momentos
Recursos
Asegúrese de tener los cuatro recursos sólidos cerca de tu ubicación; Carbón, Mineral de cobre, Mineral de hierro y Piedra. Estos deben encontrarse dentro de una proximidad razonable entre sí; cuanto más separados estén, más difícil será redirigirlos para su uso combinado.
También es aconsejable tener una fuente de Agua en tu área de arranque, ya que es necesario para los Motores de vapor.
Si en donde apareciste no tienes uno de estos recursos, o son muy escasos o están muy separados, simplemente presiona la tecla Escape y dale a "Reiniciar". Esto volverá a generar el mundo del juego y aparecerás en una nueva ubicación inicial. Es posible que debas hacerlo varias veces hasta que se cree un mundo aceptable.
Más tarde también necesitaremos petróleo crudo. Sin embargo, está bien si en tu area no cuentas con petroleo cerca, ya que no la necesitarás hasta más adelante en el juego. Lo mismo ocurre con Mineral de uranio.
Casi todo en Factorio está hecho de estos siete recursos básicos, y los necesitarás todos excepto el uranio si tienes la intención de terminar el juego.
Colocación de minas y hornos
reunir y crear manualmente es un dolor, y el propósito de Factorio es crear máquinas que hagan el trabajo por ti.
Comienzas tu viaje con un Horno de piedra y un Taladro minero quemador. Esto significa que solo tiene que cosechar un número limitado de recursos a mano. En primer lugar, debe colocar su taladro en el borde de un depósito de hierro, mirando hacia el horno. El depósito de hierro parece a rocas grises azuladas en el suelo.
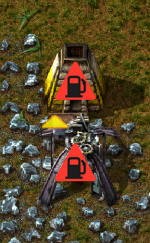
La pequeña flecha amarilla muestra de dónde saldrá el mineral de hierro extraído. Primero que nada, vas a querer que el horno esté delante de esa flecha, para que el taladro inserte automáticamente el mineral en el horno. Debería verse más o menos así:
'Recuerda que puedes presionar "ALT" para activar la vista detallada .Esto facilita ver lo que está sucediendo.
Alimentando con combustible
Ahora que ha colocado el taladro y el horno, necesitan 'Combustible' .
Puedes alimentarlos con madera o carbon. Para recolectarlos, debes cortar árboles o extraer carbón; Esto se puede lograr manteniendo presionado el botón derecho sobre árboles o depósitos de carbón, respectivamente.
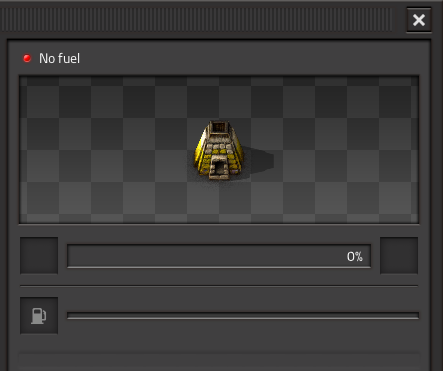
Una vez que tenga algo de combustible en el inventario, haz clic izquierdo en el horno o taladro para abrir la interfaz.
Para colocar el combustible en la máquina simplemente haz clic izquierdo para recogerlo y clic izquierdo nuevamente para colocarlo en la ranura de combustible.
Si deseas dividir una 'pila' por la mitad, haz clic derecho en la pila. ¡Ahora ambas máquinas deberían estar funcionando y automáticamente haciéndote algunas planchas de hierro!
'También puedes hacer clic derecho con la tecla CTRL para insertar directamente la mitad de la pila'
Puedes usar una configuración idéntica para el mineral de cobre y obtener placas de cobre.
Production upgrade!
What's better than iron plates? More iron plates!
You'll need to craft some extra drills. If you hover over drill in the crafting menu, you'll see two lists of materials. The first list shows the components needed to make the drill; the second one at the very bottom of the tooltip window shows the raw resources needed to craft it. Unlike other games, you do not need to create the pre-requisite items before you select the item you want to make. All required items are crafted for you. You can see this process happening on the bottom left of the screen, where your Crafting Queue is. You can also queue up more crafting orders, as long as you have the necessary materials on you, and they'll get carried out one after the other.
Now that you can afford some extra drill and furnaces, you should automate the acquisition of both coal and stone. These are easy to set up and work essentially the same as the iron setup. For Coal, you can have two drills facing each other: they'll run on the coal they get fed by their partner and you can collect the surplus.
Don't forget that you can collect resources from machines without opening their inventories, with CTRL-LMB. You might also want to activate the detailed view, by pressing the ALT key once. You can deactivate it by pressing ALT again.
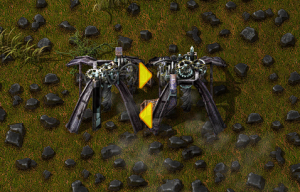
And for stone you can have the drill output directly into a chest.
Once this is all setup up, you will probably want to make it go faster. Set up more drills with furnaces for the iron, setup some for copper and maybe lay more drills on the coal to cover for the extra coal production. In the early game, the most used resource is iron, so you'll probably need twice as many miners on iron than copper, if not more. But expect copper to become more and more important the more you mess with electricity and electronics!
More automation
Great! So now you have four or so furnaces making iron, a couple making copper, some stone production and a good amount of coal production. But you know what really sucks? Having to run the coal around to all your other machines, right? Well let's automate that too! Conveyor belts and inserters are the way of the future! The output slots on the drill can also output onto conveyor belts to be transported to your other machines.
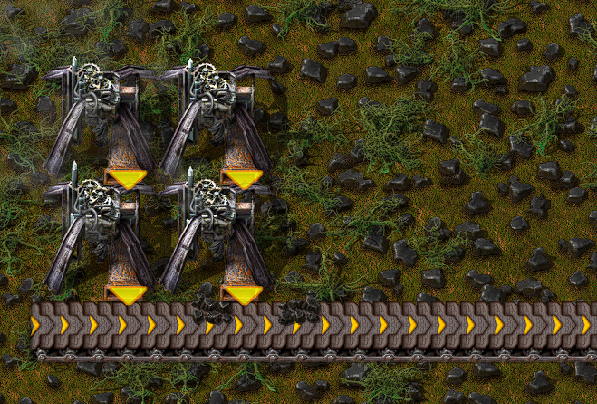
Now that we can take our coal to other places with no effort, we just need a way to input the coal into those machines.
This is where Inserters step in. In the first few stages of the game, you can use Burner Inserters as a cheap way to move items from anything to anything. You can move objects from the ground, chests, machines and put them wherever you want.
Burner Inserters themselves require coal to run though, which makes this a little counter intuitive to have to fuel them instead of the machines you are trying to fuel anyway.
Here is a small example of inserters working. Notice that the flat line is where the inserters will pick up from, and the arrow is where they will place the item. To see this in your game you need to go into the game's menu, then press Options, Graphics and turn on the option "Show inserter arrows when detailed info is on."

Okay, so now we know how to automatically mine things and then how to automatically move things from one place to another, and then to place said items into machine or out of machines.
Next up we want to get some electricity so that we can have inserters that run off that instead of fuel.
Electrical power
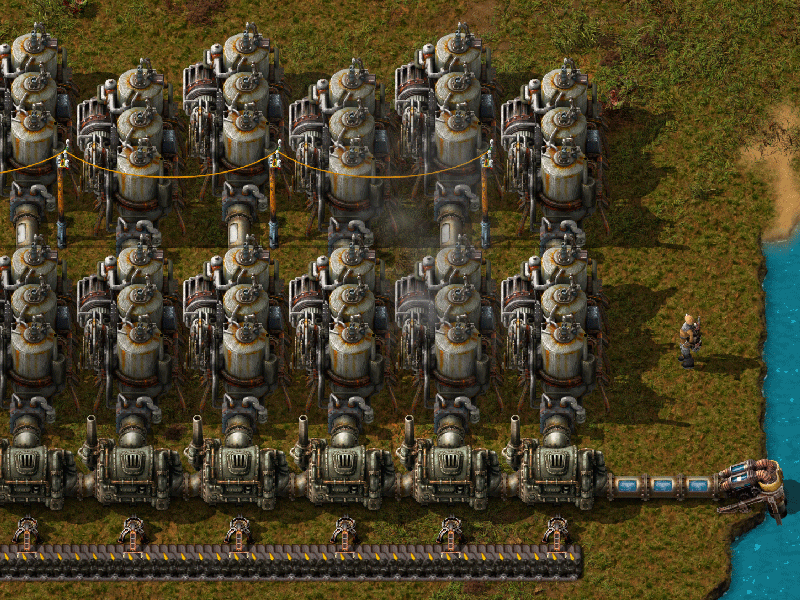
Electricity. This is where things start to get interesting. We're going to need a single Offshore Pump, a boiler and two Steam Engines. These are really simple to set up, they just require thirty-some iron plates per steam engine and 5 stone. The offshore pump goes in the water and needs no power to run. From there, you can either use pipes to transport the water to boilers, or you can run boilers straight from the pump. Water is fed into the boiler through the connection on the short side, as shown in the picture. If the boiler is fuelled, it will output steam in the middle of one of the long sides. The steam output of the boiler then connects to the middle of the short side of the steam engine. Make sure you connect it in the right place or it won't work. You can see where you can connect boilers and steam engines if you turn on the detailed view (press the Alt key). Boilers allow water to flow through, you can place multiple boilers next to each other and all will get water. Similarly, steam engines allow steam to run through, so you can have as many engine as you want connected in a row. Here is a small example.
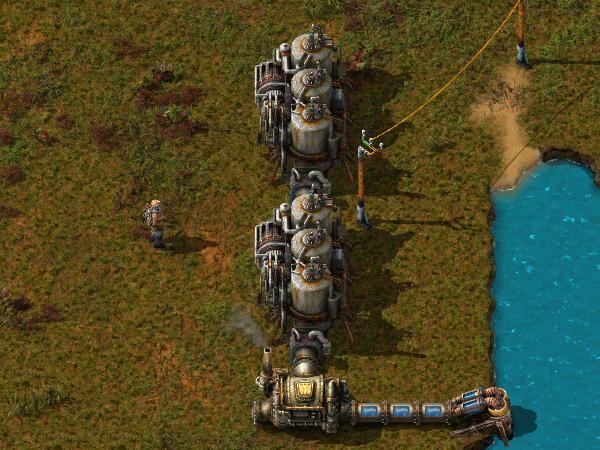
Now you need to use power poles to carry power to your machines. Place some down so that their coverage area (the blue square) overlaps each steam engine in at least one square. If they are going to connect, the machines that use power will be shown with a blue outline around their edges.
If the steam engine is producing power but nothing is using it, it'll show a yellow flashing icon: right now it's showing because we don't have electric machines yet!
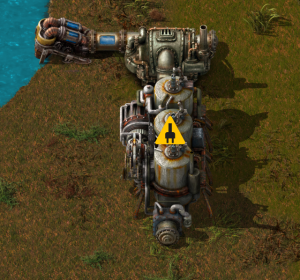
Your power setup can look however you want it to look. A boiler produces exactly as much steam as two steam engines can consume in the same time, so the usual method is to have a line of boilers each connected to two steam engines. The boilers are supplied with coal via inserters that take coal from a transport belt. A pump produces enough water for 20 boilers, so the most often used setup contains 1 offshore pump, 20 boilers and 40 steam engines. The example above is easily expanded into this efficient design. But hey, this game is all about experimentation and for you to be able to find ways to do your own things! So get to it, and show off your own unique designs!
Using this power is as simple as creating a machine that runs on electricity and placing a power pole close enough to it that the blue square touches the machine, just like you have to do at the power plant with the engines. Make sure that there is a line of power poles that actually connect to your power plant.
Now that power is explained, we need to increase our resource production.
However, if you want detailed info on your power production/consumption, you can check the Detailed Electric Network Info, opened by clicking on any powerpole.
Re-thinking our resources and research
Next we really want to get onto automation of items, not just the smelting of ores.
Before we can get to that though, we're going to have increase our production of ores. This is where things start becoming a little tricky and there are few things you want to do at once. We really want to be able to set the factory to make things and let it go. But for that we need some extra utilities which we don't have and need to get through research.
We haven't even touched on that yet! Let's start by cranking up our resource production. Now that we have electricity, we can use Electric Mining Drills. These are much better than those scummy Burner ones. They work exactly the same except they are twice as fast and they don't rely on fuel, as you could guess by the names. You can have them to output your raw resources onto belts and get them to a place where you can mass process the ores into plates. Here is a small example of what you could do, but let your imagination and your calculating logic figure out other, maybe even better ways of doing it! You want ore to be split more or less evenly on each side of the belts. This helps with the amount of resources that can be carried to your base of operations on a single belt.
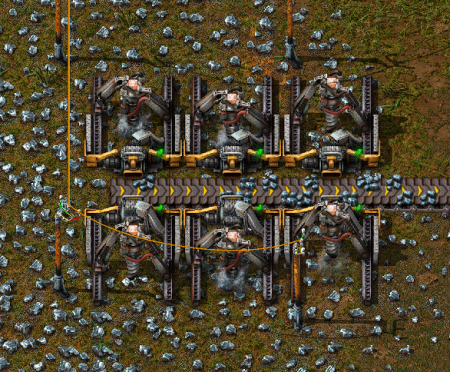
This is once again easily expandable all over an iron deposit. This conveyor belt can then take all of the ore to some sort of processing area. The processing area needs some machines that we currently don't have due to limitations in our research.
Most importantly, we want the long handed inserter. This inserter is able to reach twice as far as a normal inserter! It is very useful for bringing or placing items to or from conveyor belts that are one extra tile away. So what we need to do is to make some science labs. They don't cost too many resources, but take a little while to make. Craft one or two of them and connect them to power. When you first place one, you are going to get a popup asking you want you want to research. We really want automation right now. This gives us our inserters and the Assembling machine 1, which is going to be very useful in the near future.
You'll notice that the cost for this is 10 Science Pack 1's, or "red potions" or "flasks" as some people like to call them. These are simply another crafted item, which you should craft 10 of now and place them in your labs to begin researching. While you are waiting for your flasks to craft or your research to complete, let's continue building an ore processing center. We want a line of copper, iron and coal to be available for this area. Despite being in the electric era, our furnaces still need coal until a little further down the line.
Below is another sample of how you could set up your area. There are efficient ways of making them that you might see on the forum, but if you want to learn about what they are and how they work, you can either experiment yourself or search the wiki/forum for some better designs.
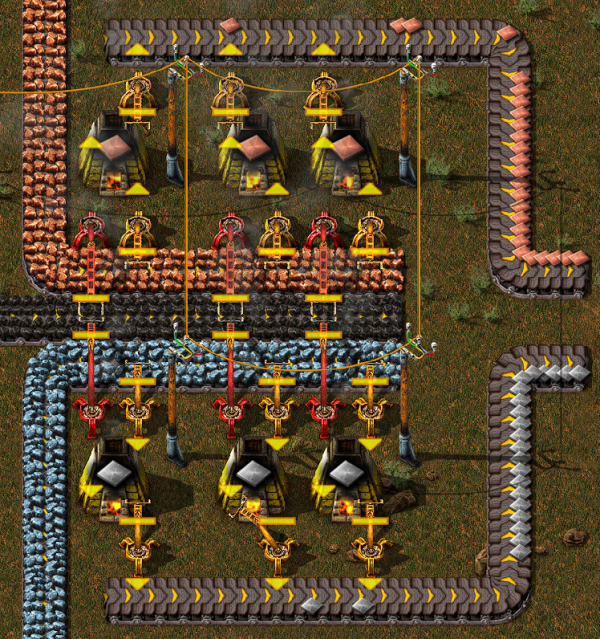
As per usual, I leave this area with plenty of room to expand later on when demands become higher. The important parts about this is that you need the red, long handed inserters to be able to reach the coal in the middle to fuel your furnaces. You need seperate belts for your incoming raw materials to be able to be processed, and then another belt outside of them to handle the output after they have been smelted. These materials can then go straight into your base to be made into a myriad of other things. Finally, we have a steady and upgradeable supply of copper and iron plates, and we can get into further automation with the assembling machines so we can automate creation of things like Science Packs, Ammunition and every other item that the player themselves can craft, but without you involved at all!
Automating that research
Ok, so a fair amount has happened. Now, to be able to progress into later parts of the game with better research we are going to want automate the process of making science packs and putting them into the labs. This way we won't have to worry about research any longer.
There are many designs that you can find on the forums, but I'll show you something simple, letting you find what works for you. I would highly recommend that you research Logistics as your next research, and in fact manually craft the science required for this. The logistic research gives you some important things: the splitter, the underground belt and the fast inserter. The splitter and underground belts are some of the most important items you'll get at this stage. They do pretty much what their names imply.
So what do science packs require? We need copper plates and iron gears. So far we have only dealt with raw resources, how do we make craftable things? The Assembler answers your prayers! If you place an assembler down and open its interface, it asks you what you would like it to craft. Once you select one, if you put the ingredients in that it requires it will craft the item and you can pull out the finished product. In the case of red science packs, we will need an assembler making iron gears, and an assembler making the actual packs. A nice way of doing this is to have a conveyor belt with 1 side containing the copper plates and the other side taking the gears from another assembler like below.
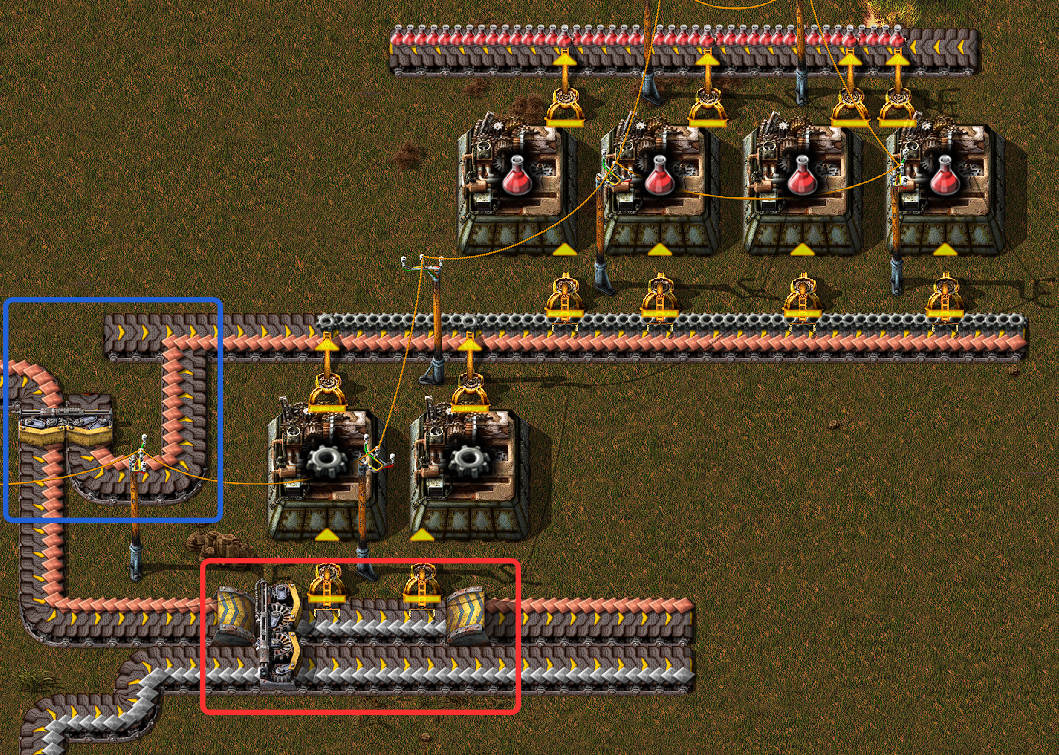
Now this picture uses a few neat little tricks that I will explain in detail. If you have your plate belts seperate, and you want them running side by side there can be issues with trying to grab one or the other resources from the far belt. Yes, you could use a long inserter, but in some cases you don't want this (e.g. you need a fast inserter to get resources quickly into your assemblers).
The area in red is a good way to get around this. By having a splitter, you can move the far belt from your production in close while also allowing it to continue down the line for later use. For the copper, we use an underground belt to go underneath the area that is now taken by the far line which also allows the copper to continue on. Once again, this is only one possible method of doing things and you are in no way obligated to follow it.
The area in blue is a quick way to allow copper to continue down the main line, while also splitting some off for our red science assemblers. Notice how when it joins the line that the gears are on, they only join the bottom side of the belt. The little extra belt that I added to the left stops the belt from becoming a turn, and therefore makes the items only join the side I want them to. The rest is simple: the gears and copper get pulled into the assemblers, they make the science and then it gets pulled out again on the other side. These flasks can then be transported to some labs to automatically do your research for you, for example like this:
