Tutorial:Quick start guide
Hadi başlayalım
Eğer öğreticiyi oynadıktan sonra hâlâ ne yapacağınızı bilmiyorsanız, bu kılavuz yardıma hazır.
Oyuna başlama
Ana menüden oyuna girmek için öncelikle "Oyna" ve "Yeni oyun"u seçiniz. Dünya ayarlarını değiştirebileceğiniz bir menü karşınıza çıkacak. Eğer bu ilk oyununuzsa hiç bunları kurcalamanıza gerek yok. Ancak eğer öğreticiyi henüz oynamadıysanız, onunla başlamanız önerilir. Ana menüden sırasıyla "Oyna", "Sefere Başla" ve "İlk Adımlar"a tıklayınız. "İlk Adımlar" oyunu basitçe tanıtır, "Yeni Umut" ise biraz daha ayrıntısıyla anlatır.
Dünya oluşturma
Haritayı farklı şekilde olulturmak için bu ayarları değiştirebilirsiniz. Dünya oluşumuna yapılan değişiklikler oyunun zorluğunu oldukça değiştirebilir.
İlk sekme oyuncuya önceden belirlenmiş hazır seçimler sunar. Yeni oyuncular için varsayılan ayarlar ya da zengin kaynaklar önerilir.
Eğer barışçıl mod açıksa, düşmanlar oyuncu onlara saldırmadığı sürece saldırmazlar
Kaynak ayarları sekmesi, kaynakların ne sıklıkla ve ne zenginlikte oluşacağını belirler. Aynı zamanda düşman oluşumu da değiştirilebilir.
Kaynaklar ve düşman üsleri 3 değişkene bağlıdır: sıklık, büyüklük ve zenginlik.
- Sıklık ne sıklıkla haritada oluşacağını belirler.
- Büyüklük oluşan kaynak ve üslerin ne kadar büyük bir alana dağılacağını belirler.
- Zenginlik kaynakların tükenmeden ne kadar süreceğini veya üslerin ne kadar yoğun düşman barındırdığını belirler.
Eğer kolay bir oyuna başlamak istiyorsanız; kaynakların sıklığı, büyüklüğünü ve zenginliğini artırıp; düşman üslerininkini azaltabilirsiniz. Yeni başlayan oyuncuların petrolün büyüklüğünü ve sıklığını artırması önerilir çünkü petrole erişim dünya oluşumuna bağlı olarak çok zorlayıcı olabilir. Düşman büyüklüğü 0'a ayarlanarak düşmanlar olmadan da oynanabilir ama düşmanlar oyunun büyük bir parçasını oluşturur.
Dünya oluşumuyla ilgili detaylı bilgi dünya oluşumu makalesinde bulunabilir.
Basit kontroller ve arayüz
Tuş atamaları ile ilgili detaylı bilgi ve nasıl kişiselleştirilmesi için tuş atamalarına bakınız.
Hareket
Karaketeriniz tuşlara basarak oynatınız ("W", "A", "S", "D" varsayılandır).
Harita
Harita tuşuna basarak (varsayılan "M") haritayı açıp kapatabilirsiniz. Farenizi kaynakların üzerinde gezdirerek detaylı bilgi alabilirsiniz.
Kaynak toplama
Bazı kaynakları sağ tık ile elle toplayabilirsiniz. Bu sadece Odun, Taş, Kömür, Bakır cevheri, Demir cevheri ve Çiğ balık için geçerlidir.
Envanter ve üretim
Envanter tuşuna basarak (varsayılan "E") envanteriniz açıp kapatabilirsiniz. Envanter arayüzü iki tarafa ayrılır; solda oyuncunun envanteri, sağda üretim tarifleri yer alır. Tariflerin üzerinde bulunan 4 büyük buton, tarifler için kategorilerdir. Eğer bir tarif için yeteri kadar malzemeniz varsa o tarife istediğiniz kadar tıklayarak üretebilirsiniz. Üretim sürecini ekranın sol altından takip edebilirsiniz.
Bina inşa etme ve yıkma
Eşyaların bazıları zemine konulabilen binalardır. Envanterinizi açıp yerleştirilebilen bir binayı seçin. İşaretçiniz, binanın ikonuna dönüşecektir. Envanterinizi kapattıkan sonra da işaretçinizin yerine binanın ikonu olacaktır. Farenizi gezdirin ve binayı nereye işaret edebileceğinize bakın. Eğer kırmızı gözüküyorsa binayı oraya inşa edemezsiniz demektir. Eğer yeşilse yerleştirebilirsiniz demektir. Binanın yönünü döndürmek için döndürme tuşuna basın (varsayılan "R"). Sol tık ile binayı yerleştirin.
Binayı inşa ettikten sonra sağ tık'a basılı tutarak yıkabilir ve envanterinize geri alabilirsiniz.
Binalarla etkileşime geçme
Eğer bir bina etkileşime geçilebilen bir binaysa, sol tık ile tıkladığınızda o binanın arayüzü karşınıza çıkar. Bunu genellikle makineye bir tarif seçmek için veya envanterinizden binaya/binadan envanterinize eşya aktarımı yapmak için kullanacaksınız.
Bir konteyneri açtığınızda, onun envanterini görebilirsiniz. Eşya aktarımı yapmak için önce kendi envanterinizdeki bir eşyaya, ardından konteynerin boş bir bölmesine tıklayın. Yığın olarak aktarmak istiyorsanız "yığınla aktarma" tuşuna (varsayılan "SHIFT") basın ve ardından eşyaya tıklayın. Eğer yığının sadece yarısını almak istiyorsanız, sağ tıklayın. CTRL-sağ tık ile envanterinizdeki eşyaların yarısını aktarabilirsiniz. Eğer BİR türdeki eşyaların hepsini aktarmak istiyorsanız "envanter aktarımı" tuşuna (varsayılan "CTRL") ve sol tık'a basın. Eğer envanterinizdeki TÜM türdeki eşyaları aktarmak istiyorsanız "envanter aktarımı" tuşuna (varsayılan "CTRL") ve boş bir bölmeye tıklayın.
"alt modu" tuşuna (varsayılan "ALT") basarak "ayrıntılı gösterimi" açabilirsiniz, bu sayede binalar hakkında detaylı bilgi görebilirsiniz.
Hızlı erişim ve Kısayol Barı
Ekranın aşağı kısmında solda hızlı erişim ve sağda kısayol barlarını göreceksiniz. Hızlı erişime sol tıkla eşya ekleyebilirsiniz. Fare tekerleğine (orta tuşa) basarak temizleyebilirsiniz.
Çatışma
Oyunda düşmanlar mevcuttur, ancak büyük ihtimalle siz hazırlanana kadar size saldırmayacaklardır. Eğer kendinizi savunmanız gerekiyorsa boşluk tuşuna basarak fare işaretçisinize en yakın olan düşmana ateş edebilirsiniz. Mühimmatınıza dikkat edin, ekranın sol altında gözükür.
İlk anlar
Resources
Make sure that you have the four solid resources close to your spawn location; Coal, Copper ore, Iron ore, and Stone. These should be found within a reasonable proximity to each other; the farther apart they are the harder it will be to route them for combined use.
It's also advisable to have a source of Water in your starting area, as it is required for Steam Engines.
If your spawn area doesn't have one of these resources, or they are too scarce or too far apart, simply hit the Escape key and choose "Restart." This will re-generate the game world and you will spawn in a new starting location. This may need to be done several times until a passable world is created.
Later we will also need Crude oil. However, it's okay if your starting area doesn't have oil, as you won't need it until later in the game. The same goes for for Uranium ore.
Almost everything in Factorio is made from these seven basic resources, and you will need all of them except for uranium if you intend to finish the game.
Placing mines and furnaces
Gathering and crafting manually is a pain, and the purpose of Factorio is to create machines that will do your work for you.
You begin your journey with a Stone furnace and a Burner mining drill. This means you only have to harvest a limited number of resources by hand. First of all, you should place your drill on the edge of an iron deposit, facing towards the furnace. The iron deposit looks like blue-ish gray rocks on the ground.
The little yellow arrow shows where the mined iron ore will come out. You want the Furnace to be in front of that arrow, so that the drill automatically inserts the ore into the furnace. It should look something like this:
Remember you can press "ALT" to activate the detailed view. This makes it easier to see what's happening.
Feeding with fuel
Now that you've placed the drill and furnace, they need Fuel.
You can power them with either Wood or Coal. To collect them, you'll need to cut trees or mine coal; this can be accomplished by holding right click over trees or coal deposits, respectively.
Once you have some fuel in your inventory, left click on the furnace or drill to open the interface.
To place your fuel into the machine, simply left click it to pick it up and left click again to put it into the fuel slot.
If you want to split a stack in half, right click the stack. Now both of your machines should be running and automatically making you some iron plates!
You can also CTRL-Right Click to directly insert half of the stack
You can use an identical setup for copper ore to get copper plates.
Production upgrade!
What's better than iron plates? More iron plates!
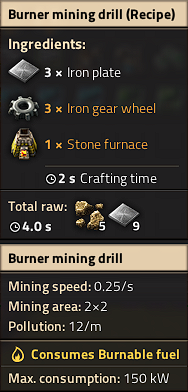
You'll need to craft some extra drills. If you hover over drill in the crafting menu, you'll see two lists of materials. The first list shows the components needed to make the drill; the second one at the very bottom of the tooltip window shows the raw resources needed to craft it. Unlike other games, you do not need to create the pre-requisite items before you select the item you want to make. All required items are crafted for you. You can see this process happening on the bottom left of the screen, where your Crafting Queue is. You can also queue up more crafting orders, as long as you have the necessary materials on you, and they'll get carried out one after the other.
Now that you can afford some extra drill and furnaces, you should automate the acquisition of both coal and stone. These are easy to set up and work essentially the same as the iron setup. For Coal, you can have two drills facing each other: they'll run on the coal they get fed by their partner and you can collect the surplus.
Don't forget that you can collect resources from machines without opening their inventories, with CTRL-LMB. You might also want to activate the detailed view, by pressing the ALT key once. You can deactivate it by pressing ALT again.
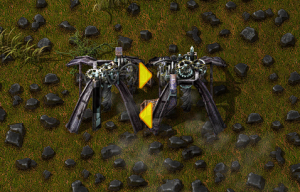
And for stone you can have the drill output directly into a chest.
Once this is all setup up, you will probably want to make it go faster. Set up more drills with furnaces for the iron, setup some for copper and maybe lay more drills on the coal to cover for the extra coal production. In the early game, the most used resource is iron, so you'll probably need twice as many miners on iron than copper, if not more. But expect copper to become more and more important the more you mess with electricity and electronics!
More automation
Great! So now you have four or so furnaces making iron, a couple making copper, some stone production and a good amount of coal production. But you know what really sucks? Having to run the coal around to all your other machines, right? Well let's automate that too! Conveyor belts and inserters are the way of the future! The output slots on the drill can also output onto conveyor belts to be transported to your other machines.
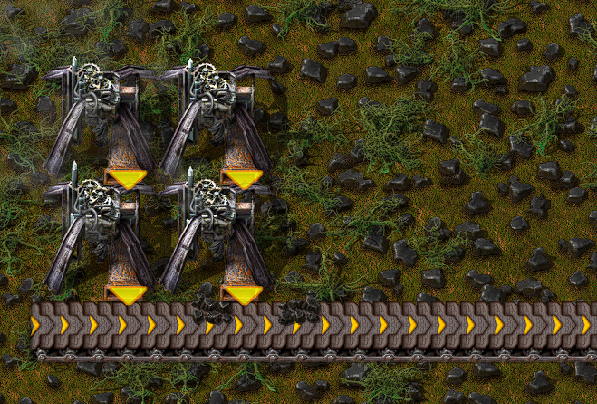
Now that we can take our coal to other places with no effort, we just need a way to input the coal into those machines.
This is where Inserters step in. In the first few stages of the game, you can use Burner Inserters as a cheap way to move items from anything to anything. You can move objects from the ground, chests, machines and put them wherever you want.
Burner Inserters require coal to run but can fuel themselves with coal from belts, eliminating the need to manually fuel them.
Here is a small example of inserters working. Notice that the flat line is where the inserters will pick up from, and the arrow is where they will place the item. To see this in your game you need to go into the game's menu, then press Options, Graphics and turn on the option "Show inserter arrows when detailed info is on."

Okay, so now we know how to automatically mine things and then how to automatically move things from one place to another, and then to place said items into machine or out of machines.
Next up we want to get some electricity so that we can have inserters that run off that instead of fuel.
Electrical power
Electricity. This is where things start to get interesting. We're going to need a single Offshore Pump, a boiler and two Steam Engines. These are really simple to set up, they just require thirty-some iron plates per steam engine and 5 stone. The offshore pump goes in the water and needs no power to run. From there, you can either use pipes to transport the water to boilers, or you can run boilers straight from the pump. Water is fed into the boiler through the connection on the short side, as shown in the picture. If the boiler is fuelled, it will output steam in the middle of one of the long sides. The steam output of the boiler then connects to the middle of the short side of the steam engine. Make sure you connect it in the right place or it won't work. You can see where you can connect boilers and steam engines if you turn on the detailed view (press the Alt key). Boilers allow water to flow through, you can place multiple boilers next to each other and all will get water. Similarly, steam engines allow steam to run through, so you can have as many engine as you want connected in a row. Here is a small example.
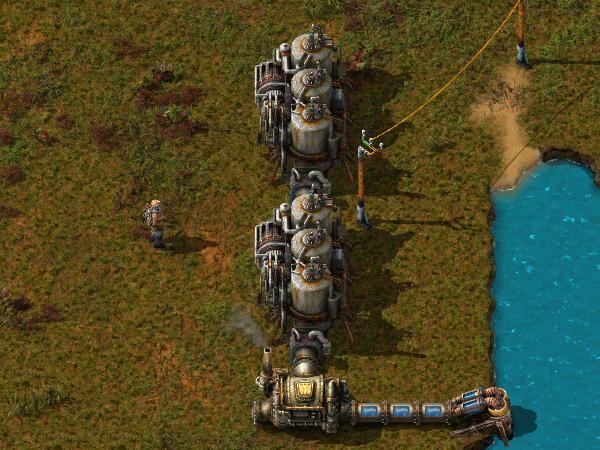
Now you need to use power poles to carry power to your machines. Place some down so that their coverage area (the blue square) overlaps each steam engine in at least one square. If they are going to connect, the machines that use power will be shown with a blue outline around their edges.
If the steam engine is producing power but nothing is using it, it'll show a yellow flashing icon: right now it's showing because we don't have electric machines yet!
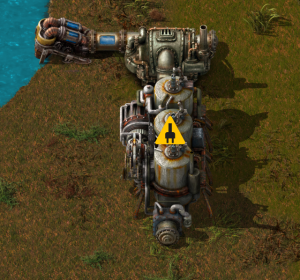
Your power setup can look however you want it to look. A boiler produces exactly as much steam as two steam engines can consume in the same time, so the usual method is to have a line of boilers each connected to two steam engines. The boilers are supplied with coal via inserters that take coal from a transport belt. A pump produces enough water for 20 boilers, so the most often used setup contains 1 offshore pump, 20 boilers and 40 steam engines. The example above is easily expanded into this efficient design. But hey, this game is all about experimentation and for you to be able to find ways to do your own things! So get to it, and show off your own unique designs!
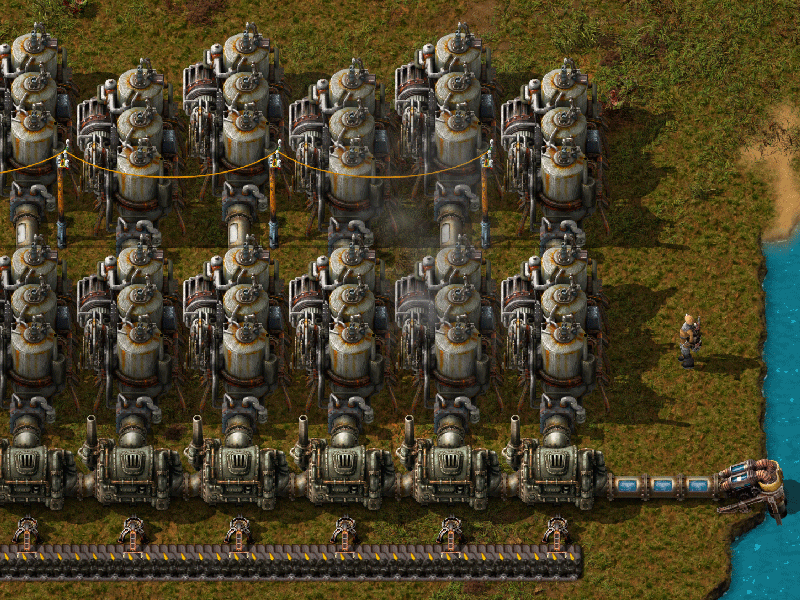
Using this power is as simple as creating a machine that runs on electricity and placing a power pole close enough to it that the blue square touches the machine, just like you have to do at the power plant with the engines. Make sure that there is a line of power poles that actually connect to your power plant.
Now that power is explained, we need to increase our resource production.
However, if you want detailed info on your power production/consumption, you can check the Detailed Electric Network Info, opened by clicking on any powerpole.
Re-thinking our resources and research
Next we really want to get onto automation of items, not just the smelting of ores.
Before we can get to that though, we're going to have increase our production of ores. This is where things start becoming a little tricky and there are few things you want to do at once. We really want to be able to set the factory to make things and let it go. But for that we need some extra utilities which we don't have and need to get through research.
We haven't even touched on that yet! Let's start by cranking up our resource production. Now that we have electricity, we can use Electric Mining Drills. These are much better than those scummy Burner ones. They work exactly the same except they are twice as fast and they don't rely on fuel, as you could guess by the names. You can have them to output your raw resources onto belts and get them to a place where you can mass process the ores into plates. Here is a small example of what you could do, but let your imagination and your calculating logic figure out other, maybe even better ways of doing it! You want ore to be split more or less evenly on each side of the belts. This helps with the amount of resources that can be carried to your base of operations on a single belt.
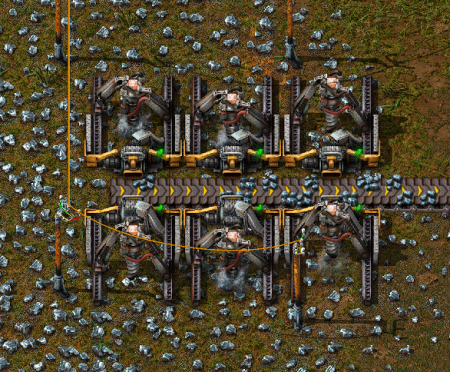
This is once again easily expandable all over an iron deposit. This conveyor belt can then take all of the ore to some sort of processing area. The processing area needs some machines that we currently don't have due to limitations in our research.
Most importantly, we want the long handed inserter. This inserter is able to reach twice as far as a normal inserter! It is very useful for bringing or placing items to or from conveyor belts that are one extra tile away. So what we need to do is to make some science labs. They don't cost too many resources, but take a little while to make. Craft one or two of them and connect them to power. When you first place one, you are going to get a popup asking you what you want to research. We really want automation right now. This gives us our inserters and the Assembling machine 1, which is going to be very useful in the near future.
You'll notice that the cost for this is 10 Science Pack 1's, or "red potions" or "flasks" as some people like to call them. These are simply another crafted item, which you should craft 10 of now and place them in your labs to begin researching. While you are waiting for your flasks to craft or your research to complete, let's continue building an ore processing center. We want a line of copper, iron and coal to be available for this area. Despite being in the electric era, our furnaces still need coal until a little further down the line.
Below is another sample of how you could set up your area. There are efficient ways of making them that you might see on the forum, but if you want to learn about what they are and how they work, you can either experiment yourself or search the wiki/forum for some better designs.
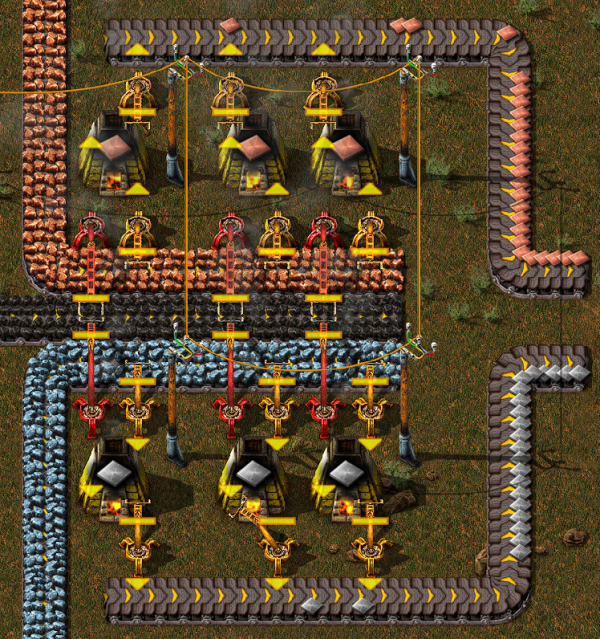
As per usual, I leave this area with plenty of room to expand later on when demands become higher. The important parts about this is that you need the red, long handed inserters to be able to reach the coal in the middle to fuel your furnaces. You need seperate belts for your incoming raw materials to be able to be processed, and then another belt outside of them to handle the output after they have been smelted. These materials can then go straight into your base to be made into a myriad of other things. Finally, we have a steady and upgradeable supply of copper and iron plates, and we can get into further automation with the assembling machines so we can automate creation of things like Science Packs, Ammunition and every other item that the player themselves can craft, but without you involved at all!
Automating that research
Ok, so a fair amount has happened. Now, to be able to progress into later parts of the game with better research we are going to want automate the process of making science packs and putting them into the labs. This way we won't have to worry about research any longer.
There are many designs that you can find on the forums, but I'll show you something simple, letting you find what works for you. I would highly recommend that you research Logistics as your next research, and in fact manually craft the science required for this. The logistic research gives you some important things: the splitter, the underground belt and the fast inserter. The splitter and underground belts are some of the most important items you'll get at this stage. They do pretty much what their names imply.
So what do science packs require? We need copper plates and iron gears. So far we have only dealt with raw resources, how do we make craftable things? The Assembler answers your prayers! If you place an assembler down and open its interface, it asks you what you would like it to craft. Once you select one, if you put the ingredients in that it requires it will craft the item and you can pull out the finished product. In the case of red science packs, we will need an assembler making iron gears, and an assembler making the actual packs. A nice way of doing this is to have a conveyor belt with 1 side containing the copper plates and the other side taking the gears from another assembler like below.
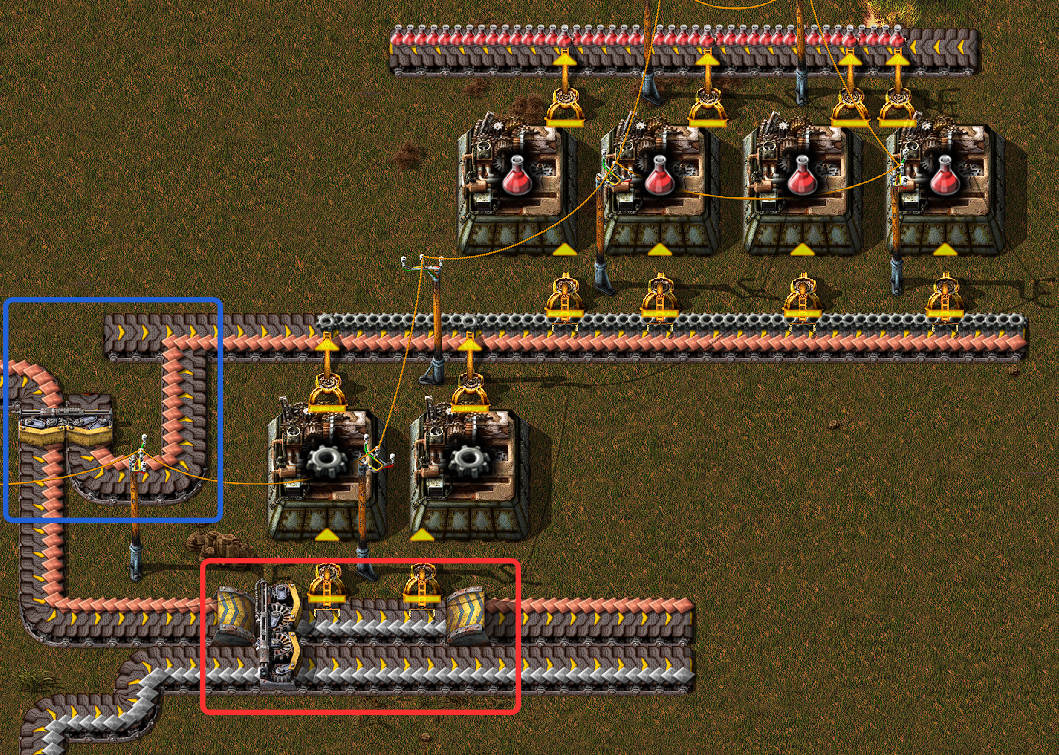
Now this picture uses a few neat little tricks that I will explain in detail. If you have your plate belts seperate, and you want them running side by side there can be issues with trying to grab one or the other resources from the far belt. Yes, you could use a long inserter, but in some cases you don't want this (e.g. you need a fast inserter to get resources quickly into your assemblers).
The area in red is a good way to get around this. By having a splitter, you can move the far belt from your production in close while also allowing it to continue down the line for later use. For the copper, we use an underground belt to go underneath the area that is now taken by the far line which also allows the copper to continue on. Once again, this is only one possible method of doing things and you are in no way obligated to follow it.
The area in blue is a quick way to allow copper to continue down the main line, while also splitting some off for our red science assemblers. Notice how when it joins the line that the gears are on, they only join the bottom side of the belt. The little extra belt that I added to the left stops the belt from becoming a turn, and therefore makes the items only join the side I want them to. The rest is simple: the gears and copper get pulled into the assemblers, they make the science and then it gets pulled out again on the other side. These flasks can then be transported to some labs to automatically do your research for you, for example like this:
