Railway: Difference between revisions
Added interrupts, elevated rails, updated images |
Rewrote parameterised interrupts, removed cleanup |
||
| Line 1: | Line 1: | ||
{{Languages}} | {{Languages}} | ||
[[File:Railway_from_trailer_2020.png|thumb|right|430px|Railway in the [https://youtu.be/J8SBp4SyvLc official game trailer.]]] | [[File:Railway_from_trailer_2020.png|thumb|right|430px|Railway in the [https://youtu.be/J8SBp4SyvLc official game trailer.]]] | ||
:''For the research see [[Railway (research)]]'' | :''For the research see [[Railway (research)]]'' | ||
| Line 194: | Line 193: | ||
Interrupts can be reordered within the locomotive's GUI like normal stops. If a train has multiple interrupt conditions true at the same time, it will prioritize interrupts that are higher on the list. This is important if one wishes a train to behave a certain way when working with a particular suite of interrupts. | Interrupts can be reordered within the locomotive's GUI like normal stops. If a train has multiple interrupt conditions true at the same time, it will prioritize interrupts that are higher on the list. This is important if one wishes a train to behave a certain way when working with a particular suite of interrupts. | ||
=== | === Wildcard Interrupts === | ||
[[File:interrupt_wildcards.png|thumb|left|300px|The four wildcard signals: Item, Fuel, Fluid, & Signal.]] | |||
Within interrupts, trains have access to four special "wildcard" signals located within the Unsorted tab, which are special [[Circuit network#Logic signals|logic signals]] that can only be used within interrupts. Wildcard signals come in four types: item, fuel, fluid, and signal. When used as a condition to trigger an interrupt, each one looks at a specific inventory within the train and will replace itself with the signal of the first item it finds. For example, if an interrupt is set to trigger if an item parameter is over 50, and 51 [[iron gear wheel]]s are placed into a cargo wagon, the interrupt will trigger as if the condition was looking for over 50 iron gears. Item, fuel, and fluid wildcards each look at a specific inventory: [[cargo wagon|cargo]] and [[artillery wagon]]s, [[fluid wagon]]s, and [[locomotive]]s, respectively. | |||
When used solely as a condition, wildcards act otherwise identically to the [[circuit network#Anything|anything]] logic signal. What makes them special is their function when used in both the condition and the target. | |||
Wildcards will also replace themselves with any [[rich text]] icons within the names of [[train stop]]s. Instead of selecting a target stop from the list, instead click on the "icon" button next to the green confirm button and select the same type of wildcard as used in the condition. Then, type the name of the station. If the stop has a matching icon in its name, then the train will match the item it contains with that icon, and select that stop as the destination. | |||
The final wildcard, Signal parameter, checks against any signals passed to the train while parked at a train stop. When combined with a signal parameter for a target station, this can make the train go to a stop which has an icon in its name matching the signal it received from the station. When combined with matching the target station based on its contents, this can be utilized to create a generic train system which can select its destination based on the item it receives. | |||
=== Troubleshooting === | === Troubleshooting === | ||
Revision as of 05:25, 9 December 2024
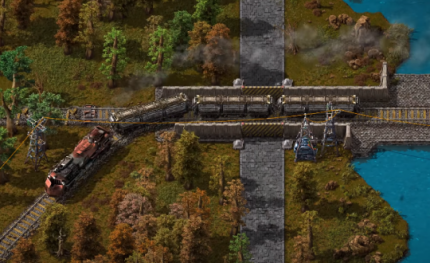
- For the research see Railway (research)
The Railway is one of the main transport methods in Factorio. Although the installation of such a network can be complicated and requires a large amount of resources and space, it is faster and more efficient than belts and robot logistics, especially over large distances.
Railway construction, however, is not understood instantly. It takes some time to learn the basics, such as automating transportation. Learning how to manage and maintain the upkeep of a larger train network takes time and experience. Rails can be built on the ground, or can be - with the Space Age expansion - elevated with the help of a rail ramp and rail supports so that trains can travel over obstacles.
Infrastructure
To build a railway, tracks (also called rails) must be built for the train to ride on. Typically, this is done via the rail planner, but can also be done manually. Bear in mind that rails are placed on a two-tile grid, so a rail cannot be moved by only one tile.
Minimum manually operated railway
As a minimum, a manually operated railway has to consist of:
- Rails (tracks)
- Locomotives
Locomotives can be entered and then manually operated by standing next to them and pressing the ENTER button.
Switches
- There is no visual representation of a working switch, however, the rails will appear to merge. Using the rail planner, the player must place a rail overlapping an existing rail to form a switch. Switches are forks in tracks that allow a train to pick between two directional options.
- The crossing of two straight tracks is not usable as a switch, as trains have a limited turning radius. They do, however, connect signal blocks which helps prevent collisions.
- Parallel tracks do not interact with each other. However, switching from one track to the other can require extra resources if they are too close together; the track must turn away from the other parallel track and then turn back to it. This can create complicated networks of signals and, as such, one should generally not build parallel tracks unless they are spaced adequately. (Generally, 2 track widths apart works well)
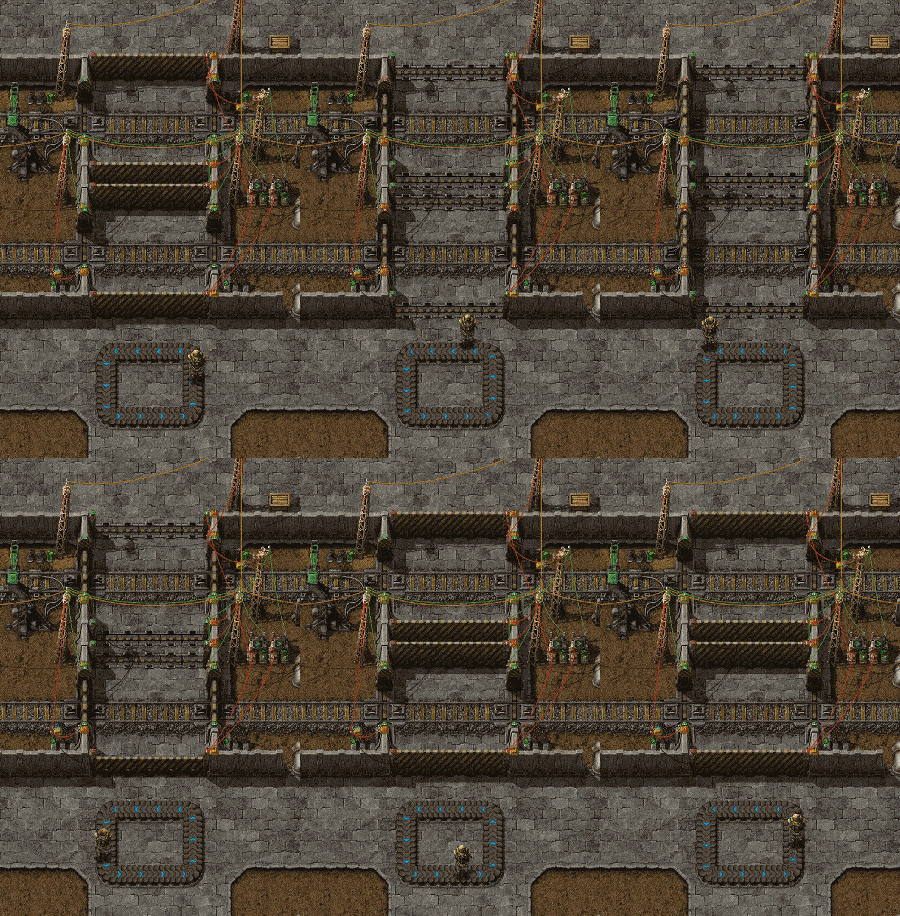
Click here for the full-sized version of the image.
Crossing tracks
Be careful when crossing train tracks! Trains are one of the highest damaging entities in the game, and will kill most players instantly on contact.
A checklist of proper track-crossing etiquette:
- Zoom out, so that you can see a train coming.
- Look left, then right.
- Check for signals nearby: If a rail signal suddenly jumps from green to red or green to yellow, a train is coming. Do not cross.
- Avoid walking near the tracks, as you do not need to be fully on the tracks to get hit.
- While it is possible to get into/out of a train while it is moving, a miss can cost your life. The sides of the train can still deal damage, as well as the player being able to slip between two rail cars.
- Heavy shields can be used to reduce the damage taken. In extreme cases, it is possible to stop a train with your body. This will require several shield modules to not be instantly killed and will drain a large amount of the suit's energy.
- All entities with health will take damage getting hit by a train, so take care not to leave a car or tank on the tracks. However, this includes hostile forces!
- Trains far from a train stop will be traveling at (near) max speed, so take extra precaution when crossing and zoom out further. Trains near a train stop or signal will slow down to stop and will be traveling slower. Trains of different configurations will also move slower or faster.
A safe railroad crossing like the example shown in the picture can be built. This works by restricting access to the tracks when an oncoming train has the rails reserved. When the player is on the rails, the signals are reserved by the circuit network, and the train must stop and wait until the player leaves the tracks. When a player is inside the area crossing the tracks, the train gates are closed so the player can't get on the tracks outside the crossing. This is to completely ensure a safe crossing and is often used on servers.
Trains
Train components:
| Locomotive | Cargo wagon | Fluid wagon | Artillery wagon |

- A train consists of at least one locomotive.
- Trains can have more than one locomotive and any number of wagons.
- Locomotives can be manually driven forwards or backwards, however, they are generally slower going backwards. The left and right movement keys are used to change direction at switches.
- Trains can only drive forwards automatically. An automatic train can drive forwards and backwards when two locomotives facing different directions are connected to the train.
- A train needs fuel to drive. Fuel can be added by inserters when the train is in manual mode or parked at a station, not when waiting at a signal or standing in automatic mode.
The locomotives' inventory is only used for fuel. To transport items or fluids cargo wagons and/or fluid wagons have to be attached to the train. To attach rolling stock, whether a wagon or a locomotive, the player may prepare to place one near an existing train, where a green graphic will show the player that the stock will be attached, showing a connection between the train and the new stock. Alternatively, the player may manually connect rolling stock to trains with the rolling stock connect key, if the cargo wagon is placed far away from a train. Rolling stock can likewise be disconnected with the rolling stock disconnect key.
Stations
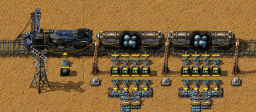
Train stations are the only place where trains can be loaded or unloaded when they are in automatic mode. Cargo wagons can be filled or emptied by up to twelve adjacent inserters (six on each side). Inserters can also be used to insert fuel into locomotives. Pumps are used to transfer fluid into and out of fluid wagons, only three pumps can attach to one fluid wagon at once.
Train stations are usually created by placing a train stop. Train stops must be on the right-hand side of the track. However, it is also possible to create a temporary train station by opening a locomotive's GUI and using CTRL + Left mouse button near a rail in the minimap in the GUI or by entering a locomotive and using CTRL + Left mouse button near a rail on the world map. This will create a station without requiring a train stop. The temporary train station has a default wait condition of 5 seconds and is removed from the schedule once the train leaves the station.
Signals
| Rail signal | Rail chain signal |
Rail signals are used to employ multiple trains automatically without the danger of trains crashing into each other. Rail signals split the network into blocks and ensure that only one train can be in every block at any time. Note that driving a train manually ignores all signals, so it is possible for automatic trains to crash into the player if the player ignores red/yellow signals. Always beware of automatic trains and give them the right of way.
The train signals tutorial contains an in-depth explanation of rail signals, blocks and deadlocks.
Basic signaling rules
- There can only be one train in a block at any time. A train spanning multiple blocks occupies them all.
- A red signal means that the following block is occupied by a train.
- A yellow signal means that a train is approaching and already has the approval to enter the following block.
- Rail signals separate a new block and reflect its state: green - free, yellow - reserved, red - occupied
- Rail chain signals separate a new block and reflect the state of the next signal(s): see above, blue - at least one of the paths is blocked, but not all
- A train can only pass a signal on the right of the track, or if there is a signal on both sides on the same rail segment. Of course, manual driving overrides this.
Automated transport
Trains set on "Automatic" choose their destination stop and route on departure, and after waiting at a chain signal for five seconds, and when their destination stop disables itself by circuit condition. They choose the shortest route using a path finding algorithm that will get them to an enabled train stop with the right name, taking penalties for any apparent-at-the-time delays into account. If no such train stop exists they will skip the stop and go on to the next.
This section covers items used to make trains automatically transport items between stations. The player should be familiar with creating a rail system.
First, the player has to set up a rail system with at least two train stops, which are placed on the right-hand side of the expected train arrival direction. By hovering over the train stop with the mouse you see the positions of the vehicles for better setting up the train station (including (un)loading machinery, and refueling/repair installations).
When you set up the train schedule (see below) and fuel the train, you can start the train on its schedule by switching from manual to automatic driving mode.
Train schedule
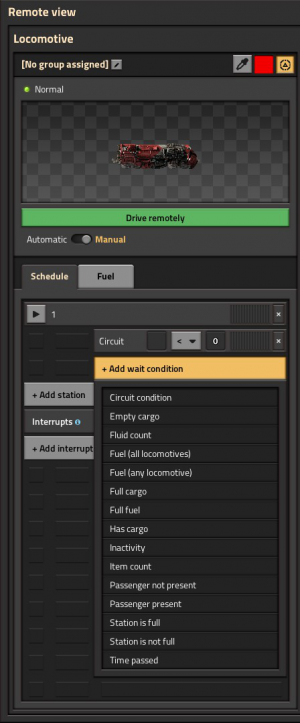
The player can set up a list of train stations in the left locomotive's GUI. The train will route to stops in the given order, if it's at the end it will continue with the first. Stations can be added by clicking "Add station" in the GUI. A pop-up appears with a list of all stop names. If one is selected, another button appears which allows selecting a wait condition from a pop-up list. Furthermore, the map in the right part of the GUI can be used to add stations to the schedule by using SHIFT + Left mouse button on a station or using CTRL + Left mouse button near a rail in the map to create a temporary train station. These actions can also be performed on the world map when the player is sitting inside the train.
Wait conditions are used to tell the train when to leave the station. There are 15 types of wait conditions:
- Circuit condition – The train stop is connectable to the circuit network, so the signals can used for wait conditions.
- Empty cargo – All inventories of the train are empty. Does not include fuel inventories.
- Fluid count – The train (all fluid wagons summed) contains a specific amount of a certain fluid.
- Fuel (all locomotives) - All locomotives in the train collectively contain a specific amount of fuel
- Fuel (any locomotive) - Any one locomotive contains a specific amount of fuel
- Full cargo - All inventories of the train are full. Does not include fuel inventories
- Full fuel - All fuel inventories are full. Does not include cargo or fluid inventories
- Has cargo - Cargo or fluid inventories contain items.
- Inactivity – No items were added or removed for the specified amount of seconds.
- Item count – The train (all cargoes summed) contains a specific amount of a certain item. Does not include fuel inventories.
- Passenger present - At least one player is inside any part of the train.
- Passenger not present - No players are inside any part of the train.
- Station is full - A specified stop is full, according to its set train limit. If the stop has no train limit set, this condition will not be met.
- Station is not full - A specified stop is not full, according to its set train limit. If the stop has no train limit set, this condition will be met.
- Time passed
It is also possible to set no wait condition, this causes the train to simply pass by the station without stopping.
Hereafter the word "term" is used to describe one type of wait condition, and the words "wait condition" are used to describe the whole set of terms (it turns a bit into maths).
If more than one term is added, it is possible to change the connection of those using the logical operators AND and OR. An AND condition will result in true if all terms are true. An OR condition will return true if at least one of the terms is true.
When mixing AND and OR terms, the logic is grouped by the OR terms. When evaluating the wait condition, the first term is evaluated along with all AND terms immediately following up to but excluding the next occurring OR term. If they all evaluate true, the wait condition evaluates true. Otherwise, evaluation continues with that next occurring OR term and all AND terms immediately following it, up to the next OR term. This continues until either an OR group evaluates true and the wait condition is satisfied, or all terms have been checked.
Examples
Expand for examples
Wait until full, up to 30 seconds:
Full cargo inventory
OR 30 seconds passed
Wait until cargo full, or circuit condition Oil > 3000:
Full cargo inventory
OR Circuit condition - Oil > 3000
Wait until empty, and 30 seconds passed, and 5 seconds of inactivity:
Empty cargo inventory
AND 30 seconds passed
AND 5 seconds of inactivity
Wait until iron ore is low, or copper ore is low and at least 30 seconds passed:
Cargo: Iron ore < 500
AND 30 seconds passed
OR Cargo: Copper ore < 500
AND 30 seconds passed
Factorio's wait condition logic is read as disjunctive normal form (DNF), and so this last example is processed as (note the parenthesis):
((Cargo: Iron ore < 500 AND 30 seconds passed) OR (Cargo: Copper ore < 500 AND 30 seconds passed))
Which is the same as this:
((Cargo: Iron ore < 500 OR Cargo: Copper ore < 500) AND 30 seconds passed)
Unfortunately, there is no way to write that shorter form in the current UI.
Train Groups
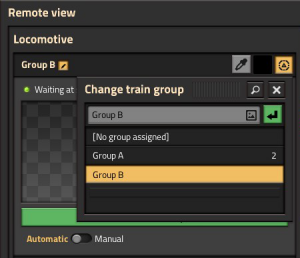
Trains are able to be assigned to a group. Selecting the small edit icon next to "no group assigned" will bring up the existing groups in the current world. One can select a group for the train to join, or create a new one. Editing the schedule of one train will change the schedules of all trains in the same group.
Schedule Interrupts
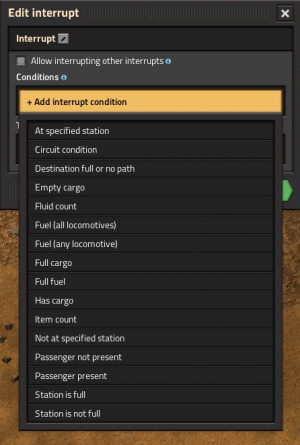
Schedule interrupts allow a locomotive to override its current schedule when a certain condition is met. Selecting "Add interrupt" in the locomotive's GUI will bring up a list of existing interrupts in the current world. One can be selected from the list, or typing in a name will create a new one. Creating one will add it to the locomotive and all locomotives in the current locomotive group.
To work, an interrupt requires two parts: a condition and a target station. When a condition is met, the interrupt will activate and insert the target station as a temporary stop in the locomotive's schedule. The locomotive will route to the target station and wait there until the specified wait condition is met, at which point it will leave and resume its original schedule.
An interrupt can be triggered on many of the same conditions as waiting at a stop, along with some new conditions:
- At specified station - The train is waiting at a specific stop
- Destination full or no path - The train's next stop is full, according to its train limit; or the train cannot physically reach its next station
- Not at specified station' - The train is stopped somewhere other than the specific stop
Multiple trains can have the same interrupt regardless if they are in the same locomotive group or not. Editing an interrupt will change it for all trains which have the interrupt in their system.
Interrupts can be reordered within the locomotive's GUI like normal stops. If a train has multiple interrupt conditions true at the same time, it will prioritize interrupts that are higher on the list. This is important if one wishes a train to behave a certain way when working with a particular suite of interrupts.
Wildcard Interrupts

Within interrupts, trains have access to four special "wildcard" signals located within the Unsorted tab, which are special logic signals that can only be used within interrupts. Wildcard signals come in four types: item, fuel, fluid, and signal. When used as a condition to trigger an interrupt, each one looks at a specific inventory within the train and will replace itself with the signal of the first item it finds. For example, if an interrupt is set to trigger if an item parameter is over 50, and 51 iron gear wheels are placed into a cargo wagon, the interrupt will trigger as if the condition was looking for over 50 iron gears. Item, fuel, and fluid wildcards each look at a specific inventory: cargo and artillery wagons, fluid wagons, and locomotives, respectively.
When used solely as a condition, wildcards act otherwise identically to the anything logic signal. What makes them special is their function when used in both the condition and the target.
Wildcards will also replace themselves with any rich text icons within the names of train stops. Instead of selecting a target stop from the list, instead click on the "icon" button next to the green confirm button and select the same type of wildcard as used in the condition. Then, type the name of the station. If the stop has a matching icon in its name, then the train will match the item it contains with that icon, and select that stop as the destination.
The final wildcard, Signal parameter, checks against any signals passed to the train while parked at a train stop. When combined with a signal parameter for a target station, this can make the train go to a stop which has an icon in its name matching the signal it received from the station. When combined with matching the target station based on its contents, this can be utilized to create a generic train system which can select its destination based on the item it receives.
Troubleshooting
Below are some things to verify if a rail system or train is not working.
- Is the train fueled? Ensure that the locomotive has fuel of some kind.
- Misplaced or non-functional switches? Ensure that the train can plan a path through the switches.
- Another train on the same block? Make sure the path of the train is unobstructed.
- Train stops placed correctly? Make sure that the yellow arrows when hovering on the stop point towards the end or exit of the stop.
- Is the train allowed to enter signals from the right direction? Are the signals set correctly?
- If a track is supposed to be two-way, the rail signals should be opposite each other. You can verify they match up by hovering the cursor over one. For a matched pair, it will show the other.
No path
When trains cannot reach the target, a "no path" symbol pops up over the locomotive. Check:
- Can the train reach its current destination by only driving forward? Build turning slopes or place a locomotive at both ends of a train!
- Are the train stops standing in the right direction? Train stops must be on the right-hand side of the track (from the forward-facing locomotive's perspective). If the train is traveling south, the stop must be on the west side of the track.
- If you use rail signals, check that the signals are all allowing traffic in the correct direction.
- Check for interruptions in the train tracks, drive to the station manually to check there are no rail parts missing. Especially near junctions, these can be hard to spot if missing.
If you are still having problems, consider:
- Driving the train manually, and as you pass each switch, try switching to automatic. When it works, you will know the rough area of the problem.
A pictorial summary of typical problems.
Elevated Rails

![]() Space Age expansion exclusive feature.
Space Age expansion exclusive feature.
Elevated rails come in a separate mod which can be enabled independently of Space Age. They come as two new buildings: rail ramp and rail support. Ramps and supports are the only items in the game able to be built in the oceans of Nauvis. When playing with Space Age itself, elevated rails become an important part of the game, as they are critical to bridging the oil oceans of Fulgora![]() and the lava rivers of Vulcanus
and the lava rivers of Vulcanus![]() .
.
Elevated rails can be built using the rail planner. Pressing G will switch levels, and attempt to build a ramp up or down, if the player has one in their inventory. While holding SHIFT and targeting a section of rail on the opposite level, the rail planner will automatically place any ramps and/or supports necessary to reach that destination. A rail support must be placed every 16 straight tiles. Disassembling a support or ramp will automatically disassemble any rails which rely on that support.
Players and enemies cannot walk on elevated rail. A player can enter and exit the train if it is elevated as normal, and will be teleported to the ground. If the player attempts to exit while over water or lava, nothing will happen. Both types of rail signals can be placed on elevated rail, but not train stops.
Certain buildings are too tall to be placed underneath elevated rails:
- Big electric pole
- Cargo landing pad
- Oil refinery
- Roboport
- Rocket silo
- Agricultural tower

- Cargo bay

- Lightning rod

- Lightning collector

Achievements

|
Getting on track Build a locomotive. |

|
Trans-Factorio express Have a train plan a path 1,000 tiles or longer. |

|
Watch your step Get killed by a moving locomotive. |

|
Getting on track like a pro Build a locomotive within the first 90 minutes of the game. |