![]()
![]()
![]()
![]()
Tutorial:Train signals
Rail signals are necessary to run a functioning rail system in Factorio. This tutorial explains why and how signals are used, how chain signals work, what deadlocks are and how they can be avoided. The aim is to enable the reader to keep a rail system running smoothly and fix common issues. Examples of frequent issues and use cases are shown.
This tutorial mostly uses rail systems with two parallel rails, one for each direction. For beginners, using this architecture is suggested instead of a single bidirectional rail line, which can lead to issues when more trains are added to the system.
It is recommended to place radars near intersections to help identify issues quickly. It is also recommended to set up automation for fueling trains as soon as possible whenever a new train or station is added to the system. Trains can either be fueled at one stop on their usual schedule (this may or may not involve transporting fuel to a station) or by adding a separate fuel station to the schedule. Finally, players should choose a maximum train length before designing a rail system.
Regular signals and blocks

Whenever there is more than one train on a track, there is the possibility that trains can crash into one another. To prevent this, we place signals along the track and at crossings. Signals split the tracks into different parts called blocks. The signals then ensure that only one train can be in each block. Any signal leading into an already occupied block will display the red color and trains that would enter will wait at the signal instead.
Rail blocks are shown with colors on the rails themselves when a player has a signal in hand. These colors are only for visualization of blocks and are not related to the color of the signal light. The picture shows the block visualization in an example, there are a total of eleven blocks. Rail signals and chain signals break up blocks, train stops do not.

A regular signal is green when there is no train on the block behind it. When a train enters the block, all signals going into the block will turn red. When a train is in the process of entering the block, the signal turns yellow shortly before turning red to inform that the block is reserved for the incoming train even though there is no train inside it.
Signals are placed on the right side of the track and trains are only allowed to go past signals that are on the right hand side from direction of travel. To allow trains to go in both directions one either runs two rail lines in parallel or puts signals on both sides of the track. A train in automatic mode will not drive through a track if it would pass a signal on the left side unless there is also a signal on the right side at that signal. This can sometimes cause a "no path" error where the track appears to be connected, but part of the connection is a one way track.

In the image, the tracks are from top to bottom:
- left to right,
- right to left,
- bidirectional,
- bidirectional,
- bidirectional on the left side, splitting into a right to left (upper) and a left to right track (lower).
Chain signals
If a train waits on an intersection, other trains have to wait for it, even trains that are not going in the same direction. These trains may in turn cause other trains to wait, resulting in a slowdown of the entire system. Traffic systems should avoid having trains waiting on crossings and in Factorio, Rail chain signals are used to ensure that this cannot happen.

If a block is guarded by a chain signal instead of a rail signal, the train will only enter if it can enter the next block as well. So a train cannot wait for an extended period of time in a block after a chain signal, whereas it can wait in a block after a regular signal. Since trains should not wait on crossings, there is a well known rule: Use chain signals in and before crossings and use regular signals at the exits of crossings. In general, whenever a waiting train would block another train that is going on a different track, a chain signal should be used to prevent the train from waiting.

If there are multiple chain signals in a row, a train will only enter if its path is clear all the way into a block behind a regular signal (or up to its destination station, whichever comes first). If the train goes past the first chain signal, it will reserve all blocks on the path and not allow other trains to pass through a block until it leaves the block. A chain signal which leads to a block that has only one outgoing signal will always have the same color as that signal. If a rail line splits up, it can happen that one outgoing signal is red and another is green. In that case the chain signal leading into the block will turn blue and trains are allowed in only if their path doesn't take them into an occupied block. A driver in a train wouldn't know from seeing the blue signal wether they have to wait or not, but the game magically makes it work anyways.

Splitting rail blocks and increasing throughput
If an intersection is one single block with chain signals at the entrances and rail signals at the exits, then there cannot be multiple trains on the intersection on the same time. The intersection will work, but one can break up the intersection into more blocks with signals to allow multiple trains to go through simultaneously. Long straight tracks can also be broken up with signals to allow multiple trains on them, to also increase throughput.
If the rail network contains many chain signals it is possible that a very large number of blocks is reserved when a train drives by a chain signal. This would restrict other trains, reducing throughput in general. It is suggested to use regular signals whenever possible and chain signals only where they are necessary.
Deadlocks
Using signals can lead to trains waiting for other trains. It may occur that there is a chain of trains, each waiting for the next, with the last waiting for the first. This situation is called a deadlock, because the trains will wait forever or until the situation is resolved manually. It should be avoided and resolved as soon as possible because every train going through the area will get stuck. The most frequent causes of deadlocks are
- trains waiting on intersections and
- a rail network that does not allow enough space for trains.

The image above shows a deadlock caused by missing chain signals since only regular rail signals were used. As a result trains can wait on a crossing which leads to a deadlock. A corrected version of this intersection can be found above. The eight signals before and on the intersection should be replaced by chain signals, the ones leading out of the intersection can stay as they are. As stated above, in general chain signals should be used before and on intersections.

The deadlock in the image happened because there is a circle in the network which was used by more trains than can fit into the circle. The signals are correct; to fix the deadlock the circle must be removed or less trains need to be routed through this area.

This deadlock also happened because there were too many trains in a too small circle. It shows that a deadlock can happen with as few as two trains. In this case the deadlock could have been avoided by replacing the marked signal with a chain signal, because it would ensure that only one train can enter the offending circle. However this could lead to trains waiting on the main line, which would block other traffic. The station can only have one incoming train without causing issues, so it should have its train limit set to 1 or only one train should be routed to it. An alternative is creating a waiting area for trains heading to the station, see further below.
Train length and signal spacing

The image shows a deadlock between two T-junctions. It happened because while a train was waiting at the intersection, its tail end was still in the last intersection. The junctions when taken individually are signaled correctly, however, given the length of trains using them, they are too close to each other. One might argue that they form a single big intersection. Here are three ways to fix this: the regular signals between the two junctions could be turned into chain signals, or the junctions could be moved further away from each other, or all trains could be shortened.
After an exit signal of a junction, the next signal must be at least far enough away to fit the longest train in the rail system between the signals. In general, after every regular signal there should be at least that much space.
It is recommended that you choose a maximum train length before designing your rail system, and stick to it. Then rail signal blocks can be spaced according to the maximum length.
Examples
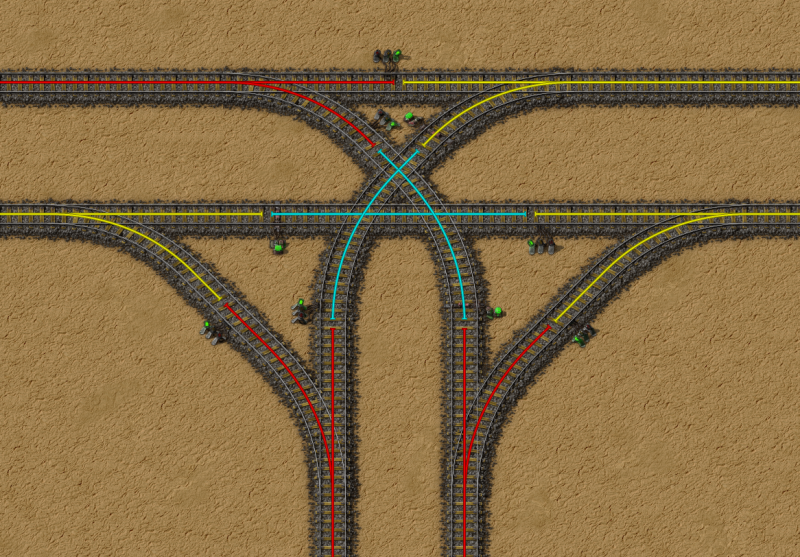
T-Junction
The image shows a basic three way junction. Signals have been placed inside the junction to ensure that more than one train can enter the junction in some cases. For example for one train going left to right and one going right to left, the trains will pass through different blocks: the first will go through the left yellow, the blue and the lower right yellow block; the second will use the upper yellow and upper red blocks. Because they use different blocks, they can use the junction simultaneously. While this is not strictly necessary for a junction to work, it will allow better throughput at a low cost.
-
 Copy blueprint string

Waiting area
If multiple trains use the same station, the trains will wait on the main rail line which leads to a traffic jam in the network and can cause deadlocks. One way to avoid this is to add waiting areas for trains at each station.

The image shows a shared waiting area for two stations. The signals leading into the waiting areas are regular signals because this is where trains are expected to wait for an extended time. The signals leading out of the waiting areas are chain signals because the track from the waiting areas to the stations should not be blocked. The stations are also in different blocks to make sure that all stations can be used simultaneously.
There are two ways to design waiting areas, parallel (as above) and sequential. The parallel version is easily extendable, takes less space and multiple stations can share a parallel waiting area. The sequential version as shown below is easier to set up but cannot be shared by multiple stations. Waiting areas are often referred to as stackers.
