Inserters: Difference between revisions
add inserter max transportation |
m style fixes for Insertion into lava/space |
||
| (131 intermediate revisions by 30 users not shown) | |||
| Line 1: | Line 1: | ||
{{Languages}} | {{Languages}} | ||
''For the common yellow electrical inserter, see [[Inserter]].'' | ''For the common yellow electrical inserter, see [[Inserter]].'' | ||
'''Inserters''' are devices which are used to move items over short distances. When placed, they have a fixed direction. They can move items from behind and place them in front of them. By doing this, they can move items from one transport belt to another, but also extract items | '''Inserters''' are devices which are used to move items over short distances. When placed, they have a fixed direction. They can move items from behind and place them in front of them. By doing this, they can move items from one transport belt to another, but also extract items from—and insert items into—machines or storage devices. | ||
== Types of inserters == | |||
{| class="wikitable" | {| class="wikitable" | ||
| {{ | | {{Imagelink|Burner inserter}} || The only [[fuel]]-powered inserter, with the slowest speed. | ||
|- | |- | ||
| {{ | | {{Imagelink|Inserter}} || The standard electrical inserter. | ||
|- | |- | ||
| {{ | | {{Imagelink|Long-handed inserter}} || Capable of inserting and removing items from a greater distance. | ||
|- | |- | ||
| {{ | | {{Imagelink|Fast inserter}} || Much faster than the inserter. | ||
|- | |- | ||
| {{ | | {{Imagelink|Bulk inserter}} || As fast as the fast inserter, but can move many more items at the same time at once. | ||
|- | |- | ||
| {{Imagelink|Stack inserter|space-age=yes}} || As fast as the bulk inserter, but can stack items on a belt. | |||
|} | |} | ||
==Mechanics== | == Mechanics == | ||
Inserters '''will''': | Inserters '''will''': | ||
* | * Pick up items off the ground, off of a [[Transport belts|transport belt]], or from any object that has storage space, such as [[chests]], [[furnace]]s, [[assembling machine]]s, or [[vehicle]]s. | ||
* | * Place the item onto the ground, onto a transport belt, or into any object that has storage space. | ||
* | * Run at slower speeds when starved for energy. | ||
* | * Pick up as many items as their [[inserter capacity bonus (research)|stack size]] allows at once, if they do not have to wait too long to pick them up. | ||
* Pick up items and drop them into the void of space or lava, permanently destroying them. This is useful for getting rid of unwanted items. | |||
Inserters | Inserters '''will not''': | ||
* Pick up any items that | * Pick up any items that cannot be inserted into the adjacent entity. | ||
* Pick up items into an entity with a full inventory. | * Pick up any items if the adjacent entity is a [[ghost]]. | ||
* Pick up items to place into an entity with a full inventory (however, it will pick up items up to its hand size even if not all of them will fit). | |||
* Place more than one item at a time onto the same ground tile. | * Place more than one item at a time onto the same ground tile. | ||
* Place items into | * Place items into an entity that cannot hold them, for example due to [[Stack#Filtered_stacks|filtered]] or [[Stack#Stack_limitation|limited slots]]. | ||
* Place items into a [[cargo wagon]] or fuel into a [[locomotive]] if the train it's part of is in motion, or in automatic mode and not stopped at a [[train stop]] (e.g. waiting at a signal). (Wagons will be visibly closed if they cannot be inserted into for this reason.) | |||
* Fill up the entire target inventory of [[boiler]]s, [[nuclear reactor]]s, [[:Category:Producers|production building]]s, [[furnace]]s and [[turret]]s (see below). | |||
If two or more inserters are picking up from the same tile, the inserter that can grab the items the fastest will grab them first. Besides faster inserters, this favors inserters taking from the inner lane of a transport belt. | |||
This | === Insertion limits === | ||
Depending on where an inserter is moving items, it does not always fill up the entire target inventory. This allows other inserters taking from the same transport belt to pick up their share of the items. For example, if a boiler has 5 or more items of fuel in it, an inserter will not insert additional fuel. This allows the other fuel to travel further down the transport belt. When the fuel drops below 5 items, the inserter will resume inserting fuel, up to the limit of 5 items. | |||
{| class="wikitable" | {| class="wikitable" | ||
! Entity !! Item type !! | ! Entity !! Item type !! Automatic insertion limit | ||
|- | |- | ||
| [[Boiler]]s, [[ | | [[Boiler]]s, [[burner inserter]]s, [[furnace]]s, and [[nuclear reactor]]s || [[Fuel]] || style="text-align:center" | 5 | ||
|- | |- | ||
| [[Gun turret]]s || | | [[Gun turret]]s || Magazines || style="text-align:center" | 10 | ||
|- | |- | ||
| [[ | | [[Artillery turret]]s || [[Artillery shell]]s || style="text-align:center" | 5 | ||
|- | |- | ||
| [[ | | [[Assembling machine]]s, [[furnace]]s, [[centrifuge]]s, [[chemical plant]]s, and [[Oil refinery|oil refineries]]|| Items needed for the recipe || The ingredients for 1 craft in addition to the ingredients for the number of crafts that can be completed (rounded up) during one full normal [[quality]] standard [[inserter]] swing (1.166 seconds); but at least the ingredients for 2 crafts and at most the ingredients for 100 crafts.[https://forums.factorio.com/viewtopic.php?p=309796#p309796] | ||
|- | |- | ||
| [[Lab]]s || [[Science pack]]s || | | [[Lab]]s || [[Science pack]]s || The number of normal quality science packs needed for one research unit in addition to the science packs for the number of research units that can be completed (rounded up) during one full normal quality standard inserter swing (1.166 seconds); but at least the ingredients for 2 research units and at most the ingredients for 100 research units. | ||
|} | |} | ||
An inserter that | An inserter that has a higher [[inserter capacity bonus (research)|inserter capacity bonus]] than 1 can overfill the target building, due to the inserter picking up a higher amount of items than needed. Overfilling can also occur if multiple inserters are used to insert items into one building. | ||
=== Inserters and transport belts === | |||
[[Transport belts]] have two lanes on which items can travel. Inserters only place items onto one side of the belt, either the far side from the inserter's perspective or, if the belt is going the same or the opposite direction as the inserter, the right side from the belt's perspective. | |||
<gallery mode="nolines" class="center" widths=300px heights=350px> | |||
File:Inserter_dropoff_locations.gif| Inserters place the item on the furthest lane. If a belt is in the same orientation as the inserter, the item will be placed on the right-hand lane, from the belt's perspective. In curves the inserter always places on the far side. | |||
File:Inserter_pickup_locations.gif| If the belt is perpendicular to the inserter, inserters '''prefer''' taking items from the nearest lane. If the nearest lane is empty, the inserter will take from the far lane. If the belt is the same/opposite orientation of the inserter or a curve, the inserter '''prefers''' taking from the left lane, from the belt's perspective. If the left lane is empty it will take from the right lane. | |||
</gallery> | |||
== Potential | === Potential issues === | ||
Inserters may have problems picking up items: | Inserters may have problems picking up items: | ||
| Line 86: | Line 72: | ||
* From turning belts if the item is on the inside of the corner | * From turning belts if the item is on the inside of the corner | ||
==Inserter | == Inserter speed == | ||
[[File:all_inserter_speeds.gif|frame|right|Animation showing all inserter speeds at once.]] | |||
{| class="wikitable" | {| class="wikitable" | ||
! Type | ! Type | ||
! Rotation-speed (turns per [[ | ! Rotation-speed (turns per [[Time#Ticks|tick]])<br/>Extension-speed ([[Map_structure#Tile|Tiles]] per Tick) | ||
! Turns per [[Game-second]] | ! Turns per [[Time#Seconds|Game-second]] | ||
! Game-second per full turn | ! Game-second per full turn | ||
! Ticks per full turn | ! Ticks per full turn | ||
|- align="center" | |- align="center" | ||
| align="left"| {{ | | align="left"| {{Imagelink|Burner inserter}} || 0.013<br/>0.035 || ~0.7895 || ~1.267 || 76 | ||
|- align="center" | |- align="center" | ||
| align="left"| {{ | | align="left"| {{Imagelink|Inserter}} || 0.014<br/>0.035 || ~0.857 || ~1.167 || 70 | ||
|- align="center" | |- align="center" | ||
| align="left"| {{ | | align="left"| {{Imagelink|Long-handed inserter}} || 0.02<br/>0.05 || 1.2 || 0.833 || 50 | ||
|- align="center" | |- align="center" | ||
| align="left"| {{ | | align="left"| {{Imagelink|Fast inserter}}<br/>{{Imagelink|Bulk inserter}}<br/>{{Imagelink|Stack inserter|space-age=yes}} || 0.04<br/>0.1 || 2.5 || 0.4 || 24 | ||
|} | |} | ||
===Rotation | '''Note:''' The speeds per tick come directly from the [https://github.com/wube/factorio-data/tree/master/base/prototypes/entity factorio-data github repository], while the other values have been verified empirically in game. Discrepancies are due to rounding errors during the games runtime, so the empirical values are more accurate when dealing with speeds. | ||
=== Rotation speed === | |||
Convention: 2π rad = 100% of a circle rotation = '''1 turn''' (or one full rotation). | Convention: 2π rad = 100% of a circle rotation = '''1 turn''' (or one full rotation). | ||
Note: | Note: | ||
* An Inserter doesn't always need to make full turns. When grabbing from a transport belt, it is slightly faster when grabbing items from the closest lane. | |||
* If the rotation speed of an inserter would result in an odd number of ticks per full turn, the actual number of ticks per full turn for this inserter is truncated to be the next lowest even number. The reason for this is that the inserter needs to do two half turns to pick and drop an item. This takes a certain number of ticks two times, therefore the number of ticks for the full turn is always an even number. Example: The Fast inserter's rotation speed of 864°/s or 0.04 turns per tick would result in 25 ticks per full turn, but the inserter cannot do a half turn in "12.5 ticks", so it actually takes 2×12 = 24 ticks per full turn. | |||
The | |||
=== Extension speed === | |||
The extension-speed is normally not visible (only when compared to other inserters), but there are measurable speed differences when taking - for example - from the near or the far side of a belt. Also some mods can alter the pickup and drop locations of inserters, making this stat more relevant. | |||
== Inserter throughput == | |||
=== Chest to chest === | |||
'''Note:''' Experimental data from 2.0.26, recorded in this doc [https://docs.google.com/spreadsheets/d/1L8Td5o6TAicGi-TPwzh4lz2YiH0n7Jkpp3E8FxNpnAs/edit?usp=sharing]. Chest to chest transfer transfers the entire hand size during a single tick, so most of the time is spent during the swing to and from. | |||
'''Note:''' [https:// | |||
{| class="wikitable" | {| class="wikitable" | ||
! rowspan=2 | Type | ! rowspan=2 | Type | ||
! rowspan=2 | Arm cycles per second | ! rowspan=2 | Arm cycles per second (ticks per cycle) | ||
! colspan= | ! colspan=8 | Items/second at [[inserter capacity bonus (research)|capacity bonus]] level (stack size) | ||
|- | |- | ||
! colspan=2 | No capacity bonus | ! colspan=2 | No capacity bonus | ||
! colspan=2 | Capacity bonus 2 | ! colspan=2 | Capacity bonus 2 | ||
! colspan=2 | Capacity bonus 7 | ! colspan=2 | Capacity bonus 7 | ||
! colspan=2 | [[Transport belt capacity (research)|Transport belt stacking]] {{SA}} | |||
|- align="center" | |||
| align="left"| {{Imagelink|Burner inserter}} || {{Quality | 0.79 (76 ticks) | 1.03 (58 ticks) | 1.25 (48 ticks) | 1.5 (40 ticks) | 2 (30 ticks) }} | |||
|| {{ Quality | 0.79 |1.03 |1.25|1.5 |2 }} | |||
|| (1) | |||
|| {{ Quality | 1.58 |2.07 |2.5|3 |4 }} | |||
|| (2) | |||
|| {{ Quality | 2.37 |3.10 |3.75|4.5 |6 }} | |||
|| (3) | |||
|| {{ Quality | 3.16 |4.14 |5|6 |8 }} | |||
|| (4) | |||
|- align="center" | |- align="center" | ||
| align="left"| {{ | | align="left"| {{Imagelink|Inserter}} || {{Quality | 0.86 (70 ticks) | 1.03 (58 ticks) | 1.36 (44 ticks) | 1.67 (36 ticks) | 2.14 (28 ticks) }} | ||
|| {{ Quality | 0.86 |1.11 |1.36|1.67 |2.14 }} | |||
|| (1) | |||
|| {{ Quality | 1.71 |2.22 |2.73|3.33 |4.29 }} | |||
|| (2) | |||
|| {{ Quality | 2.57 |3.33 |4.09|5 |6.43 }} | |||
|| (3) | |||
|| {{ Quality | 3.43 |4.44 |5.45|6.67 |8.57 }} | |||
|| (4) | |||
|- align="center" | |- align="center" | ||
| align="left"| {{ | | align="left"| {{Imagelink|Long-handed inserter}} || {{Quality | 1.2 (50 ticks) | 1.58 (38 ticks) | 2 (30 ticks) | 2.31 (26 ticks) | 3.33 (18 ticks) }} | ||
|| {{ Quality | 1.2 |1.58 |2|2.31 |3.33 }} | |||
|| (1) | |||
|| {{ Quality | 2.4 |3.16 |4|4.62 |6.67 }} | |||
|| (2) | |||
|| {{ Quality | 3.6 |4.74 |6|6.92 |10 }} | |||
|| (3) | |||
|| {{ Quality | 4.8 |6.32 |8|9.23 |13.33 }} | |||
|| (4) | |||
|- align="center" | |- align="center" | ||
| align="left"| {{ | | align="left"| {{Imagelink|Fast inserter}} || {{Quality | 2.5 (24 ticks) | 3.33 (18 ticks) | 4.29 (14 ticks) | 5 (12 ticks) | 7.5 (8 ticks) }} | ||
|| {{ Quality | 2.5 |3.33 | 4.29 | 5 | 7.5 }} | |||
|| (1) | |||
|| {{ Quality | 5 |6.67 | 8.57 | 10 | 15 }} | |||
|| (2) | |||
|| {{ Quality | 7.5 |10 |12.86|15 |22.5 }} | |||
|| (3) | |||
|| {{ Quality | 10 |13.33 |17.14|20 |30 }} | |||
|| (4) | |||
|- align="center" | |- align="center" | ||
| align="left"| {{ | | align="left"| {{Imagelink|Bulk inserter}} || {{Quality | 2.5 (24 ticks) | 3.33 (18 ticks) | 4.29 (14 ticks) | 5 (12 ticks) | 7.5 (8 ticks) }} | ||
|| {{ Quality | 5 |6.673 | 8.57 | 10 | 15 }} | |||
|| (2) | |||
|| {{ Quality | 10 |13.33 |17.14|20 |30 }} | |||
|| (4) | |||
|| {{ Quality | 30 |40 |51.43|60 |90 }} | |||
|| (12) | |||
|| {{ Quality | 30 |40 |51.43|60 |90 }} | |||
|| (12) | |||
|- align="center" | |- align="center" | ||
| align="left"| {{ | | align="left"| {{Imagelink|Stack inserter|space-age=yes}} || {{Quality | 2.5 (24 ticks) | 3.33 (18 ticks) | 4.29 (14 ticks) | 5 (12 ticks) | 7.5 (8 ticks) }} | ||
| | || {{ Quality | 15 |20 | 25.71 | 30 | 45 }} | ||
|| (6) | |||
|| {{ Quality | 20 |26.67 | 34.29 | 40 | 60 }} | |||
|| (8) | |||
|| {{ Quality | 40 | 53.33 | 68.57 | 80 | 120 }} | |||
|| (16) | |||
|| {{ Quality | 40 | 53.33 | 68.57 | 80 | 120 }} | |||
|| (16) | |||
|} | |} | ||
===Chest to belt=== | === Chest to belt === | ||
Throughput going from chest to belt depends on how full the belt is. An inserter will not put down an item on a belt that has items back-to-back (aka full compression) - it waits until there is a gap. However, if the gap is narrower than the item, then the items upstream on the belt will stop to make room for the item being inserted. The direction of the belt compared to the inserter does not matter however. | |||
In these measurements inserters move items onto an empty belt. Values are given for the stack sizes at four different [[inserter capacity bonus (research)|capacity bonus]] levels. | |||
'''Note:''' Experimental data from 2.0 | |||
{| class="wikitable" | <div style="display:inline-block; width: 100%; overflow-x: auto; vertical-align:top; margin-right:20px;"> | ||
! rowspan=3 | Type | {|class="wikitable" min-width: 100%; | ||
! colspan= | ! rowspan="3" | Type | ||
! colspan="20" | Items/second at [[inserter capacity bonus (research)|capacity bonus]] level (stack size) | |||
|- | |||
! colspan="5" | No capacity bonus | |||
! colspan="5" | Capacity Bonus 2 | |||
! colspan="5" | Capacity bonus 7 | |||
! colspan="5" | [[Transport belt capacity (research)|Transport belt stacking]] {{SA}} | |||
|- | |||
! [[File:Transport belt.png|link=Transport belt|32px]] || [[File:Fast transport belt.png|link=Fast transport belt|32px ]] || [[File:Express transport belt.png|link=Express transport belt|32px]] || [[File:Turbo transport belt.png|link=Turbo transport belt|32px]] || | |||
! [[File:Transport belt.png|link=Transport belt|32px]] || [[File:Fast transport belt.png|link=Fast transport belt|32px ]] || [[File:Express transport belt.png|link=Express transport belt|32px]] || [[File:Turbo transport belt.png|link=Turbo transport belt|32px]] || | |||
! [[File:Transport belt.png|link=Transport belt|32px]] || [[File:Fast transport belt.png|link=Fast transport belt|32px ]] || [[File:Express transport belt.png|link=Express transport belt|32px]] || [[File:Turbo transport belt.png|link=Turbo transport belt|32px]] || | |||
! [[File:Transport belt.png|link=Transport belt|32px]] || [[File:Fast transport belt.png|link=Fast transport belt|32px ]] || [[File:Express transport belt.png|link=Express transport belt|32px]] || [[File:Turbo transport belt.png|link=Turbo transport belt|32px]] || | |||
|- | |||
| align="left"| {{Imagelink|Burner inserter}} | |||
|| {{ Quality | 0.78 | 1.03 | 1.25 | 1.5 | 2 }} | |||
|| {{ Quality | 0.78 | 1.03 | 1.25 | 1.5 | 2 }} | |||
|| {{ Quality | 0.78 | 1.03 | 1.25 | 1.5 | 2 }} | |||
|| {{ Quality | 0.78 | 1.03 | 1.25 | 1.5 | 2 }} | |||
|| (1) | |||
|| {{ Quality | 1.57 | 2.03 | 2.43 | 2.93 | 3.87 }} | |||
|| {{ Quality | 1.57 | 2.03 | 2.43 | 2.93 | 3.87 }} | |||
|| {{ Quality | 1.57 | 2.03 | 2.43 | 2.93 | 3.87 }} | |||
|| {{ Quality | 1.57 | 2.03 | 2.43 | 2.93 | 3.87 }} | |||
|| (2) | |||
|| {{ Quality | 2.15 | 2.72 | 3.2 | 3.75 | 4.75 }} | |||
|| {{ Quality | 2.25 | 2.9 | 3.45 | 4.1 | 5.3 }} | |||
|| {{ Quality | 2.3 | 3 | 3.6 | 4.3 | 5.6 }} | |||
|| {{ Quality | 2.3 | 3 | 3.6 | 4.3 | 5.6 }} | |||
|| (3) | |||
|| {{ Quality | 2.6 | 3.27 | 3.73 | 4.27 | 5.2 }} | |||
|| {{ Quality | 2.87 | 3.65 | 4.27 | 5 | 6.33 }} | |||
|| {{ Quality | 2.93 | 3.8 | 4.53 | 5.33 | 6.87 }} | |||
|| {{ Quality | 3 | 3.87 | 4.6 | 5.47 | 7.07 }} | |||
|| (4) | |||
|- | |||
| align="left"| {{Imagelink|Inserter}} | |||
|| {{ Quality | 0.85 | 1.12 | 1.37 | 1.67 | 2.13 }} | |||
|| {{ Quality | 0.85 | 1.12 | 1.37 | 1.67 | 2.13 }} | |||
|| {{ Quality | 0.85 | 1.12 | 1.37 | 1.67 | 2.13 }} | |||
|| {{ Quality | 0.85 | 1.12 | 1.37 | 1.67 | 2.13 }} | |||
|| (1) | |||
|| {{ Quality | 1.7 | 2.17 | 2.67 | 3.23 | 4.13 }} | |||
|| {{ Quality | 1.7 | 2.17 | 2.67 | 3.23 | 4.13 }} | |||
|| {{ Quality | 1.7 | 2.17 | 2.67 | 3.23 | 4.13 }} | |||
|| {{ Quality | 1.7 | 2.17 | 2.67 | 3.23 | 4.13 }} | |||
|| (2) | |||
|| {{ Quality | 2.3 | 2.9 | 3.45 | 4.1 | 5 }} | |||
|| {{ Quality | 2.45 | 3.1 | 3.75 | 4.5 | 5.6 }} | |||
|| {{ Quality | 2.5 | 3.2 | 3.9 | 4.75 | 6 }} | |||
|| {{ Quality | 2.5 | 3.2 | 3.9 | 4.75 | 6 }} | |||
|| (3) | |||
|| {{ Quality | 2.8 | 3.43 | 4 | 4.6 | 5.47 }} | |||
|| {{ Quality | 3.07 | 3.87 | 4.6 | 5.47 | 6.67 }} | |||
|| {{ Quality | 3.2 | 4.07 | 4.87 | 5.87 | 7.27 }} | |||
|| {{ Quality | 3.27 | 4.13 | 5 | 6 | 7.48 }} | |||
|| (4) | |||
|- | |||
| align="left"| {{Imagelink|Long-handed inserter}} | |||
|| {{ Quality | 1.2 | 1.58 | 2 | 2.3 | 3.33 }} | |||
|| {{ Quality | 1.2 | 1.58 | 2 | 2.3 | 3.33 }} | |||
|| {{ Quality | 1.2 | 1.58 | 2 | 2.3 | 3.33 }} | |||
|| {{ Quality | 1.2 | 1.58 | 2 | 2.3 | 3.33 }} | |||
|| (1) | |||
|| {{ Quality | 2.33 | 3 | 3.87 | 4.43 | 6.3 }} | |||
|| {{ Quality | 2.33 | 3 | 3.87 | 4.43 | 6.3 }} | |||
|| {{ Quality | 2.33 | 3 | 3.87 | 4.43 | 6.3 }} | |||
|| {{ Quality | 2.33 | 3 | 3.87 | 4.43 | 6.3 }} | |||
|| (2) | |||
|| {{ Quality | 3.1 | 3.9 | 4.75 | 5.3 | 6.92 }} | |||
|| {{ Quality | 3.35 | 4.3 | 5.3 | 6 | 8.18 }} | |||
|| {{ Quality | 3.45 | 4.5 | 5.6 | 6.4 | 9 }} | |||
|| {{ Quality | 3.45 | 4.5 | 5.6 | 6.4 | 9 }} | |||
|| (3) | |||
|| {{ Quality | 3.65 | 4.45 | 5.20 | 5.72 | 7.07 }} | |||
|| {{ Quality | 4.13 | 5.2 | 6.33 | 7.07 | 9.23 }} | |||
|| {{ Quality | 4.33 | 5.6 | 6.87 | 7.73 | 10.43 }} | |||
|| {{ Quality | 4.47 | 5.73 | 7.07 | 8 | 10.92 }} | |||
|| (4) | |||
|- | |- | ||
| align="left"| {{Imagelink|Fast inserter}} | |||
|| {{ Quality | 2.5 | 3.33 | 4.28 | 5 | 7.5 }} | |||
|| {{ Quality | 2.5 | 3.33 | 4.28 | 5 | 7.5 }} | |||
|| {{ Quality | 2.5 | 3.33 | 4.28 | 5 | 7.5 }} | |||
|| {{ Quality | 2.5 | 3.33 | 4.28 | 5 | 7.5 }} | |||
|| (1) | |||
|| {{ Quality | 4.8 | 6.3 | 7.5 | 7.5 | 7.52 }} | |||
|| {{ Quality | 4.8 | 6.3 | 8 | 9.23 | 13.33 }} | |||
|| {{ Quality | 4.8 | 6.3 | 8 | 9.23 | 13.33 }} | |||
|| {{ Quality | 4.8 | 6.3 | 8 | 9.23 | 13.33 }} | |||
|| (2) | |||
|| {{ Quality | 5.62 | 6.92 | 7.5 | 7.5 | 7.52 }} | |||
|| {{ Quality | 6.42 | 8.18 | 10 | 11.25 | 15 }} | |||
|| {{ Quality | 6.9 | 9 | 11.25 | 12.85 | 18 }} | |||
|| {{ Quality | 6.9 | 9 | 11.25 | 12.85 | 18 }} | |||
|| (3) | |||
|| {{ Quality | 6 | 7.07 | 7.5 | 7.52 | 7.52 }} | |||
|| {{ Quality | 7.5 | 9.23 | 10.92 | 12 | 15 }} | |||
|| {{ Quality | 8.27 | 10.43 | 12.62 | 14.13 | 18.47 }} | |||
|| {{ Quality | 8.58 | 10.92 | 13.33 | 15 | 20 }} | |||
|| (4) | |||
|- | |- | ||
| align="left"| {{Imagelink|Bulk inserter}} | |||
|| {{ Quality | 4.8 | 6.3 | 7.5 | 7.5 | 7.52 }} | |||
|| {{ Quality | 4.8 | 6.3 | 8 | 9.23 | 13.33 }} | |||
| | || {{ Quality | 4.8 | 6.3 | 8 | 9.23 | 13.33 }} | ||
|| {{ Quality | 4.8 | 6.3 | 8 | 9.23 | 13.33 }} | |||
| | || (2) | ||
|| {{ Quality | 6 | 7.07 | 7.5 | 7.52 | 7.52 }} | |||
| | || {{ Quality | 7.5 | 9.23 | 10.92 | 12 | 15 }} | ||
|| {{ Quality | 8.27 | 10.43 | 12.62 | 14.13 | 18.47 }} | |||
|| {{ Quality | 8.58 | 10.92 | 13.33 | 15 | 20 }} | |||
| | || (4) | ||
| | || {{ Quality | 6.93 | 7.35 | 7.5 | 7.52 | 7.52 }} | ||
|| {{ Quality | 11.23 | 12.4 | 13.33 | 13.85 | 15 }} | |||
|| {{ Quality | 14.4 | 16.38 | 18 | 18.95 | 21.18 }} | |||
|| {{ Quality | 16.4 | 18.97 | 21.2 | 22.5 | 25.72 }} | |||
|| (12) | |||
|| {{ Quality | 6.93 | 7.35 | 7.5 | 7.52 | 7.52 }} | |||
|| {{ Quality | 11.12 | 12.4 | 13.33 | 13.85 | 15 }} | |||
|| {{ Quality | 14.4 | 16.38 | 18 | 18.95 | 21.18 }} | |||
|| {{ Quality | 16.4 | 18.97 | 21.2 | 22.5 | 25.72 }} | |||
|| (12) | |||
|- | |- | ||
| align="left"| {{Imagelink|Stack inserter|space-age=yes}} | |||
|| {{ Quality | 11.27 | 13.87 | 15 | 15 | 15.03 }} | |||
|| {{ Quality | 12.87 | 16.37 | 20 | 22.5 | 30 }} | |||
|| {{ Quality | 13.8 | 18 | 22.5 | 25.7 | 36 }} | |||
|| {{ Quality | 13.8 | 18 | 22.5 | 25.7 | 36 }} | |||
|| (6) | |||
|| {{ Quality | 12 | 14.13 | 15 | 15.03 | 15.03 }} | |||
|| {{ Quality | 15 | 18.47 | 21.83 | 24 | 30 }} | |||
|| {{ Quality | 16.53 | 20.87 | 25.23 | 28.27 | 36.93 }} | |||
|| {{ Quality | 17.17 | 21.83 | 26.67 | 30 | 40 }} | |||
|| (8) | |||
|| {{ Quality | 13.33 | 14.57 | 15 | 15.03 | 15.03 }} | |||
|| {{ Quality | 20 | 22.87 | 25.27 | 26.67 | 30 }} | |||
|| {{ Quality | 24 | 28.27 | 32 | 34.3 | 40 }} | |||
|| {{ Quality | 26.67 | 32 | 36.9 | 40 | 48 }} | |||
|| (16) | |||
|| {{ Quality | 24 | 28.27 | 30 | 30.07 | 30.07 }} | |||
|| {{ Quality | 30 | 36.93 | 43.67 | 48 | 60 }} | |||
|| {{ Quality | 33.07 | 41.73 | 50.47 | 56.53 | 73.87 }} | |||
|| {{ Quality | 34.33 | 43.67 | 53.33 | 60 | 80 }} | |||
|| (16) | |||
|} | |} | ||
</div> | |||
=== Chest to splitter === | |||
When an inserter drops items onto the side of a perpendicular splitter, it always is considered to do so on the input side, enabling the splitter to move half of the items to the other belt (assuming that the splitter filter/priority settings allow it to do so and that there is available space on both belts). This allows the inserter to drop its items more quickly. A bulk inserter with capacity bonus 7 can move 16.0 items/second instead of the usual 14.4 items/second. | |||
<gallery mode="nolines" class="center" widths=400px heights=250px> | |||
File:Inserter to splitter comparison.gif|By inserting onto the side of a splitter, a fully-upgraded bulk inserter can fill 71% of an express belt lane instead of the usual 64%. (Gif from 1.1) | |||
File:Inserter belt saturation.gif|In 1.1, three bulk inserters could saturate an express belt if one of them inserts onto a splitter. In 2.0, three bulk inserters can saturate an express belt if two of them insert onto splitters. (Gif from 1.1) | |||
</gallery> | |||
===Belt to chest (perpendicular)=== | |||
'''Note:''' The following is based on experimental data from [https://docs.google.com/spreadsheets/d/1Q4hxL69qrK3qeEKU8aDkuwM3gJy6I2dJ4FYSs-FQUpI/edit?usp=sharing 1.1]. | |||
Most of the 1.1 experimental data was gathered using the following circuit blueprint to measure the exact tick difference between inserter swings. A lot of the data on this page (specifically the belt to chest data) relies heavily on the conditions of the setup on which the measurements are done. If your setup differs from the ones tested on this page, you can use the following blueprint to do the measurements yourself. | |||
== | {{BlueprintString|bp-string=0eNrtXF1v4kYU/SuRq75UkMz32GhbKY996FvfuivkwBCsBYNss20U8d87NiHAwMVzHdjsKKtIURzb1zPn3K85Y3iOHmYrsyyyvIoGz9HYlKMiW1bZIo8G0V8mLVeFKW+yvDRFZYqbalosVo/T5aq6WeVj+49xNpmYwuTVzWiRj7P6xvL2c/45n1bVshzc3f2bfc1uJ+moWhTZ4na0mN/9+WKs/GX71/DvV7Of86gXZdZWGQ3+eY7K7DFPZ/XIqqelsUPKKjO3V+TpvD4qq3T0tb8dXbS2t9pR/RcN6LrXenNaZNV0bqps1LfDesjy1I5xzwZbf+lFdmZ2UmYzmubgaZiv5g/2aQPaYqoXLRdltsHyObIW+/pW9qIn+we3jxlnhRltzopeZKdcFYvZ8MFM02+ZvdvesjM73KFbn5hkRVkNj+b3LSuqlf3PDp/miv59PavS1DZqQxa1mm1KetFiaYr0he07e99iVVkSUJbX62bw+WYuzfBo/asw433QMnvE7ZVZMVplVXNI11/svQy4mEp7el3z6MDO0LCr94HdpKPpHvI4uvaZ+fSpAzWbpyPYkUfs9KLHwpi8hUa2o/Hk5VQBRHI0kfJHjp9frx4/1GWod3Ca8RYm2HH8neJFoHnhHzuvKUxea1g6BbtEw85+5jUPdtj5qNFgnlO4PMcEQKxCE0s/dp4T5xnjtIUJ6Zfn9Osot5M9zwrZsmLjbn2aiUk2qzvb070rBA6JGmurGuw+JVonXFEWtzSzkDV6YI3HgjLC2V5XizHGDowlhBCaaLqzxlHW+J41O0+uBY2ZeDUmUMbEwdCojmWSiD1rEmVNHnKQCE05FztrCmVN7VljVHAWJ/vGNMqYPhialDROmIjJq7UYZS0+sKY4lbFgUr1aS1DWkgNrzP5IHu9ZowRl7v7kVHfWNoHftZ89zCKJX5KIscmbfOxeiFJMM8Qh2BMs7PRnL+TBDtzsuLy1dTucAczVLvcyyrEZZWNTnOVNvLDWlNQ93tRp3l5Mvo20NH+qpln+uMk221gh9cF8mRbNQAfRHx0IqSFvjC6fhk0eG06KxXyY5dZKNJiks9JAbJ1mhZ/XSNgRaRC9nms/iha12MfuVeOWXjVpiSPPMkTRqpfY71XbA+tSvLxEwBEzfXrIzG9dowsXPwTMaqfC6ehqh0zlSRaHFOojlnT7mmL7xPlibIaLyXAPxT0lrjDpeDhNN5hXdkAWmapYmd0VzcnmstpS46rdgQSnvhOPynk6m/Vn6Xx5Yi0Vb+dNt/P2G4cg0IN38sncjLPVvG9m1mJho2S5mJlzQyDgENo1uKYK2ieb7HH6sFg1Sz/Ge5x+OTVG5QeOPgIHdIrXWO0QquR8/fsUoUKNnY8dGkPEaT9Q1PcBhV4UFJpAs46RrkCuOmt22Vkrh3wBNosJkvzrwsAvC4N2YYCkX0b8YJBBJgaIfEb9Zi261goNPZgh4b6u14nLwk1cr4P23xjHlkzRqWTy8y2yaK+otrjz5FRFZZ7tBg8xcOT5ispAXqUfKCzEisrAoFZIVwipojLhkC+hPphpJPkhVVQmXRigdQjz7K9oiImBg+R7tlOkY0WV0Ds5nCDhDqqixq7XQTu9nGIrKulUUdX5ihq/oaJyv96IhBg3SYu8A9LKvTChIdZTDoa0wDlCSOWUu9RLSJ3gEkd9SNWUcxcFSK3gqsueDv2eezqvOy8/yHaO327N2a0B5blnw/1aPhZkqwMGZoybdEgNB3eFIwUJRzxBNhy8m+jd8uap1m9QxQXBbRkQXM9K3aWTAN97pbiB4LcuHFahBbxgOHH4ur4tLyuKus20gLouwXHa8HVRUJfeF3BQgNowIXC+cN3kri+KgnDbMAWJO0LifIEG1IYJtw1TUM0TCqdbh5QXmOsLAkRB47YNkPWCHenTUFcsYhwd13XK+LJO6W7hKRCFBEcHfhPH6TUg8UsSnAAcVHS4dEhoU01SnP4bUtVkri9I8LM0DOcLIVVN6faRGmpoJcf5QkhVUx6tQcCIEDhtOqS8wF1fkNCaQkrc1gC2aroNrYRaOalwdIRUNaW71tRggtI4OvAbNc5AoFWWjFEyb1DB4bKhwNYhQam8IdVM7nqCgqqFIihPCKpkuqKDhpbbiqI8IaiK6aZoDdUKxTrI/cRV+9n3VPv5ETaXVvvrl6lxkafObzcqhnk3XQnfr2fw3TZQHKWgB5X53XhXYLyLDq5O39XVXWx+7/YZl4tta6mWN7/dzYG2T2+fuv4kdRLlvyH1kcqVBDUkhimF27NgSPUFBF/jZGl2VfSTy2pfwleQVTFOlr4uCveXRUEei/OekqBKcMIoC6i0iNjXOTTBCaPY0ITQ1xSnfYUUmpL5qj6a4bSvkEJT8mMF0FN30BynvoQUmlJ5O4fAqS/I0AS1Ly1RS+yQIlMR39WlVqgldkiBqeixzuDZyGndYSHC3nUhwi6w5r7vuOJ+2wpZ4FYs51fm9Uf8e29bymjcy2whJWUlT+cFC1nzdayDvS+g7UWz9MHYMUbbb4a9eUxXj/VrbN9MUW48PKZCJ0xLQbkkcr3+HxANddo=}} | ||
When picking items from a belt, many more factors come into play besides belt fullness: | When picking items from a belt, many more factors come into play besides belt fullness: | ||
| Line 237: | Line 358: | ||
* All sorts of intricate timing factors between the inserter and the items on the belt, since the game simulates the arm homing in on every item. | * All sorts of intricate timing factors between the inserter and the items on the belt, since the game simulates the arm homing in on every item. | ||
The test setup used below is with | The test setup used below is with an inserter taking items from a perpendicular belt with items on the far lane only. The belt is fully compressed and timings are both for items that move at full speed and queued up as much as possible. Values are given for the stack sizes at three different [[inserter capacity bonus (research)|capacity bonus]] levels. | ||
{| class="wikitable" | {| class="wikitable" | ||
| Line 257: | Line 378: | ||
! rowspan=2 | | ! rowspan=2 | | ||
|- | |- | ||
! [[File: | ! [[File:Transport belt.png|link=Transport belt|32px]] || [[File:Fast transport belt.png|link=Fast transport belt|32px]] || [[File:Express transport belt.png|link=Express transport belt|32px]] | ||
! [[File: | ! [[File:Transport belt.png|link=Transport belt|32px]] || [[File:Fast transport belt.png|link=Fast transport belt|32px]] || [[File:Express transport belt.png|link=Express transport belt|32px]] | ||
! [[File: | ! [[File:Transport belt.png|link=Transport belt|32px]] || [[File:Fast transport belt.png|link=Fast transport belt|32px]] || [[File:Express transport belt.png|link=Express transport belt|32px]] | ||
|- align="center" | |- align="center" | ||
| align="left"| {{ | | align="left"| {{Imagelink|Burner inserter}} || 0.60 || '''0.65''' || 0.50 || 0.64 || (1) || 1.11 || '''1.20''' || 1.13 || 1.26 || (2) || 1.61 || 1.61 || '''1.65''' || 1.71 /<br/>1.73 /<br/>1.86 * || (3) | ||
|- align="center" | |- align="center" | ||
| align="left"| {{ | | align="left"| {{Imagelink|Inserter}} || '''0.94''' || '''0.94''' || '''0.94''' || 0.88 || (1) || '''1.67''' || '''1.67''' || 1.50 || 1.74 || (2) || '''2.50''' || 2.25 || 2.33 || 2.37 /<br/>2.37 /<br/>2.54 * || (3) | ||
|- align="center" | |- align="center" | ||
| align="left"| {{ | | align="left"| {{Imagelink|Long-handed inserter}} || 1.18 || 1.18 || '''1.25''' || 1.20 || (1) || 2.20 || 2.31 || '''2.40''' || 2.40 || (2) || 3.21 || 3.21 || '''3.46''' || 3.40 || (3) | ||
|- align="center" | |- align="center" | ||
| align="left"| {{ | | align="left"| {{Imagelink|Fast inserter}} || '''2.50''' || 2.31 || '''2.50''' || 2.50 || (1) || 4.50 || 4.29 || '''5.00''' || 4.80 || (2) || '''6.43''' || 6.00 || '''6.43''' || 6.43 || (3) | ||
|- align="center" | |- align="center" | ||
| align="left"| {{ | | align="left"| {{Imagelink|Bulk inserter}} || 4.50 || 4.29 || '''5.00''' || 4.80 || (2) || 7.50 || 7.50 || '''8.00''' || 7.50 /<br/>8.57 /<br/>8.28 * || (4) || 7.50 || 11.25 || '''15.00''' || 7.50 /<br/>13.09 /<br/>15.32 * || (12) | ||
|} | |} | ||
| Line 280: | Line 400: | ||
* When items are queued up the belt type hardly matters, so there is only a single column for that. The exceptions are the stack inserters - for basic transport belts it's the belt that sets the limit for stack sizes above 4, and there is also a notable difference between fast and express belts. | * When items are queued up the belt type hardly matters, so there is only a single column for that. The exceptions are the stack inserters - for basic transport belts it's the belt that sets the limit for stack sizes above 4, and there is also a notable difference between fast and express belts. | ||
=== Belt to chest (facing inserter) === | |||
'''Note:''' Experimental data from 1.1 | |||
When picking up items from a belt facing the inserter, there are multiple small differences between different setups. The following throughput tests are performed with [[express transport belt]]s and [[bulk inserter]]s with the maximum [[inserter capacity bonus (research)|capacity bonus]]. | |||
Each setup in the following picture shows the amount of ticks per cycle of the inserter and the amount of items per second the inserter moves. These measurements are consistent in all orientations of the setup. | |||
[[File:Inserter_belt_to_chest_throughput.png|center|900px]] | |||
=== Insertion into lava/space === | |||
{{About/Space age}} | |||
Inserters can dump items into lava on [[Vulcanus]]{{SA}} or into space on [[space platform]]s{{SA}}. This act however is not as fast as inserting into a chest or similar container. | |||
When inserting into lava/space, one item is removed from the inserter's hand every tick. So a [[stack inserter]] holding 16 items requires 16 ticks to dump its contents into lava/space. By contrast, when inserting into a container, the entire hand size is placed in the container in one tick. | |||
== Power usage == | |||
Inserter power draw is determined by several factors. | |||
Firstly like most machines, all of the inserters (with the exception of the burner) have drain. Drain is the energy cost of existence, and is expended constantly as long as the inserter exists on the power grid, regardless of activity or lack thereof. | |||
Inserters also have a two costs associated with movement. These costs are applied separately and cumulatively for rotational motion as well as extension/retraction. | |||
Lastly, inserters exhibit a power spike when acquiring and dropping off an item. This can be referred to as "item spike" because it is typically observed directly after item interaction. This is because after receiving/delivering an item it will begin extending/retracting a distance of 0.2 units (distance sourced from [https://github.com/wube/factorio-data/blob/master/base/prototypes/entity/entities.lua source code]). This power cost associated with linear movement is significantly more expensive than that of rotational movement, hence the sharp increase in power consumption. | |||
[[File:Yellow Inserter Power Spikes.png|thumb|Power Consumption graph of Yellow Inserter]] | |||
Here we can see that for the duration of the lateral movement the power consumption is significantly higher. | |||
Burner Inserters, despite not using electricity, also have the same power consumption characteristics as the rest of the inserters (excluding drain). Upon accepting fuel they will replenish something resembling an internal battery, and draw from it in the same manner other inserters draw from the power grid, item spikes and all. Aside from their exclusion from drain, Burner Inserters function identically to other Inserters. | |||
=== Energy costs === | |||
[[File:Inserter Testing Setup.png|thumb|Inserter Testing Setup]] | |||
It's important to note that due to rounding errors the games values cannot be taken at face value when doing calculations, so a blend of theoretical and empirical methods must be used to ensure accuracy. More information can be viewed here at this [https://forums.factorio.com/viewtopic.php?t=128389 forum topic] | |||
The game calculates inserter power based on its hard coded power modifiers: | |||
'''Inserter Power Modifiers (kJ)''' | |||
These values are derived from [https://github.com/wube/factorio-data/blob/master/base/prototypes/entity/entities.lua source code] | |||
{| class="wikitable" | |||
|- | |||
! Burner !! Yellow!! Red!! Blue !! Green !! Stack | |||
|- | |||
| 50 || 5 || 5 || 7 || 20 || 40 | |||
|- | |||
|} | |||
The way the game uses these values is it takes the game's programmed speed in ticks (which can be found higher up on the page), and then uses that alongside these numbers to derive a wattage, using the following equation: | |||
<code>Speed × Power Modifier × Ticks per second</code> | |||
Applying the equation we can derive the following values: | |||
'''Cost of rotational movement in kW''' | |||
{| class="wikitable" | |||
|- | |||
! Burner !! Yellow!! Red!! Blue !! Green !! Stack | |||
|- | |||
| 39 || 4.2 || 6 || 16.8 || 48 || 96 | |||
|- | |||
|} | |||
'''Cost of linear movement in kW''' | |||
{| class="wikitable" | {| class="wikitable" | ||
|- | |- | ||
! | ! Burner !! Yellow!! Red!! Blue !! Green !! Stack | ||
|- | |||
| 105 || 10.5 || 15 || 42 || 120 || 240 | |||
| | |- | ||
| | |} | ||
Taking these two values and adding them together, alongside drain, will give you your max power. It is critical to note that while the duration of consumption is affected by rounding errors in the game like the time per spin and so on, the actual wattage is unaffected by these rounding errors. Just because the inserter spins slightly faster than in the games code doesn't mean it uses slightly more wattage, it still demands the same wattage. | |||
Your rotational power is used during the entire time the inserter is spinning, while the the extension cost is only used briefly during item interaction, causing item spike. By calculating the duration of both you can accurately calculate how many joules your inserter is using in any given situation. Just like with the rotational speeds, item spike duration is subject to rounding errors from the game. You can calculate it by taking the games rated distance of 0.2 and dividing it by the inserters rated speed, and then truncating the number. To save you some hassle here is a reference table | |||
'''Tick duration of Item Spike''' | |||
{| class="wikitable" | |||
|- | |||
! Burner !! Yellow!! Red!! Blue !! Green !! Stack | |||
|- | |||
| 5 || 5 || 4 || 1 || 1 || 1 | |||
|- | |||
|} | |||
Knowing these values, energy cost is easy to calculate, and is linear to inserter utilization. This means if your inserter is only running half the time, it will only use half the power, with the exception of drain which remains constant in all situations. | |||
'''Cost per transfer cycle in kJ''' | |||
These values are isolated from drain. Values were theoretically derived and empirically confirmed for accuracy. [https://forums.factorio.com/viewtopic.php?t=128389 More information] | |||
{| class="wikitable" | |||
|- | |||
! Burner !! Yellow!! Red!! Blue !! Green !! Stack | |||
|- | |||
| 66.9 || 6.65 || 7 || 8.12 || 23.2 || 46.4 | |||
|- | |- | ||
|} | |} | ||
< | === Inserter efficiency === | ||
The above data can be used to compare inserter efficiency directly. Remember that the transfer cycle cost remains the same regardless of how many items are moved. This means that the later inserters with their larger stack sizes can outperform other inserters despite their higher transfer cost, since they can achieve a lower cost per item. Here are some graphs of chest-to-chest data showing the efficiency of different inserters at differing stack sizes. Because the other inserters maintain a proportional relationship (as in an identical stack size) these graphs will primarily focus on highlighting the Green Inserter and new Stack Inserter. Dots have been marked at the turning point where they overtake the other inserters in consumption | |||
<gallery mode="slideshow"> | |||
File:Inserter Efficiency Graph (No Capacity Bonus).png||No Capacity Bonus | |||
File:Inserter Efficiency Graph (Capacity Bonus 2).png|Capacity Bonus 2 | |||
File:Inserter Efficiency Graph (Capacity Bonus 4).png|Capacity Bonus 4 | |||
File:Inserter Efficiency Graph (Capacity Bonus 5) .png|Capacity Bonus 5 | |||
File:Inserter Efficiency Graph (Capacity Bonus 6) (Zoomed).png|Capacity Bonus 6 | |||
File:Inserter Efficiency Graph (Capacity Bonus 7).png|Capacity Bonus 7 | |||
</gallery> | |||
Important to note is that the actual efficiency of the inserters is best measured in terms of kJ / item. Such a version of these graphs wasn't generated because it is almost a flat line. This is because for this kind of linear power consumption the kJ / item would just be the slope of the line, or in other words it would be the ''kJ per transfer cycle / stack size''. | |||
Now for an important caveat. The above graphs are assuming unlimited input. That is to say the graphs assume that the inserter is always spinning at its maximum hand size. In situations that are input limited however, the inserter will not always do so. When the inserter completes its spin, the only time it waits for items is when there are zero to take. As long as there is at least a single item, the inserter will transfer whatever is there immediately, regardless of the inefficiency of moving less than its maximum. Stack Inserters are an exception to this as they actually do wait for a full hand before making the transfer, but no other inserter does. An example of an input limited situation would be the unloading of an assembler. Here are some graphs showing power usage in input limited situations: | |||
<gallery mode="slideshow"> | |||
File:Inserter Efficiency Graph (Capacity Bonus 2, Input Minimum 1).png | Capacity Bonus 2, Input Minimum 1 | |||
File:Inserter Efficiency Graph (Capacity Bonus 2, Input Minimum 1, kJ).png | Capacity Bonus 2, Input Minimum 1 | |||
File:Inserter Efficiency Graph (Capacity Bonus 7, Input Minimum 1).png| Capacity Bonus 7, Input Minimum 1 | |||
File:Inserter Efficiency Graph (Capacity Bonus 7, Input Minimum 1, kJ).png| Capacity Bonus 7, Input Minimum 1 | |||
</gallery> | |||
Here is how the behavior works. The inserter will increase its spin speed to max power as a utilization function of its minimum input. In simpler terms, if the minimum input is 1, it will increase power consumption as though it had no capacity bonus. Once it reaches the maximum, it will maintain max power while gradually increasing the average hand size its moving, thereby gradually increasing its efficiency. We can see this behavior in the kJ graph, where we get this swooping descent curve as it gains efficiency. We can see that with each subsequent inserter the average improves, and it will ultimately converge towards the same value as the previous set of graphs, that being ''kJ per transfer cycle / stack size''. The graphs shared cover the most common use cases, but input minimums can very quite largely. For example the input minimum for crafting yellow belts would be 2, and in general for any recipe the input minimum would be the minimum craft quantity. When belt feeding, its possible for inserters to experience inserter limiting as the belt approaches empty, or if using circuit limited sushi. Due to how many possible permutations of these graphs there are, sharing them all is simply not feasible. If you need a graph not displayed, you can generate one yourself using the code shared [https://forums.factorio.com/viewtopic.php?p=670540#p670540 here] | |||
Because the Burner Inserter doesn't have drain, its efficiency can only truly be appreciated in extremely low throughput situations. Thus we use these dedicated graphs. Before one graph with no capacity bonus would have been sufficient because at low throughputs inserters don't wait and always default to as stack size of 1. The new Stack Inserter changes this though, because Stack Inserters do in fact wait until they get a full hand before beginning their swing, meaning they always remain at optimal efficiency unlike the rest of the inserters. Though having generated the graphs it appears to be largely irrelevant, as the fundamental relationship never really changes from one extreme to the other. | |||
<gallery mode="slideshow"> | |||
File:Burner Efficiency Graph (No Capacity Bonus).png|No Capacity Bonus | |||
File:Burner Efficiency Graph (Capacity Bonus 7).png|Capacity Bonus 7 | |||
</gallery> | |||
Note: The Burner graphs are mislabeled on the y-axis. They should read kJ, not kW. | |||
=== Belt differences=== | |||
Up until now all data was regarding chest-to-chest use cases, due to their sterile and consistent nature. The introduction of belts creates special conditions that require consideration. Here is a power chart from the game for reference: | |||
[[File:Yellow Inserter Belt-to-Belt Power Signature.png|frameless|center|upright 3]] | |||
The Yellow Inserter above is doing a belt-to-belt transfer, and it has a stack bonus. | |||
The erratic section of the graph is the loading process. We can see the behavior is irregular as the inserter does not wait for the item, but rather fishes around for them. The exact behavior here is still being studied, and due to its dependence on stack size and belt speed it is very difficult to give any firm answers regarding how much power this actually uses as a quantifiable generalization. Likely a set of tables would need to be generated with every possible combination as a reference, but such data does not currently exist. The behavior should be consistent across belt speeds and stack sizes, so it can theoretically be gathered and collated into a reference table, though such data doesn't exist at this time. | |||
Looking at the unloading section, we can see the inserter swings around normally, but then there is this dip that doesn't exist in the chest to chest behavior. This is the inserter waiting at the belt to drop off all its items. During this waiting, it uses no power aside from its drain. Once all the items are delivered, it resumes operation as normal. Different amounts of delay caused by different belt speeds and stack sizes can create variations in both our throughput and our total cost per transfer due to the additional drain. This can also be easily modeled into a table, though such a table is currently unavailable | |||
If you are interested in volunteering to collect and share this data, you are encouraged to do so! | |||
What this currently means in practice is that you should just use the chest-to-chest data. The overall relationship between the inserters doesn't change significantly and their efficiency hierarchy remains undisturbed, though the exact consumption in joules per item likely increases noticeably. This could be problematic for other cost estimates in your factory, but for choosing inserters its not an issue. | |||
'''Important:''' The above efficiency graphs only apply when loading from a chest. When loading from a belt, until a more accurate dedicated data set is provided, it is advised to reference the initial no capacity bonus version of the graph for all decisions. With an inserter stack size of 1, the efficiency relationship between chests and belts is identical. | |||
'''Regarding Quality:''' Quality inserters receive a linear speed boost for each level of quality, with a corresponding power cost increase. What this means is that the quality level of an inserter has no impact on its energy efficiency | |||
''More data regarding inserters feeding from belts, as well as more detailed data regarding burner inserter power consumption is still needed. Please contribute if you are willing'' | |||
==See | == See also == | ||
* [[Electric | * [[Electric system]] | ||
* [[ | * [[Belt transport system]] | ||
* [[Inserter capacity bonus (research)]]: Inserter moves more than an item per turn. | |||
* [[Inserter | |||
{{C|Logistics{{!}}#Inserters}} {{C|Inserters{{!}}#Inserters}} | |||
Latest revision as of 18:44, 17 April 2026
For the common yellow electrical inserter, see Inserter.
Inserters are devices which are used to move items over short distances. When placed, they have a fixed direction. They can move items from behind and place them in front of them. By doing this, they can move items from one transport belt to another, but also extract items from—and insert items into—machines or storage devices.
Types of inserters
| The only fuel-powered inserter, with the slowest speed. | |
| The standard electrical inserter. | |
| Capable of inserting and removing items from a greater distance. | |
| Much faster than the inserter. | |
| As fast as the fast inserter, but can move many more items at the same time at once. | |
| As fast as the bulk inserter, but can stack items on a belt. |
Mechanics
Inserters will:
- Pick up items off the ground, off of a transport belt, or from any object that has storage space, such as chests, furnaces, assembling machines, or vehicles.
- Place the item onto the ground, onto a transport belt, or into any object that has storage space.
- Run at slower speeds when starved for energy.
- Pick up as many items as their stack size allows at once, if they do not have to wait too long to pick them up.
- Pick up items and drop them into the void of space or lava, permanently destroying them. This is useful for getting rid of unwanted items.
Inserters will not:
- Pick up any items that cannot be inserted into the adjacent entity.
- Pick up any items if the adjacent entity is a ghost.
- Pick up items to place into an entity with a full inventory (however, it will pick up items up to its hand size even if not all of them will fit).
- Place more than one item at a time onto the same ground tile.
- Place items into an entity that cannot hold them, for example due to filtered or limited slots.
- Place items into a cargo wagon or fuel into a locomotive if the train it's part of is in motion, or in automatic mode and not stopped at a train stop (e.g. waiting at a signal). (Wagons will be visibly closed if they cannot be inserted into for this reason.)
- Fill up the entire target inventory of boilers, nuclear reactors, production buildings, furnaces and turrets (see below).
If two or more inserters are picking up from the same tile, the inserter that can grab the items the fastest will grab them first. Besides faster inserters, this favors inserters taking from the inner lane of a transport belt.
Insertion limits
Depending on where an inserter is moving items, it does not always fill up the entire target inventory. This allows other inserters taking from the same transport belt to pick up their share of the items. For example, if a boiler has 5 or more items of fuel in it, an inserter will not insert additional fuel. This allows the other fuel to travel further down the transport belt. When the fuel drops below 5 items, the inserter will resume inserting fuel, up to the limit of 5 items.
| Entity | Item type | Automatic insertion limit |
|---|---|---|
| Boilers, burner inserters, furnaces, and nuclear reactors | Fuel | 5 |
| Gun turrets | Magazines | 10 |
| Artillery turrets | Artillery shells | 5 |
| Assembling machines, furnaces, centrifuges, chemical plants, and oil refineries | Items needed for the recipe | The ingredients for 1 craft in addition to the ingredients for the number of crafts that can be completed (rounded up) during one full normal quality standard inserter swing (1.166 seconds); but at least the ingredients for 2 crafts and at most the ingredients for 100 crafts.[1] |
| Labs | Science packs | The number of normal quality science packs needed for one research unit in addition to the science packs for the number of research units that can be completed (rounded up) during one full normal quality standard inserter swing (1.166 seconds); but at least the ingredients for 2 research units and at most the ingredients for 100 research units. |
An inserter that has a higher inserter capacity bonus than 1 can overfill the target building, due to the inserter picking up a higher amount of items than needed. Overfilling can also occur if multiple inserters are used to insert items into one building.
Inserters and transport belts
Transport belts have two lanes on which items can travel. Inserters only place items onto one side of the belt, either the far side from the inserter's perspective or, if the belt is going the same or the opposite direction as the inserter, the right side from the belt's perspective.
-
 Inserters place the item on the furthest lane. If a belt is in the same orientation as the inserter, the item will be placed on the right-hand lane, from the belt's perspective. In curves the inserter always places on the far side.
 -
 If the belt is perpendicular to the inserter, inserters prefer taking items from the nearest lane. If the nearest lane is empty, the inserter will take from the far lane. If the belt is the same/opposite orientation of the inserter or a curve, the inserter prefers taking from the left lane, from the belt's perspective. If the left lane is empty it will take from the right lane.


Potential issues
Inserters may have problems picking up items:
- From very fast belts, because the items are moving too quickly.
- From the entry or exit of an underground belt (because the time they have to pick up is shorter)
- From turning belts if the item is on the inside of the corner
Inserter speed

| Type | Rotation-speed (turns per tick) Extension-speed (Tiles per Tick) |
Turns per Game-second | Game-second per full turn | Ticks per full turn |
|---|---|---|---|---|
| 0.013 0.035 |
~0.7895 | ~1.267 | 76 | |
| 0.014 0.035 |
~0.857 | ~1.167 | 70 | |
| 0.02 0.05 |
1.2 | 0.833 | 50 | |
| 0.04 0.1 |
2.5 | 0.4 | 24 |
Note: The speeds per tick come directly from the factorio-data github repository, while the other values have been verified empirically in game. Discrepancies are due to rounding errors during the games runtime, so the empirical values are more accurate when dealing with speeds.
Rotation speed
Convention: 2π rad = 100% of a circle rotation = 1 turn (or one full rotation).
Note:
- An Inserter doesn't always need to make full turns. When grabbing from a transport belt, it is slightly faster when grabbing items from the closest lane.
- If the rotation speed of an inserter would result in an odd number of ticks per full turn, the actual number of ticks per full turn for this inserter is truncated to be the next lowest even number. The reason for this is that the inserter needs to do two half turns to pick and drop an item. This takes a certain number of ticks two times, therefore the number of ticks for the full turn is always an even number. Example: The Fast inserter's rotation speed of 864°/s or 0.04 turns per tick would result in 25 ticks per full turn, but the inserter cannot do a half turn in "12.5 ticks", so it actually takes 2×12 = 24 ticks per full turn.
Extension speed
The extension-speed is normally not visible (only when compared to other inserters), but there are measurable speed differences when taking - for example - from the near or the far side of a belt. Also some mods can alter the pickup and drop locations of inserters, making this stat more relevant.
Inserter throughput
Chest to chest
Note: Experimental data from 2.0.26, recorded in this doc [2]. Chest to chest transfer transfers the entire hand size during a single tick, so most of the time is spent during the swing to and from.
| Type | Arm cycles per second (ticks per cycle) | Items/second at capacity bonus level (stack size) | |||||||||||||||||||||||||||||||||||||||||||||||||||||||||||||||||||
|---|---|---|---|---|---|---|---|---|---|---|---|---|---|---|---|---|---|---|---|---|---|---|---|---|---|---|---|---|---|---|---|---|---|---|---|---|---|---|---|---|---|---|---|---|---|---|---|---|---|---|---|---|---|---|---|---|---|---|---|---|---|---|---|---|---|---|---|---|---|
| No capacity bonus | Capacity bonus 2 | Capacity bonus 7 | Transport belt stacking | ||||||||||||||||||||||||||||||||||||||||||||||||||||||||||||||||||
|
|
(1) |
|
(2) |
|
(3) |
|
(4) | |||||||||||||||||||||||||||||||||||||||||||||||||||||||||||||
|
|
(1) |
|
(2) |
|
(3) |
|
(4) | |||||||||||||||||||||||||||||||||||||||||||||||||||||||||||||
|
|
(1) |
|
(2) |
|
(3) |
|
(4) | |||||||||||||||||||||||||||||||||||||||||||||||||||||||||||||
|
|
(1) |
|
(2) |
|
(3) |
|
(4) | |||||||||||||||||||||||||||||||||||||||||||||||||||||||||||||
|
|
(2) |
|
(4) |
|
(12) |
|
(12) | |||||||||||||||||||||||||||||||||||||||||||||||||||||||||||||
|
|
(6) |
|
(8) |
|
(16) |
|
(16) | |||||||||||||||||||||||||||||||||||||||||||||||||||||||||||||
Chest to belt
Throughput going from chest to belt depends on how full the belt is. An inserter will not put down an item on a belt that has items back-to-back (aka full compression) - it waits until there is a gap. However, if the gap is narrower than the item, then the items upstream on the belt will stop to make room for the item being inserted. The direction of the belt compared to the inserter does not matter however.
In these measurements inserters move items onto an empty belt. Values are given for the stack sizes at four different capacity bonus levels.
Note: Experimental data from 2.0
| Type | Items/second at capacity bonus level (stack size) | |||||||||||||||||||||||||||||||||||||||||||||||||||||||||||||||||||||||||||||||||||||||||||||||||||||||||||||||||||||||||||||||||||||||||||||||||||||||||||||||||||||||||||||||||||||||||||||||||||||||||||||||||||
|---|---|---|---|---|---|---|---|---|---|---|---|---|---|---|---|---|---|---|---|---|---|---|---|---|---|---|---|---|---|---|---|---|---|---|---|---|---|---|---|---|---|---|---|---|---|---|---|---|---|---|---|---|---|---|---|---|---|---|---|---|---|---|---|---|---|---|---|---|---|---|---|---|---|---|---|---|---|---|---|---|---|---|---|---|---|---|---|---|---|---|---|---|---|---|---|---|---|---|---|---|---|---|---|---|---|---|---|---|---|---|---|---|---|---|---|---|---|---|---|---|---|---|---|---|---|---|---|---|---|---|---|---|---|---|---|---|---|---|---|---|---|---|---|---|---|---|---|---|---|---|---|---|---|---|---|---|---|---|---|---|---|---|---|---|---|---|---|---|---|---|---|---|---|---|---|---|---|---|---|---|---|---|---|---|---|---|---|---|---|---|---|---|---|---|---|---|---|---|---|---|---|---|---|---|---|---|---|---|---|---|---|---|
| No capacity bonus | Capacity Bonus 2 | Capacity bonus 7 | Transport belt stacking | |||||||||||||||||||||||||||||||||||||||||||||||||||||||||||||||||||||||||||||||||||||||||||||||||||||||||||||||||||||||||||||||||||||||||||||||||||||||||||||||||||||||||||||||||||||||||||||||||||||||||||||||||
|
|
|
|
(1) |
|
|
|
|
(2) |
|
|
|
|
(3) |
|
|
|
|
(4) | |||||||||||||||||||||||||||||||||||||||||||||||||||||||||||||||||||||||||||||||||||||||||||||||||||||||||||||||||||||||||||||||||||||||||||||||||||||||||||||||||||||||||||||||||||||||||||||||||
|
|
|
|
(1) |
|
|
|
|
(2) |
|
|
|
|
(3) |
|
|
|
|
(4) | |||||||||||||||||||||||||||||||||||||||||||||||||||||||||||||||||||||||||||||||||||||||||||||||||||||||||||||||||||||||||||||||||||||||||||||||||||||||||||||||||||||||||||||||||||||||||||||||||
|
|
|
|
(1) |
|
|
|
|
(2) |
|
|
|
|
(3) |
|
|
|
|
(4) | |||||||||||||||||||||||||||||||||||||||||||||||||||||||||||||||||||||||||||||||||||||||||||||||||||||||||||||||||||||||||||||||||||||||||||||||||||||||||||||||||||||||||||||||||||||||||||||||||
|
|
|
|
(1) |
|
|
|
|
(2) |
|
|
|
|
(3) |
|
|
|
|
(4) | |||||||||||||||||||||||||||||||||||||||||||||||||||||||||||||||||||||||||||||||||||||||||||||||||||||||||||||||||||||||||||||||||||||||||||||||||||||||||||||||||||||||||||||||||||||||||||||||||
|
|
|
|
(2) |
|
|
|
|
(4) |
|
|
|
|
(12) |
|
|
|
|
(12) | |||||||||||||||||||||||||||||||||||||||||||||||||||||||||||||||||||||||||||||||||||||||||||||||||||||||||||||||||||||||||||||||||||||||||||||||||||||||||||||||||||||||||||||||||||||||||||||||||
|
|
|
|
(6) |
|
|
|
|
(8) |
|
|
|
|
(16) |
|
|
|
|
(16) | |||||||||||||||||||||||||||||||||||||||||||||||||||||||||||||||||||||||||||||||||||||||||||||||||||||||||||||||||||||||||||||||||||||||||||||||||||||||||||||||||||||||||||||||||||||||||||||||||
Chest to splitter
When an inserter drops items onto the side of a perpendicular splitter, it always is considered to do so on the input side, enabling the splitter to move half of the items to the other belt (assuming that the splitter filter/priority settings allow it to do so and that there is available space on both belts). This allows the inserter to drop its items more quickly. A bulk inserter with capacity bonus 7 can move 16.0 items/second instead of the usual 14.4 items/second.
-
 By inserting onto the side of a splitter, a fully-upgraded bulk inserter can fill 71% of an express belt lane instead of the usual 64%. (Gif from 1.1)
 -
 In 1.1, three bulk inserters could saturate an express belt if one of them inserts onto a splitter. In 2.0, three bulk inserters can saturate an express belt if two of them insert onto splitters. (Gif from 1.1)


Belt to chest (perpendicular)
Note: The following is based on experimental data from 1.1. Most of the 1.1 experimental data was gathered using the following circuit blueprint to measure the exact tick difference between inserter swings. A lot of the data on this page (specifically the belt to chest data) relies heavily on the conditions of the setup on which the measurements are done. If your setup differs from the ones tested on this page, you can use the following blueprint to do the measurements yourself.
When picking items from a belt, many more factors come into play besides belt fullness:
- How fast the items move (i.e. if they are queued up on the belt or move at belt speed).
- Whether the belt is perpendicular to the inserter or approaches it head on.
- Whether items are on the near or far lane of a perpendicular belt.
- Whether the belt turns or not, and whether the items are in the inner or outer side of the bend.
- If the belt is an underground entrance or exit. This shortens the time items are visible to the inserter for pickup.
- All sorts of intricate timing factors between the inserter and the items on the belt, since the game simulates the arm homing in on every item.
The test setup used below is with an inserter taking items from a perpendicular belt with items on the far lane only. The belt is fully compressed and timings are both for items that move at full speed and queued up as much as possible. Values are given for the stack sizes at three different capacity bonus levels.
| Type | Items/second at capacity bonus level (stack size) | ||||||||||||||
|---|---|---|---|---|---|---|---|---|---|---|---|---|---|---|---|
| No capacity bonus | Capacity bonus 2 | Capacity bonus 7 | |||||||||||||
| Items at belt speed |
Items queued up |
Items at belt speed |
Items queued up |
Items at belt speed |
Items queued up |
||||||||||
| 0.60 | 0.65 | 0.50 | 0.64 | (1) | 1.11 | 1.20 | 1.13 | 1.26 | (2) | 1.61 | 1.61 | 1.65 | 1.71 / 1.73 / 1.86 * |
(3) | |
| 0.94 | 0.94 | 0.94 | 0.88 | (1) | 1.67 | 1.67 | 1.50 | 1.74 | (2) | 2.50 | 2.25 | 2.33 | 2.37 / 2.37 / 2.54 * |
(3) | |
| 1.18 | 1.18 | 1.25 | 1.20 | (1) | 2.20 | 2.31 | 2.40 | 2.40 | (2) | 3.21 | 3.21 | 3.46 | 3.40 | (3) | |
| 2.50 | 2.31 | 2.50 | 2.50 | (1) | 4.50 | 4.29 | 5.00 | 4.80 | (2) | 6.43 | 6.00 | 6.43 | 6.43 | (3) | |
| 4.50 | 4.29 | 5.00 | 4.80 | (2) | 7.50 | 7.50 | 8.00 | 7.50 / 8.57 / 8.28 * |
(4) | 7.50 | 11.25 | 15.00 | 7.50 / 13.09 / 15.32 * |
(12) | |
*) Throughput for basic/fast/express belt.
Since there are many more factors involved, these measurements exhibit a more complex pattern than chest-to-belt.
- Boldface cells show for which belt each inserter has the best throughput on each bonus level when items move at belt speed. Higher speed belts mean that inserters have to work harder to catch the fast moving items. The effect is most noticeable for slower inserters and smaller stack sizes.
- When items are queued up the belt type hardly matters, so there is only a single column for that. The exceptions are the stack inserters - for basic transport belts it's the belt that sets the limit for stack sizes above 4, and there is also a notable difference between fast and express belts.
Belt to chest (facing inserter)
Note: Experimental data from 1.1
When picking up items from a belt facing the inserter, there are multiple small differences between different setups. The following throughput tests are performed with express transport belts and bulk inserters with the maximum capacity bonus. Each setup in the following picture shows the amount of ticks per cycle of the inserter and the amount of items per second the inserter moves. These measurements are consistent in all orientations of the setup.

Insertion into lava/space
![]() Space Age expansion exclusive feature.
Space Age expansion exclusive feature.
Inserters can dump items into lava on Vulcanus![]() or into space on space platforms
or into space on space platforms![]() . This act however is not as fast as inserting into a chest or similar container.
. This act however is not as fast as inserting into a chest or similar container.
When inserting into lava/space, one item is removed from the inserter's hand every tick. So a stack inserter holding 16 items requires 16 ticks to dump its contents into lava/space. By contrast, when inserting into a container, the entire hand size is placed in the container in one tick.
Power usage
Inserter power draw is determined by several factors.
Firstly like most machines, all of the inserters (with the exception of the burner) have drain. Drain is the energy cost of existence, and is expended constantly as long as the inserter exists on the power grid, regardless of activity or lack thereof.
Inserters also have a two costs associated with movement. These costs are applied separately and cumulatively for rotational motion as well as extension/retraction.
Lastly, inserters exhibit a power spike when acquiring and dropping off an item. This can be referred to as "item spike" because it is typically observed directly after item interaction. This is because after receiving/delivering an item it will begin extending/retracting a distance of 0.2 units (distance sourced from source code). This power cost associated with linear movement is significantly more expensive than that of rotational movement, hence the sharp increase in power consumption.

Here we can see that for the duration of the lateral movement the power consumption is significantly higher.
Burner Inserters, despite not using electricity, also have the same power consumption characteristics as the rest of the inserters (excluding drain). Upon accepting fuel they will replenish something resembling an internal battery, and draw from it in the same manner other inserters draw from the power grid, item spikes and all. Aside from their exclusion from drain, Burner Inserters function identically to other Inserters.
Energy costs

It's important to note that due to rounding errors the games values cannot be taken at face value when doing calculations, so a blend of theoretical and empirical methods must be used to ensure accuracy. More information can be viewed here at this forum topic
The game calculates inserter power based on its hard coded power modifiers:
Inserter Power Modifiers (kJ)
These values are derived from source code
| Burner | Yellow | Red | Blue | Green | Stack |
|---|---|---|---|---|---|
| 50 | 5 | 5 | 7 | 20 | 40 |
The way the game uses these values is it takes the game's programmed speed in ticks (which can be found higher up on the page), and then uses that alongside these numbers to derive a wattage, using the following equation:
Speed × Power Modifier × Ticks per second
Applying the equation we can derive the following values:
Cost of rotational movement in kW
| Burner | Yellow | Red | Blue | Green | Stack |
|---|---|---|---|---|---|
| 39 | 4.2 | 6 | 16.8 | 48 | 96 |
Cost of linear movement in kW
| Burner | Yellow | Red | Blue | Green | Stack |
|---|---|---|---|---|---|
| 105 | 10.5 | 15 | 42 | 120 | 240 |
Taking these two values and adding them together, alongside drain, will give you your max power. It is critical to note that while the duration of consumption is affected by rounding errors in the game like the time per spin and so on, the actual wattage is unaffected by these rounding errors. Just because the inserter spins slightly faster than in the games code doesn't mean it uses slightly more wattage, it still demands the same wattage.
Your rotational power is used during the entire time the inserter is spinning, while the the extension cost is only used briefly during item interaction, causing item spike. By calculating the duration of both you can accurately calculate how many joules your inserter is using in any given situation. Just like with the rotational speeds, item spike duration is subject to rounding errors from the game. You can calculate it by taking the games rated distance of 0.2 and dividing it by the inserters rated speed, and then truncating the number. To save you some hassle here is a reference table
Tick duration of Item Spike
| Burner | Yellow | Red | Blue | Green | Stack |
|---|---|---|---|---|---|
| 5 | 5 | 4 | 1 | 1 | 1 |
Knowing these values, energy cost is easy to calculate, and is linear to inserter utilization. This means if your inserter is only running half the time, it will only use half the power, with the exception of drain which remains constant in all situations.
Cost per transfer cycle in kJ
These values are isolated from drain. Values were theoretically derived and empirically confirmed for accuracy. More information
| Burner | Yellow | Red | Blue | Green | Stack |
|---|---|---|---|---|---|
| 66.9 | 6.65 | 7 | 8.12 | 23.2 | 46.4 |
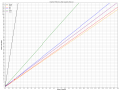
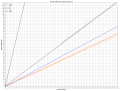
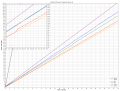
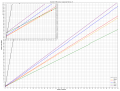
Inserter efficiency
The above data can be used to compare inserter efficiency directly. Remember that the transfer cycle cost remains the same regardless of how many items are moved. This means that the later inserters with their larger stack sizes can outperform other inserters despite their higher transfer cost, since they can achieve a lower cost per item. Here are some graphs of chest-to-chest data showing the efficiency of different inserters at differing stack sizes. Because the other inserters maintain a proportional relationship (as in an identical stack size) these graphs will primarily focus on highlighting the Green Inserter and new Stack Inserter. Dots have been marked at the turning point where they overtake the other inserters in consumption
-
 No Capacity Bonus
 -
 Capacity Bonus 2
 -
 Capacity Bonus 4
 -
 Capacity Bonus 5
 -
 Capacity Bonus 6
 -
 Capacity Bonus 7
.png)
.png)
.png)
_.png)
_(Zoomed).png)
.png)
Important to note is that the actual efficiency of the inserters is best measured in terms of kJ / item. Such a version of these graphs wasn't generated because it is almost a flat line. This is because for this kind of linear power consumption the kJ / item would just be the slope of the line, or in other words it would be the kJ per transfer cycle / stack size.
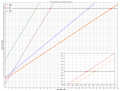
Now for an important caveat. The above graphs are assuming unlimited input. That is to say the graphs assume that the inserter is always spinning at its maximum hand size. In situations that are input limited however, the inserter will not always do so. When the inserter completes its spin, the only time it waits for items is when there are zero to take. As long as there is at least a single item, the inserter will transfer whatever is there immediately, regardless of the inefficiency of moving less than its maximum. Stack Inserters are an exception to this as they actually do wait for a full hand before making the transfer, but no other inserter does. An example of an input limited situation would be the unloading of an assembler. Here are some graphs showing power usage in input limited situations:
-
 Capacity Bonus 2, Input Minimum 1
 -
 Capacity Bonus 2, Input Minimum 1
 -
 Capacity Bonus 7, Input Minimum 1
 -
 Capacity Bonus 7, Input Minimum 1
.png)
.png)
.png)
.png)
Here is how the behavior works. The inserter will increase its spin speed to max power as a utilization function of its minimum input. In simpler terms, if the minimum input is 1, it will increase power consumption as though it had no capacity bonus. Once it reaches the maximum, it will maintain max power while gradually increasing the average hand size its moving, thereby gradually increasing its efficiency. We can see this behavior in the kJ graph, where we get this swooping descent curve as it gains efficiency. We can see that with each subsequent inserter the average improves, and it will ultimately converge towards the same value as the previous set of graphs, that being kJ per transfer cycle / stack size. The graphs shared cover the most common use cases, but input minimums can very quite largely. For example the input minimum for crafting yellow belts would be 2, and in general for any recipe the input minimum would be the minimum craft quantity. When belt feeding, its possible for inserters to experience inserter limiting as the belt approaches empty, or if using circuit limited sushi. Due to how many possible permutations of these graphs there are, sharing them all is simply not feasible. If you need a graph not displayed, you can generate one yourself using the code shared here
Because the Burner Inserter doesn't have drain, its efficiency can only truly be appreciated in extremely low throughput situations. Thus we use these dedicated graphs. Before one graph with no capacity bonus would have been sufficient because at low throughputs inserters don't wait and always default to as stack size of 1. The new Stack Inserter changes this though, because Stack Inserters do in fact wait until they get a full hand before beginning their swing, meaning they always remain at optimal efficiency unlike the rest of the inserters. Though having generated the graphs it appears to be largely irrelevant, as the fundamental relationship never really changes from one extreme to the other.
-
 No Capacity Bonus
 -
 Capacity Bonus 7
.png)
.png)
Note: The Burner graphs are mislabeled on the y-axis. They should read kJ, not kW.
Belt differences
Up until now all data was regarding chest-to-chest use cases, due to their sterile and consistent nature. The introduction of belts creates special conditions that require consideration. Here is a power chart from the game for reference:

The Yellow Inserter above is doing a belt-to-belt transfer, and it has a stack bonus.
The erratic section of the graph is the loading process. We can see the behavior is irregular as the inserter does not wait for the item, but rather fishes around for them. The exact behavior here is still being studied, and due to its dependence on stack size and belt speed it is very difficult to give any firm answers regarding how much power this actually uses as a quantifiable generalization. Likely a set of tables would need to be generated with every possible combination as a reference, but such data does not currently exist. The behavior should be consistent across belt speeds and stack sizes, so it can theoretically be gathered and collated into a reference table, though such data doesn't exist at this time.
Looking at the unloading section, we can see the inserter swings around normally, but then there is this dip that doesn't exist in the chest to chest behavior. This is the inserter waiting at the belt to drop off all its items. During this waiting, it uses no power aside from its drain. Once all the items are delivered, it resumes operation as normal. Different amounts of delay caused by different belt speeds and stack sizes can create variations in both our throughput and our total cost per transfer due to the additional drain. This can also be easily modeled into a table, though such a table is currently unavailable
If you are interested in volunteering to collect and share this data, you are encouraged to do so!
What this currently means in practice is that you should just use the chest-to-chest data. The overall relationship between the inserters doesn't change significantly and their efficiency hierarchy remains undisturbed, though the exact consumption in joules per item likely increases noticeably. This could be problematic for other cost estimates in your factory, but for choosing inserters its not an issue.
Important: The above efficiency graphs only apply when loading from a chest. When loading from a belt, until a more accurate dedicated data set is provided, it is advised to reference the initial no capacity bonus version of the graph for all decisions. With an inserter stack size of 1, the efficiency relationship between chests and belts is identical.
Regarding Quality: Quality inserters receive a linear speed boost for each level of quality, with a corresponding power cost increase. What this means is that the quality level of an inserter has no impact on its energy efficiency
More data regarding inserters feeding from belts, as well as more detailed data regarding burner inserter power consumption is still needed. Please contribute if you are willing
See also
- Electric system
- Belt transport system
- Inserter capacity bonus (research): Inserter moves more than an item per turn.