![]()
![]()
![]()
![]()
![]()
![]()
![]()
![]()
![]()
Belt transport system: Difference between revisions
m (→Expert: cleaned up some of the links, still a lot to do though) |
(both. both categories is good) |
||
| (102 intermediate revisions by 26 users not shown) | |||
| Line 1: | Line 1: | ||
{{Languages}} | {{Languages}} | ||
[[File: | [[File:transport_belt_preview.png|right]]The belt transport system is the first system the [[player]] will use to transport items from place to place. It, along with [[Railway|trains]], and [[Logistic network|Logistic robots]], makes up the systems of item transportation in Factorio. | ||
The belt transport system is the first transport | |||
== | Belts specifically are used to transport items and run without using energy. Belts can also interact with other moving entities such as [[player]]s, [[vehicle]]s and [[enemies]], also allowing for faster or slower movement speed. | ||
== Belt tier overview == | |||
[[File:Transport_belts_speed.gif|300px|thumb|top|Animation showing the three types of belt and their speed (from top to bottom: regular belts, fast belts, and express belts).]] | |||
There are 3 different tiers of belts available for use. The [[transport belt]] has a yellow color and is the slowest, as well as the cheapest to craft. The next tier up, the [[fast transport belt]] has a red color and is twice as fast as the standard transport belt. The [[express transport belt]] is the final tier. It is colored blue and is three times faster than normal belts, or 1.5× faster than red belts.<br> | |||
{| class="wikitable" | {| class="wikitable" | ||
! [[Transport belts]] !! [[Underground belts]] !! [[Splitters]] !! Max. throughput ( | ! [[Transport belts]] !! [[Underground belts]] !! [[Splitters]] !! Max. throughput<br>(Items/[[Time#Seconds|second]]) !! Needed research | ||
|- | |- | ||
| {{ | | {{Imagelink|Transport belt}} | ||
| {{ | | {{Imagelink|Underground belt}} | ||
| {{ | | {{Imagelink|Splitter|Splitter}} | ||
| | | 15 | ||
| [[Logistics | | [[Logistics (research)]]<sup>1</sup> | ||
|- | |- | ||
| {{ | | {{Imagelink|Fast transport belt}} | ||
| {{ | | {{Imagelink|Fast underground belt}} | ||
| {{ | | {{Imagelink|Fast splitter}} | ||
| | | 30 | ||
| [[Logistics 2]] | | [[Logistics 2 (research)]] | ||
|- | |- | ||
| {{ | | {{Imagelink|Express transport belt}} | ||
| {{ | | {{Imagelink|Express underground belt}} | ||
| {{ | | {{Imagelink|Express splitter}} | ||
| | | 45 | ||
| [[Logistics 3]] | | [[Logistics 3 (research)]] | ||
|- | |- | ||
|} | |} | ||
<sup>(1)</sup> Only for the underground belt and splitter. The basic transport belt is available at the start of the game. | |||
Regardless of the belt tier, a fully filled straight transport belt holds 8 items in total. For more information on this, see [[Transport belts/Physics]] and [https://factorio.com/blog/post/fff-276 Friday Facts #276 - Belt item spacing]. | |||
{{clear}} | |||
== Belt mechanics == | |||
=== Merging and un-merging belts === | |||
Belts of all tiers have 2 lanes for items to ride on. This allows for either a double flow of one material, or to transport two different materials on the same belt. Mixed belts can be beneficial for | |||
smelting ore, or producing items with many different ingredients such as [[Utility science pack]]. The belt can be unmerged using a splitter filter. It is also possible to unmerge a mixed belt by using underground belts since an underground belt will block half of the belt. | |||
[[File:Transport_belts_2_lanes.gif|top]] [[File:Transport_belts_unmerge.gif|top]] | |||
Belts going across a splitter will have items from the splitter moving to one side of the crossing belt. | |||
Belts have | |||
[[File: | [[File:splitters_to_one_side.gif|top|Splitters moving objects to just one side of a belt.]] | ||
Commonly, merging and un-merging is done by using a [[splitter]]. The trick in the second gif is better described in the '''[[Belt_transport_system#Separating_belt_lanes|underground belt]]''' section. | |||
=== Lane balance === | |||
[[ | Due to how items are placed onto belts by [[inserters]], their lanes can sometimes become unbalanced. In order to | ||
maintain throughput, balancing the lanes may be necessary. The gifs below show two ways how to do this. The former only works if only one lane is in use initially. For further explanation of the mechanics, see [[Balancer mechanics#Lane_balancers|lane balancers]]. | |||
[ | [[File:Transport_belts_balance1.gif|top]] [[File:Transport_belts_balance2.gif|top]] | ||
== | === Belt throughput === | ||
== | [[File:Stack inserters fill express belt.gif|frame|230px|right|4 [[stack inserter]]s can compress an express belt at stack size 12 for the left inserters and stack size 8 for the right inserters.]] | ||
Maximizing the throughput | Maximizing the throughput means ensuring that as many items as possible are transported. Therefore some definitions need to | ||
be introduced: | |||
; Speed | ; Speed | ||
: How fast | : How fast a belt moves in tiles per second. This is 1.875, 3.75 and 5.625 for basic, fast and express belts. | ||
; Density | ; Density | ||
: How tight are the items put | : How tight are the items put onto the belts; each straight belt piece can hold exactly 8 items. | ||
; Throughput | ; Throughput | ||
: This is speed | : This is speed × density. It describes how many items pass by at a given time. | ||
So there are | So, there are three opportunities to enhance the throughput: | ||
; More density | ; More density | ||
:Sometimes items have | :Sometimes items have small gaps in between each other that aren't big enough for other items to fit in. However, mining drills, inserters, and belt sideloading can still force an item into these gaps, temporarily squashing the items on the belt. The squashed gap is extended to normal size once the front of the belt starts to move again. | ||
; More speed | |||
:If the belts in the factory are already at maximum density, their speed can still be upgraded with better belts. Finding the bottleneck is the first thing that needs to be done, usually it can be discovered quite easily. There will be a part of the belt where the items don't move quickly (or at all) or stop at maximum density and suddenly they come to a point where this 'stop and go' effect releases itself, the bottleneck has been found. In most cases, this will be the place where belt optimization is needed. | |||
; More belts | |||
:Adding additional parallel belts can also increase the throughput. Simply place more belts carrying the item that needs throughput. | |||
=== Belt tricks === | |||
Moving fast can be essential to defend alien attacks in time. Running on a belt will increase or decrease the movement speed of the [[player]] accordingly to the belts speed. That is why building a belt towards your defenses can be beneficial. | |||
However, the player is not the only unit that can be moved by transport belts. Additionally, biters and spitters can be moved. This can be abused to improve your defense. Firstly, biters will have a harder time to reach your walls when placing express transport belt in front of them. Secondly, spitters can be moved closer to your walls. That way more turrets can attack a single spitter at once. | |||
Another useful usage is [[car]]s on transport belts. Cars have an inventory and can be filled by [[inserters]]. So, they can be used as moving boxes on belts. This has several advantages: Firstly the throughput of the belt-car-boxes is amazingly high, secondly the inserter stack size bonus does apply here and makes inserters more effective. | |||
== Splitters == | |||
[[Splitters]] are another form of item manipulation. Splitters are a 2×1 entity that splits incoming items on belts | |||
from up to two input to up to two outputs, in a 1:1 ratio. They are used to divide resources between two belts, or balance | |||
multiple belts. | |||
=== | === Mechanics === | ||
The behavior of splitters looks simple at first glance. But they are not that simple. Splitters have an astonishing amount of uses. | The behavior of splitters looks simple at first glance. But they are not that simple. Splitters have an astonishing amount of uses. | ||
* | * Splitters have two input belts and two output belts. If the splitter receives items on one belt, it will split the input evenly between its two outputs. If one of the outputs is fully backed-up and the splitter cannot split evenly, it will put all input on its other output. | ||
* | * Splitters can also merge belts, taking two inputs and one output. | ||
* | * Splitters preserve the lanes of the items, by moving through the splitter an item on the right lane will not be moved to the left lane, and vice versa. | ||
* Splitters can prioritize one input and/or one output. Clicking on a splitter opens its GUI where the priorities can be set. | |||
* | * One output of the splitter can be filtered to one item. Items of that type will only go to that output, and not to the other one. | ||
The speed of the splitter is the same as its relevant type of belt, so in order to properly join/split belts, the splitter must be the same speed as the incoming belts. Otherwise the splitter will become a bottleneck. | |||
==== Priority ==== | |||
For both the input and output side of the splitter it is possible to set the priority to either left or right. | |||
A splitter where the input priority has been set will first try to consume the specified input side, and will only | |||
consume the other input once there is a gap on the prioritized input belt. | |||
Similarly a splitter where the output priority has been set will try to redirect all incoming items | |||
to the specified output, and will only output on the other output once the specified output is full. | |||
==== Filter ==== | |||
If a specific item is set in the splitter's filter slot, the slider for the output priority will | |||
be used for the filter instead. All items of the set type will be redirected to that specific output | |||
and all other items are directed to the other output. The input priority can be set independently of the filter. | |||
=== Balancing === | |||
{{Main|Balancer mechanics}} | |||
Balancers are used to evenly distribute items over multiple belts or multiple belt lanes. | |||
=== Manipulating belt lanes === | |||
<gallery mode="slideshow"> | |||
File:Swap_belt_lanes.png|Swapping lanes on a belt with a different item per belt lane. | |||
File:Splitter_seperate_belt_lanes.png|Separating lanes with different items on them. | |||
</gallery> | |||
[[ | == [[Circuit network]] == | ||
[[File:transport_belt_circuits.png|thumb|200px|Two belts connected to a [[constant combinator]].]][[Red wire|Red]] or [[green wire]]s can be connected to segments of transport belts to use them as part of a circuit. Belts connected to the circuit network will appear with a yellow cage above them, with a moving red scanner within it. When a belt is connected to a circuit, a GUI can be accessed from the connected belt for settings on how the belt will be used for a circuit; there are two modes of operation that can be used: | |||
[[File: | |||
'''Enable/disable''' - A circuit condition dictates whether or not the belt will allow items through.<br /> | |||
'''Read belt contents''' - If enabled, the contents on the belt will be read. | |||
The belt's GUI will also have a "content read mode" setting, which can be set to either '''pulse''' or '''hold'''. '''Pulse''' will read the belt's contents for only one [[Time|tick]], while '''hold''' will read the belt's contents continuously on every tick. | |||
[[File:transport_belt_circuit_gui.png|thumb|right|Transport belt GUI.|130px]] | |||
<gallery mode="slideshow"> | |||
File:transport_belt_circuit_example1.gif|A small example of a transport belt circuit reading belt contents to trigger two lamps. | |||
File:transport_belt_circuit_example2.gif|[[Fast inserter]]s are activated by the [[arithmetic combinator]]s' setup; when a specific item enters a belt segment that's connected to the circuit network, the inserters place the same item on another belt. | |||
</gallery> | |||
{{clear}} | |||
== | == Underground belts == | ||
Underground belts can be used to cross different flows of items without interfering. They move items like a [[Transport belts|normal belt]]. | |||
[[File:4-6-8.png|thumb|right|Underground lengths|200px]] | |||
* Underground belts can cross any number of entities and all types of ground, like water and grass. (as long as the input and output endpoints are on land) | |||
* Underground belts can cross other underground entities (any number of underground belts or underground pipes). They won't be mixed. | |||
* For the connection only the endpoints (entry-side and exit-side) are relevant. | |||
* The underground distance is 4, 6 and 8 [[Map_structure#Tile|tiles]], respectivly, for the three belt types. | |||
* An underground belt pair that bridges a gap of 4 tiles stores up to 44 items. An express underground belt pair at max length stores up to 72 items. | |||
* The half of the underground belt tile with a belt can accept input from the side. The other half (with a tunnel entrance) blocks incoming items. | |||
=== Separating belt lanes === | |||
<gallery mode="slideshow"> | |||
File:Block belt lane.png|This is built by placing one underground belt and then using R to reverse its direction. This converts the underground belt entrance to an exit (and vice versa). | |||
File:Transport belts unmerge.gif|This can also be used to split the lanes of a belt onto seperate belts instead of using a splitter filter.</gallery> | |||
== | === Braiding === | ||
<gallery mode="slideshow"> | |||
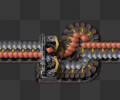
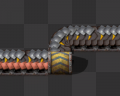
File:underground_belt_braiding.gif|Different types of underground belts can be braided together along the same line of tiles, with items staying in their respective belt types. | |||
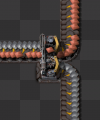
File:underground_belt_braiding2.gif|The same concept, but with a different belt design. | |||
</gallery> | |||
Braiding can be particularly useful where more than two input lanes are required while also avoiding the use of a parallel belt/[[long-handed inserter]] combination. For example, this can be useful if there is limited space, such as when using a beacon. With a beacon range of 3 orthogonal tiles, two of which would be occupied by a belt and inserter, it would not be possible to place the parallel belt in the third space and still have a beacon on the same side, as the assembler would now be in the fourth tile and not in range. With the space saved by braiding, this is now possible. | |||
== See also == | |||
* [[Splitters]] | |||
* [[Transport belts]] | |||
* [[Underground belts]] | |||
{{C|Logistics{{!}}#Belt transport system}} {{C|Belt transport system{{!}}#Belt transport system}} | |||
Latest revision as of 12:00, 29 September 2023

The belt transport system is the first system the player will use to transport items from place to place. It, along with trains, and Logistic robots, makes up the systems of item transportation in Factorio.
Belts specifically are used to transport items and run without using energy. Belts can also interact with other moving entities such as players, vehicles and enemies, also allowing for faster or slower movement speed.
Belt tier overview
There are 3 different tiers of belts available for use. The transport belt has a yellow color and is the slowest, as well as the cheapest to craft. The next tier up, the fast transport belt has a red color and is twice as fast as the standard transport belt. The express transport belt is the final tier. It is colored blue and is three times faster than normal belts, or 1.5× faster than red belts.
(1) Only for the underground belt and splitter. The basic transport belt is available at the start of the game.
Regardless of the belt tier, a fully filled straight transport belt holds 8 items in total. For more information on this, see Transport belts/Physics and Friday Facts #276 - Belt item spacing.
Belt mechanics
Merging and un-merging belts
Belts of all tiers have 2 lanes for items to ride on. This allows for either a double flow of one material, or to transport two different materials on the same belt. Mixed belts can be beneficial for smelting ore, or producing items with many different ingredients such as Utility science pack. The belt can be unmerged using a splitter filter. It is also possible to unmerge a mixed belt by using underground belts since an underground belt will block half of the belt.


Belts going across a splitter will have items from the splitter moving to one side of the crossing belt.

Commonly, merging and un-merging is done by using a splitter. The trick in the second gif is better described in the underground belt section.
Lane balance
Due to how items are placed onto belts by inserters, their lanes can sometimes become unbalanced. In order to maintain throughput, balancing the lanes may be necessary. The gifs below show two ways how to do this. The former only works if only one lane is in use initially. For further explanation of the mechanics, see lane balancers.


Belt throughput

Maximizing the throughput means ensuring that as many items as possible are transported. Therefore some definitions need to be introduced:
- Speed
- How fast a belt moves in tiles per second. This is 1.875, 3.75 and 5.625 for basic, fast and express belts.
- Density
- How tight are the items put onto the belts; each straight belt piece can hold exactly 8 items.
- Throughput
- This is speed × density. It describes how many items pass by at a given time.
So, there are three opportunities to enhance the throughput:
- More density
- Sometimes items have small gaps in between each other that aren't big enough for other items to fit in. However, mining drills, inserters, and belt sideloading can still force an item into these gaps, temporarily squashing the items on the belt. The squashed gap is extended to normal size once the front of the belt starts to move again.
- More speed
- If the belts in the factory are already at maximum density, their speed can still be upgraded with better belts. Finding the bottleneck is the first thing that needs to be done, usually it can be discovered quite easily. There will be a part of the belt where the items don't move quickly (or at all) or stop at maximum density and suddenly they come to a point where this 'stop and go' effect releases itself, the bottleneck has been found. In most cases, this will be the place where belt optimization is needed.
- More belts
- Adding additional parallel belts can also increase the throughput. Simply place more belts carrying the item that needs throughput.
Belt tricks
Moving fast can be essential to defend alien attacks in time. Running on a belt will increase or decrease the movement speed of the player accordingly to the belts speed. That is why building a belt towards your defenses can be beneficial.
However, the player is not the only unit that can be moved by transport belts. Additionally, biters and spitters can be moved. This can be abused to improve your defense. Firstly, biters will have a harder time to reach your walls when placing express transport belt in front of them. Secondly, spitters can be moved closer to your walls. That way more turrets can attack a single spitter at once.
Another useful usage is cars on transport belts. Cars have an inventory and can be filled by inserters. So, they can be used as moving boxes on belts. This has several advantages: Firstly the throughput of the belt-car-boxes is amazingly high, secondly the inserter stack size bonus does apply here and makes inserters more effective.
Splitters
Splitters are another form of item manipulation. Splitters are a 2×1 entity that splits incoming items on belts from up to two input to up to two outputs, in a 1:1 ratio. They are used to divide resources between two belts, or balance multiple belts.
Mechanics
The behavior of splitters looks simple at first glance. But they are not that simple. Splitters have an astonishing amount of uses.
- Splitters have two input belts and two output belts. If the splitter receives items on one belt, it will split the input evenly between its two outputs. If one of the outputs is fully backed-up and the splitter cannot split evenly, it will put all input on its other output.
- Splitters can also merge belts, taking two inputs and one output.
- Splitters preserve the lanes of the items, by moving through the splitter an item on the right lane will not be moved to the left lane, and vice versa.
- Splitters can prioritize one input and/or one output. Clicking on a splitter opens its GUI where the priorities can be set.
- One output of the splitter can be filtered to one item. Items of that type will only go to that output, and not to the other one.
The speed of the splitter is the same as its relevant type of belt, so in order to properly join/split belts, the splitter must be the same speed as the incoming belts. Otherwise the splitter will become a bottleneck.
Priority
For both the input and output side of the splitter it is possible to set the priority to either left or right.
A splitter where the input priority has been set will first try to consume the specified input side, and will only consume the other input once there is a gap on the prioritized input belt.
Similarly a splitter where the output priority has been set will try to redirect all incoming items to the specified output, and will only output on the other output once the specified output is full.
Filter
If a specific item is set in the splitter's filter slot, the slider for the output priority will be used for the filter instead. All items of the set type will be redirected to that specific output and all other items are directed to the other output. The input priority can be set independently of the filter.
Balancing
- Main article: Balancer mechanics
Balancers are used to evenly distribute items over multiple belts or multiple belt lanes.
Manipulating belt lanes
Swapping lanes on a belt with a different item per belt lane.
Separating lanes with different items on them.


Circuit network
Red or green wires can be connected to segments of transport belts to use them as part of a circuit. Belts connected to the circuit network will appear with a yellow cage above them, with a moving red scanner within it. When a belt is connected to a circuit, a GUI can be accessed from the connected belt for settings on how the belt will be used for a circuit; there are two modes of operation that can be used:
Enable/disable - A circuit condition dictates whether or not the belt will allow items through.
Read belt contents - If enabled, the contents on the belt will be read.
The belt's GUI will also have a "content read mode" setting, which can be set to either pulse or hold. Pulse will read the belt's contents for only one tick, while hold will read the belt's contents continuously on every tick.
A small example of a transport belt circuit reading belt contents to trigger two lamps.
Fast inserters are activated by the arithmetic combinators' setup; when a specific item enters a belt segment that's connected to the circuit network, the inserters place the same item on another belt.
Underground belts
Underground belts can be used to cross different flows of items without interfering. They move items like a normal belt.

- Underground belts can cross any number of entities and all types of ground, like water and grass. (as long as the input and output endpoints are on land)
- Underground belts can cross other underground entities (any number of underground belts or underground pipes). They won't be mixed.
- For the connection only the endpoints (entry-side and exit-side) are relevant.
- The underground distance is 4, 6 and 8 tiles, respectivly, for the three belt types.
- An underground belt pair that bridges a gap of 4 tiles stores up to 44 items. An express underground belt pair at max length stores up to 72 items.
- The half of the underground belt tile with a belt can accept input from the side. The other half (with a tunnel entrance) blocks incoming items.
Separating belt lanes
This is built by placing one underground belt and then using R to reverse its direction. This converts the underground belt entrance to an exit (and vice versa).
This can also be used to split the lanes of a belt onto seperate belts instead of using a splitter filter.

Braiding
Different types of underground belts can be braided together along the same line of tiles, with items staying in their respective belt types.
The same concept, but with a different belt design.


Braiding can be particularly useful where more than two input lanes are required while also avoiding the use of a parallel belt/long-handed inserter combination. For example, this can be useful if there is limited space, such as when using a beacon. With a beacon range of 3 orthogonal tiles, two of which would be occupied by a belt and inserter, it would not be possible to place the parallel belt in the third space and still have a beacon on the same side, as the assembler would now be in the fourth tile and not in range. With the space saved by braiding, this is now possible.