教程:快速入门指南
游戏开始
你刚安装好Factorio,通过了教程任务。接下来该干什么呢?不要急请看下去。
开始你的游戏
进入游戏后你会看到主菜单。
左键单击“开始游戏”,然后单击“新游戏”,出现地图生成引擎窗口。默认设置适合新手开始游戏。
地图生成
你可以按照自已的意愿去设置地图生成引擎,一些选项会使游戏变得简单,而其它则会令其变得困难。
每种资源以及虫巢各有三个设置,分别是生成率,尺寸以及资源含量。
生成率,尺寸以及资源含量决定了地图生成时其出现频率,占地面积以及每单位格内含量。
建议新手将铁矿,铜矿,石头,煤炭,原油的生成率设置到密集,资源含量设置到富饶。这样可以保证在距离起始点不远的范围内有充足的资源,而不必在游戏初期为了资源四处奔波。同时将虫巢的尺寸设置到非常小以减少威胁。
如果你想了解更多关于地图生成引擎的信息,请阅读此条目。
和平模式
如果你只想享受建设工厂的乐趣而不被虫族打扰的话,可以勾选“和平模式”。虫族还是会存在但永远不会主动攻击。
实用的快捷键
快捷键设置可以在“选项”菜单中的“控制”页面找到,但由于许多人不会去看,于是附上了必要的快捷键操作设置。
| 快捷键 | 效果 |
|---|---|
| ALT | 显示详情 |
| T | 打开科研界面 |
| Q | 下一个武器或清除光标 |
| R | 旋转实体 |
| Z | 丢在地面上 |
| F | 捡起附近地上的物品 |
| SPACE | 射击目标 |
| C | 强制攻击 |
| ENTER[回车] | 进入或退出交通工具 |
| X | 更改工具栏 |
| P | 打开生产面板 |
| M | 打开世界地图 |
| G | 与火车连接 |
| V | 与火车断开 |
| SHIFT+SPACE | 暂停游戏 |
| Tilde[~] | 打开控制台 |
| SHIFT+LMB | 转移一组物品 |
| CTRL+LMB | 转移全部物品 |
| MiddleMouse | 设置物品筛选 |
| SHIFT+RMB | 对半分物品 |
| CTRL+LMB | 快捷提取全部物品 |
如果你想了解更多关于快捷键的信息,请阅读此条目。
游戏初始
资源
确保在起始点附近有以下四种资源:
如果起始点附近缺少任何一种资源,量太少或是距离太远了,建议按下Esc键然后点击“重开游戏”。
之后我们还需要:
以上六种资源是异星工厂的基础,所有的物品都由它们制成。
制造一把铁斧镐
到任意一种矿石资源上长按右键。屏幕下方会出现进度条,当进度完成之后你便能获得该资源。你或许会觉得砍树或者挖掘矿石的速度非常慢。如果仔细观察主角的话,会发现他只拿着一根铁棒!是时候为自己制造一把工具了。按下E键打开背包及制造窗口,左键单击齿轮图样“工具与设施”,然后左键单击铁斧镐。这样你就获得了第一把工具,使用它可以令采集资源的速度加快。
放置石炉及采掘机
游戏起始工具栏内会有一台石炉以及一台热能采掘机。该如何使用它们呢? 首先你需要把采掘机放置在铁矿边缘,在黄色箭头处摆放冶炼炉。
你可以在放置采掘机前按“R”键旋转其方向或放置后将鼠标箭头移至采掘机上按“R”键旋转方向。黄色箭头显示铁矿产出的方向,将石炉摆放在黄色箭头位置就能使其自动获取采掘机产出的原料。摆放好的位置应该与图示相同。
按“ALT”键可以显示详细信息,这样你就能清楚了解石炉内加工的物品。
加入燃料
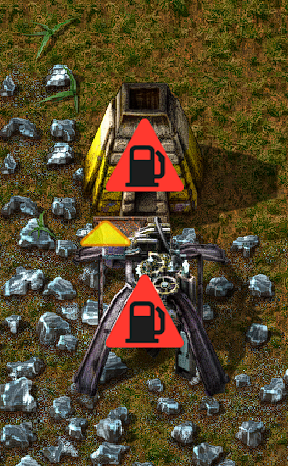
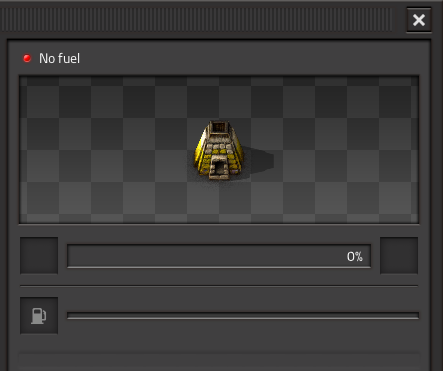
采掘机及石炉放置好了!但有一个红色警示标出现,原因是采掘机以及石炉内没有燃料。你需要向其加入木头或煤,用右键砍伐树木或采掘煤矿。当你获得燃料之后,左键单击石炉,会出现下图所示界面。
左键单击燃料后在印有加油站底样方框处左键单击就能加入燃料。
如果你想分开半组燃料,一半放入采掘机,另一半放入石炉。“Shift”+右键单击燃料。现在采掘机跟石炉都应开始工作并生产铁板。
你可以用相同的方法来获取铜板。
产品升级
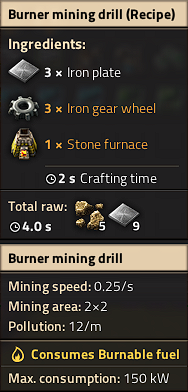
你需要更多的采掘机。当把鼠标箭头移至制造页面内的热能采掘机上时,你会看见两组材料。第一组是制造采掘机所需要的材料。第二组在页面最下方显示需要的基础原料。你不必先制造第一组中出现的物品,游戏会自动帮你合成。只要材料足够,你可以一次制造任意数量的物品。
现在你可以制造更多的采掘机及石炉。铜矿及石矿的自动化采集过程跟铁矿是一样的。至于煤炭,你可以将两个热能采掘机箭头相向摆放。这样它们就能相互补给燃料,同时你可以取走产出剩余的煤炭。不要忘记了,你不需要打开机器菜单来取走物品,用“Ctrl”+左键单击。你还可以通过按Alt键来开启详细信息,也可以通过再次按Alt键来关闭它。
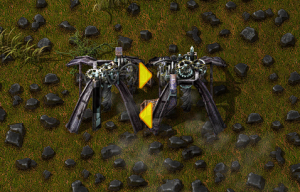
至于石头,你可以在采掘机黄色箭头处放置一个箱子。
完成上述步骤之后,你或许希望能加快采集进度。放置更多的热能采掘机及石炉来制造铁板以及铜板,同时需要更多采掘机来获取作为燃料的煤。游戏开始之时对铁板的消耗比铜板更多,对铜板的消耗将会在之后的电气时代增多。
更多自动化
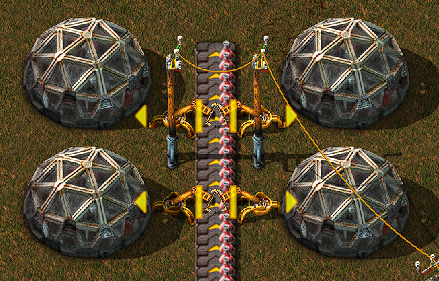
你已经有了若干热能采掘机及石炉在运作。令人恼火的是你需要手动为这些机器添加燃料,让我们来自动化这一过程吧!我们将用到传送带及机械臂。如下图所示,采掘机的产物可以直接输出到传送带上被运往工厂别处。
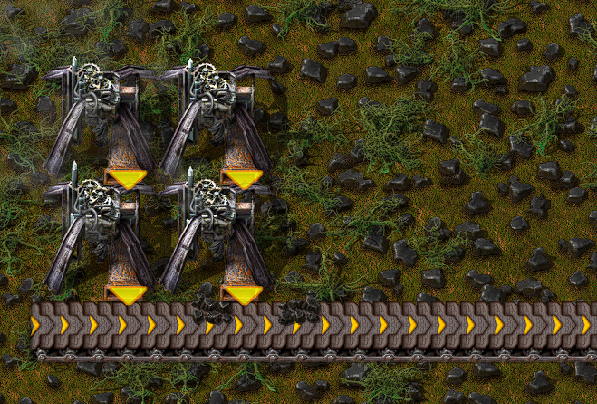
煤炭已经可以被自动挖掘并输送到其它地方,我们需要将传送带上的煤炭放入机器中,这便是机械臂的作用。你可以使用机械臂将物品从地面,箱子或机器中移至其它地方。热能机械臂需要燃料,所以需要在放置后加入燃料,方法与热能采掘机,石炉相同。下图展示了机械臂的放置方法,需要注意:黄色横线代表机械臂取物品的位置,黄色箭头处代表放下物品的位置。

现在你已经学会了如何自动挖掘资源,运输物品及将物品放入机器内。下一步将进入电气时代。
电力
电力时代开始,游戏将会变得有趣。我们需要水泵,一些炉以及蒸汽机。水泵需要在水边设置并且不需要电力就能运作。你可以使用管道江水输送到炉或者直接在水泵后连接锅炉。 Electricity. This is where things start to get interesting. We're going to need a single offshore pump, some boilers and a steam turbine. These are really simple to set up, they just require twenty-some iron plates and 5 stone per boiler. The offshore pump goes in the water and needs no power to run. From there, you can either use pipes to transport the water to boilers, or you can run boilers straight from the pump. Boilers allow water to flow through them just like pipes do, except they also heat the water along the way and cannot be used as corners. The pipes or the boilers then connect to the middle of the short side of the steam engine. Make sure you connect it in the right place or it won't work. Moreover, steam engines allow water to run through them just like boilers, so you can have as many turbines as you want connected in a row. Here is a small example.
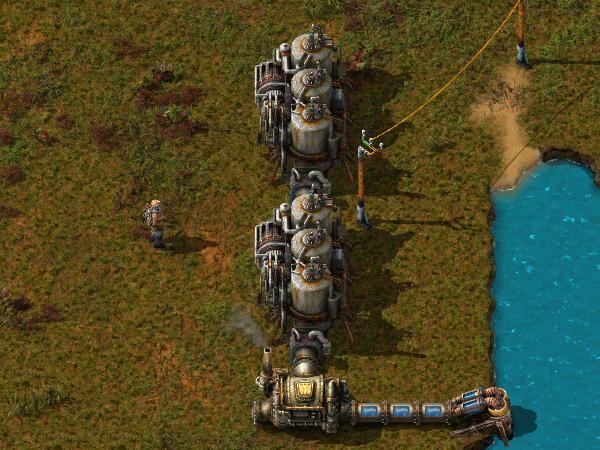
Now you need to use power poles to carry power to your machines. Place some down so that their coverage area (the blue square) overlaps each turbine in at least one square. If they are going to connect, the machines that use power will be shown with a blue outline around their edges.
If the turbine is producing power but nothing is using it, it'll show a yellow flashing icon: right now it's showing because we don't have electric machines yet!
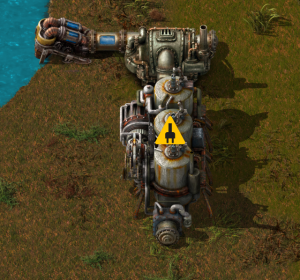
Your power setup can look however you want it to look.
A great method is to have a line of boilers that supply a certain amount of turbines with hot water, and then you can use transport belts to bring coal to them for inserters to place inside them so that your electricity is always running.
The most often used setup is 1 offshore pump, 14 boilers and 10 steam engines. This is due to this being the best ratio between the 3 of them. 1 pump produces enough water for 10 engine, and the 14 boilers is sufficient to heat the water for that many. The example above is easily expanded into this efficient design. But hey, this game is all about experimentation and for you to be able to find ways to do your own things! So get to it, and show off your own unique designs!
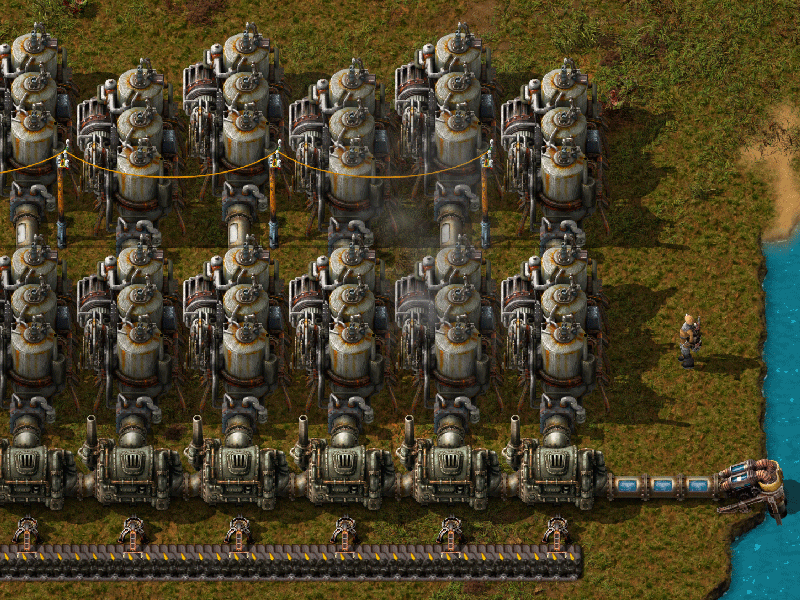
Using this power is as simple as creating a machine that runs on electricity and placing a power pole close enough to it that the blue square touches the machine, just like you have to do at the power plant with the engines. Make sure that there is a line of power poles that actually connect to your power plant.
Now that power is explained, we need to increase our resource production.
However, if you want detailed info on your power production/consumption, you can check the Detailed Electric Network Info, opened by clicking on any powerpole.
Re-thinking our resources and research
Next we really want to get onto automation of items, not just the smelting of ores.
Before we can get to that though, we're going to have increase our production of ores. This is where things start becoming a little tricky and there are few things you want to do at once. We really want to be able to set the factory to make things and let it go. But for that we need some extra utilities which we don't have and need to get through research.
We haven't even touched on that yet! lets start by ramping up our resource production. Now that we have electricity, we can use Electric Mining Drills. These are much better than those scummy Burner ones. They work exactly the same except they are twice as fast and they don't rely on fuel, as you could guess by the names. You can have them to output your raw resources onto belts and get them to a place where you can mass process the ores into plates. Here is a small example of what you could do, but let your imagination and your calculating logic figure out other, maybe even better ways of doing it! You want ore to be split more or less evenly on each side of the belts. This helps with the amount of resources that can be carried to your base of operations on a single belt.
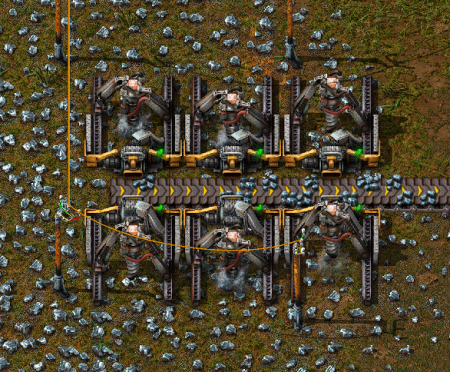
This is once again easily expandable all over an iron deposit. This conveyor belt can then take all of the ore to some sort of processing area. The processing area needs some machines that we currently don't have due to limitations in our research.
Most importantly, we want the long handed inserter. This inserter is able to reach twice as far as a normal inserter! It is very useful for bringing or placing items to or from conveyor belts that are one extra tile away. So what we need to do is to make some science labs. They don't cost too many resources, but take a little while to make. Craft one or two of them and connect them to power. When you first place one, you are going to get a popup asking you want you want to research. We really want automation right now. This gives us our inserters and the Assembling machine 1, which is going to be very useful in the near future.
You'll notice that the cost for this is 10 Science Pack 1's, or "red potions" or "flasks" as some people like to call them. These are simply another crafted item, which you should craft 10 of now and place them in your labs to begin researching. While you are waiting for your flasks to craft or your research to complete, lets continue building an ore processing center. We want a line of copper, iron and coal to be available for this area. Despite being in the electric era, our furnaces still need coal until a little further down the line.
Below is another sample of how you could set up your area. There are efficient ways of making them that you might see on the forum, but if you want to learn about what they are and how they work, you can either experiment yourself or search the wiki/forum for some better designs.
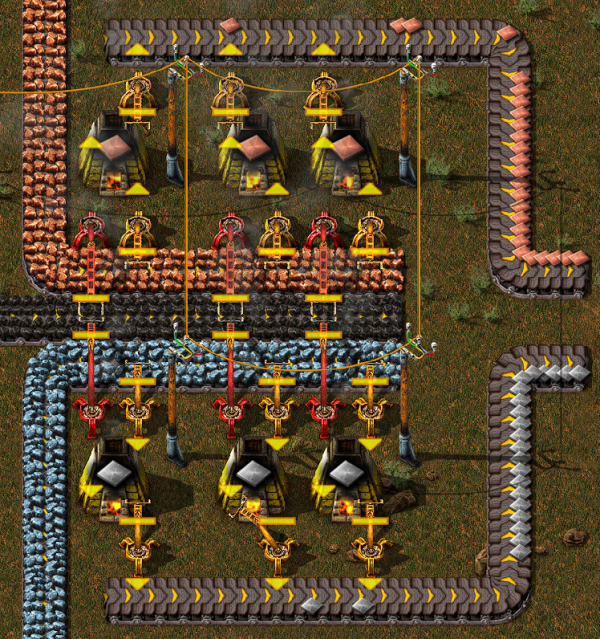
As per usual, I leave this area with plenty of room to expand later on when demands become higher. The important parts about this is that you need the red, long handed inserters to be able to reach the coal in the middle to fuel your furnaces. You need seperate belts for your incoming raw materials to be able to be processed, and then another belt outside of them to handle the output after they have been smelted. These materials can then go straight into your base to be made into a myriad of other things. Finally, we have a steady and upgradeable supply of copper and iron plates, and we can get into further automation with the assembling machines so we can automate creation of things like Science Packs, Ammunition and every other item that the player themselves can craft, but without you involved at all!
Automating that research
Ok, so a fair amount has happened. Now, to be able to progress into later parts of the game with better research we are going to want automate the process of making science packs and putting them into the labs. This way we won't have to worry about research any longer.
There are many designs that you can find on the forums, but I'll show you something simple, letting you find what works for you. I would highly recommend that you research Logistics as your next research, and in fact manually craft the science required for this. The logistic research gives you some important things: the splitter, the underground belt and the fast inserter. The splitter and underground belts are some of the most important items you'll get at this stage. They do pretty much what their names imply.
So what do science packs require? We need copper plates and iron gears. So far we have only dealt with raw resources, how do we make craftable things? The Assembler answers your prayers! If you place an assembler down and open its interface, it asks you what you would like it to craft. Once you select one, if you put the ingredients in that it requires it will craft the item and you can pull out the finished product. In the case of red science packs, we will need an assembler making iron gears, and an assembler making the actual packs. A nice way of doing this is to have a conveyor belt with 1 side containing the copper plates and the other side taking the gears from another assembler like below.
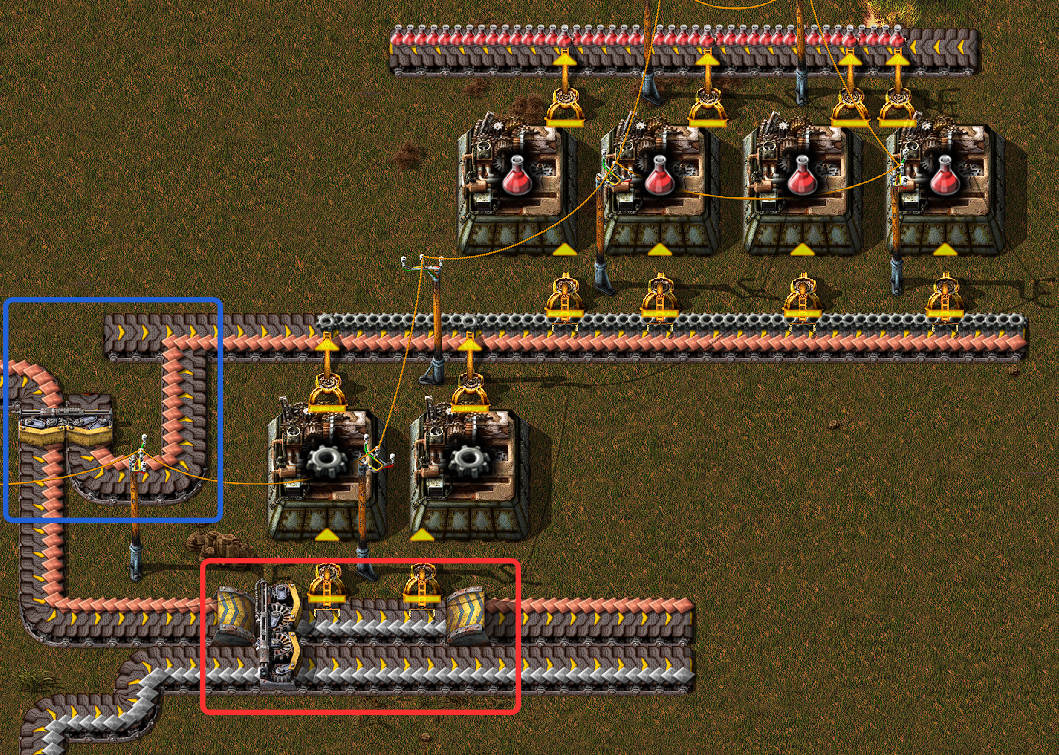
Now this picture uses a few neat little tricks that I will explain in detail. If you have your plate belts seperate, and you want them running side by side there can be issues with trying to grab one or the other resources from the far belt. Yes, you could use a long inserter, but in some cases you don't want this (e.g. you need a fast inserter to get resources quickly into your assemblers).
The area in red is a good way to get around this. By having a splitter, you can move the far belt from your production in close while also allowing it to continue down the line for later use. For the copper, we use an underground belt to go underneath the area that is now taken by the far line which also allows the copper to continue on. Once again, this is only one possible method of doing things and you are in no way obligated to follow it.
The area in blue is a quick way to allow copper to continue down the main line, while also splitting some off for our red science assemblers. Notice how when it joins the line that the gears are on, they only join the bottom side of the belt. The little extra belt that I added to the left stops the belt from becoming a turn, and therefore makes the items only join the side I want them to. The rest is simple: the gears and copper get pulled into the assemblers, they make the science and then it gets pulled out again on the other side. These flasks can then be transported to some labs to automatically do your research for you, for example like this:
