Transport belt: Difference between revisions
Jump to navigation
Jump to search
No edit summary |
Thrawcheld (talk | contribs) use proper markup |
||
| Line 9: | Line 9: | ||
|consumers=Manual + Assembling machine | |consumers=Manual + Assembling machine | ||
}} | }} | ||
The '''Basic Transport Belt''' is the easiest way of automatic transportation of items. | The '''Basic Transport Belt''' is the easiest way of automatic transportation of items. It is available from the beginning without [[research]]. | ||
See '''[[Transport_belts|Transport belts]]''' for more general information about transport belts. | |||
See '''[[Transport_belts|Transport belts]]''' for more general information about transport belts. | |||
==Properties== | ==Properties== | ||
{| class="wikitable" | {| class="wikitable" | ||
|- | |- | ||
| Line 27: | Line 24: | ||
|- | |- | ||
| {{imagelink|basic-transport-belt|Basic transport belt}} || 13.393* || 1.875* || 7.143* || none | | {{imagelink|basic-transport-belt|Basic transport belt}} || 13.393* || 1.875* || 7.143* || none | ||
|} | |} *experimental value: See '''[[Transport_belt_experiments|Transport belt experiments]]''' for more detailed information. | ||
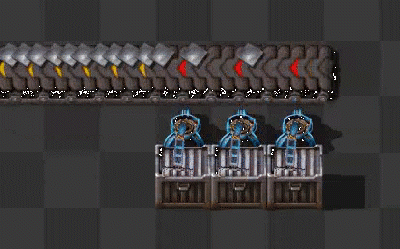
*experimental value: See '''[[Transport_belt_experiments|Transport belt experiments]]''' for more detailed information. | [[File:Basic_transport_belt_fulldensity.gif|top|400px|thumb|none|3 [[fast inserter]]s per side will fill a basic transport belt to maximum density.]] | ||
==Production Layouts== | ==Production Layouts== | ||
| Line 54: | Line 44: | ||
== Related items == | == Related items == | ||
{| class="wikitable" | |||
|- | |||
! [[Transport belts]] | |||
! [[Underground belts]] | |||
! [[Splitters]] | |||
|- | |||
| {{imagelink|basic-transport-belt|Basic transport belt}} | |||
| {{imagelink|Basic-transport-belt-to-ground|Basic underground belt}} | |||
| {{imagelink|basic-splitter|Basic splitter}} | |||
|- | |||
| {{imagelink|Fast-transport-belt|Fast transport belt}} | |||
| {{imagelink|Fast-transport-belt-to-ground|Fast underground belt}} | |||
| {{imagelink|Fast-splitter|Fast splitter}} | |||
|- | |||
| {{imagelink|Express-transport-belt|Express transport belt}} | |||
| {{imagelink|Express-transport-belt-to-ground|Express underground belt}} | |||
| {{imagelink|Express-splitter|Express splitter}} | |||
|} | |||
== See also == | == See also == | ||
* [[Transport network]] | * [[Transport network]] | ||
Revision as of 20:02, 4 March 2016
Template:Machinery The Basic Transport Belt is the easiest way of automatic transportation of items. It is available from the beginning without research.
See Transport belts for more general information about transport belts.
Properties
| Type | Max. throughput (Items per game-second) | Speed (Tiles per game-second) | Max. density (Items per tile) | Required technologies |
|---|---|---|---|---|
| Basic transport belt | 13.393* | 1.875* | 7.143* | none |
*experimental value: See Transport belt experiments for more detailed information.

Production Layouts
| Design | Input: (Items per game-second) |
|---|---|
| File:Transport belt layout1.jpg | |
| Output: (Items per game-second) | |