|
|
| (71 intermediate revisions by one other user not shown) |
| Line 3: |
Line 3: |
|
| |
|
| ---- | | ---- |
|
| |
| {{Languages}} | | {{Languages}} |
| :''テクノロジーに関しては[[Railway (research)/ja|鉄道技術(研究)]]をご覧ください。''
| | '''ベルト輸送システム(Belt transport system)'''は、アイテムを異なる場所の間で輸送するために[[player/ja|プレイヤー]]が最初に触れることとなるシステム。[[Railway/ja|列車]]、[[Logistic network/ja|物流ロボット]]と並んで、Factorioにおけるアイテム輸送システムを構成している。 |
| | | (訳注:0.16現在、"transport"は搬送ベルトについてのみ「搬送」と訳され、それ以外に於いては「輸送」と訳されている。以下では固有名詞以外は「輸送」に統一する) |
| 鉄道(Railway)はFactorioにおける主要輸送手段の一種。導入は複雑になりえるし大量の資源と場所を食うが、特に長距離輸送に於いては[[Belt transport system/ja|ベルト]]や[[Logistic network/ja|ロボット物流]]より速くて効率的。
| |
| | |
| しかしながら、鉄道の建築は即座に理解できるようなものではない。自動輸送のような基本を学ぶのにもいくらかの時間がかかる。大規模な鉄道ネットワークを運営し維持してゆくことを学習するには時間と経験が必要となる。
| |
| | |
| == インフラ ==
| |
| | |
| 鉄道を建設するには、列車を乗せるための軌道(track。線路(rail)とも)を敷かねばならない。典型的には[[rail planner/ja|レールプランナー]]で行われるが、手動でも可能。線路は2タイル単位で設置され、1タイルだけ動かすことは出来ないことに留意せよ。
| |
| | |
| === 最小限の手動運行鉄道 ===
| |
| 最小限の手動運行鉄道は以下から成る。
| |
| * [[Rail/ja|レール]] (軌道)
| |
| * [[Locomotive/ja|機関車]]
| |
| | |
| 機関車のそばに立って{{Key|ENTER}}を押下すれば乗り込んで手動運行できる。
| |
| | |
| === 分岐 ===
| |
| * 分岐の作動状況に視覚的表現はないものの、レールは合流できる。レールプランナーを使えば、[[rail/ja|レール]]を既存レールに重ねて置くことで分岐を形成できる。分岐は路線上の枝分かれであり、列車に2方向の選択肢を与える。
| |
| * 列車は旋回角に制限があるため、2つの直線軌道が交差する点は分岐とはならない。[[Rail signal/ja|信号ブロック]]を形成して衝突を防ぐことはできる。
| |
| * 並列軌道は相互に干渉しない。しかし、近すぎる場合には一方からもう一方への分岐が余計な資源を必要とする。軌道を一旦遠ざかる向きに伸ばし、そのあとで戻す必要がある。これは複雑な信号ネットワークの原因になるので、一般的には十分な間隔を開けずに並列軌道を敷くべきではない(ふつう軌道2本分の間隔で上手くいく)。
| |
| | |
| [[File:fff-140-controlled-gates.gif|thumb|安全な鉄道横断の例]]
| |
| === 軌道の横断 ===
| |
| | |
| '''軌道の横断には注意!列車はゲーム中で最も与ダメージが大きいものの一つであり、接触時にほとんどのプレイヤーを瞬殺する。''' | |
| | |
| 軌道を横断する際の適切な流儀チェックリスト。
| |
| | |
| # ズームアウトして列車が来るか見えるようにする。
| |
| # 左を見て、次に右を見る。
| |
| # 近傍の信号を確認。[[rail signal/ja|列車用信号]]が突然青から赤や黄色に変わったら、列車が来るので横断してはいけない。
| |
| # 完全には軌道上にいなくとも轢かれうるので、軌道付近を歩いてはいけない。
| |
| # 動いている列車に飛び乗ったり飛び降りたりもできるが、失敗の対価は命である。列車の側面もダメージ判定が有り、2台の列車の間で轢き潰されうる。
| |
| # 大量の[[Energy shield/ja|シールド]]はダメージを軽減しうる。極端な場合には、体一つで列車を止めることすらできる。このためには瞬殺されないように相当なエネルギーシールドモジュールが必要で、スーツのエネルギーを大量に消費する。
| |
| # 体力を持つものなら列車に轢かれるとダメージを受けるので、[[Car/ja|自動車]]や[[Tank/ja|戦車]]を軌道に放置しないように。この対象には敵勢力をも含むのだが。
| |
| # [[train stop/ja|駅]]から遠く離れた列車は(ほぼ)最高速で運行するので、横断の際はより警戒しズームアウトしておこう。[[train stop/ja|駅]]や信号付近では止まるために減速しており、低速で運行する。設定が違っても早かったり遅かったりする。
| |
| | |
| 図に示すような安全な路線横断が建設できる。これは接近中の列車がレールを予約したとき、軌道へのアクセスを制限する。プレイヤーがレール上に居る時は、[[circuit network/ja|回路ネットワーク]]を介して信号は予約され、列車はプレイヤーが軌道を離れるまで停まって待たねばならない。プレイヤーが内部にいて軌道を横断しているとき、列車のゲートは閉じているので横断部以外の軌道にプレイヤーが踏み入ることは出来ない。これは完全に安全な横断を保証するので、サーバーでよく用いられる。
| |
| | |
| {{clear}}
| |
| | |
| == Trains ==
| |
| Train components:
| |
| | |
| {| class="wikitable"
| |
| |{{Imagelink|Locomotive}} || {{Imagelink|Cargo wagon}} || {{Imagelink|Fluid wagon}} || {{Imagelink|Artillery wagon}}
| |
| |}
| |
| | |
| [[File:Railway-assemble-train.png|thumb|left|300px|Placing a [[Cargo wagon/ja|Cargo wagon/ja]] so it is attached to the train.]]
| |
|
| |
|
| * A train consists of at least one locomotive.
| | ベルトは特にアイテムの搬送に用いられ、エネルギーを使わずに稼働する。ベルトは他の動くエンティティ、例えば[[player/ja|プレイヤー]]、[[vehicle/ja|乗り物]]や[[enemies/ja|バイター]]とも干渉でき、動きを速めたり遅めたりする。 |
| * Trains can have more than one locomotive, and any number of [[Wagon/ja|Wagon/ja]]s.
| |
| * Locomotives can be '''manually''' driven forwards or backwards, however, they are generally slower going backwards. The left and right movement keys are used to change direction at switches.
| |
| * Trains can only drive forwards automatically. An automatic train can drive forwards and backwards when two locomotives facing different directions are connected to the train.
| |
| * A train needs [[fuel/ja|fuel/ja]] to drive. Fuel can be added by inserters when the train is in manual mode or parked at a station, not when waiting at a signal or standing on automatic mode.
| |
|
| |
|
| The locomotives' inventory is only used for [[fuel/ja|fuel/ja]]. To transport items or fluids [[cargo wagon/ja|cargo wagon/ja]]s and/or [[fluid wagon/ja|fluid wagon/ja]]s have to be attached to the train. To attach rolling stock, whether a wagon or a locomotive, the player may either prepare to place one near an existing train, where a green graphic will show the player that the stock will be attached, showing a connection between the train and the new stock. Alternatively, the player may manually connect rolling stock to trains with the rolling stock connect key, if the cargo wagon was placed far away from a train. Rolling stock can likewise be disconnected with the rolling stock disconnect key. The cargo wagons can be filled or emptied manually or by up to twelve adjacent [[Inserters/ja|Inserters/ja]] (six on each side), while fluid wagons can be filled or emptied with up to three [[pump/ja|pump/ja]]s, which will automatically connect to the nipples on top.
| | == 搬送ベルトの種類 == |
|
| |
|
| {{clear}}
| | 以下はFactorioで利用できる搬送ベルト全てのチャート。 |
|
| |
|
| == Stations ==
| |
| [[File:station-example-1.png|thumb|right|256px|A very minimal train station./ja|]]
| |
| Station Components:
| |
| {| class="wikitable" | | {| class="wikitable" |
| |{{Imagelink|Train stop}} || {{Imagelink|Straight rail|Rail|Rails}} || {{Imagelink|Inserter|Inserters}} or {{Imagelink|pump|pump|Pumps}} | | ! [[Transport belts/ja|搬送ベルト]] !! [[Underground belts/ja|地下搬送ベルト]] !! [[Splitters/ja|分配器]] !! 最大スループット(アイテム毎[[game-second/ja|秒]]) !! 必要研究 !! 原材料(ベルト1つあたり) |
| | |- |
| | | {{Imagelink|Transport belt|Transport belt/ja|搬送ベルト}} |
| | | {{Imagelink|Underground belt|Underground belt/ja|地下搬送ベルト}} |
| | | {{Imagelink|Splitter|Splitter/ja|分配器}} |
| | | 13.333 |
| | | [[Logistics (research)/ja|物流学1]]<sup>1</sup> |
| | | {{Icon|Time|1}} + {{Icon|Iron plate|3}} |
| | |- |
| | | {{Imagelink|Fast transport belt|Fast transport belt/ja|高速搬送ベルト}} |
| | | {{Imagelink|Fast underground belt|Fast underground belt/ja|高速地下搬送ベルト}} |
| | | {{Imagelink|Fast splitter|Fast splitter/ja|高速分配器}} |
| | | 26.666 |
| | | [[Logistics 2 (research)/ja|物流学2]] |
| | | {{Icon|Time|3.5}} + {{Icon|Iron plate|11.5}} |
| | |- |
| | | {{Imagelink|Express transport belt|Express transport belt/ja|超高速搬送ベルト}} |
| | | {{Imagelink|Express underground belt|Express underground belt/ja|超高速地下搬送ベルト}} |
| | | {{Imagelink|Express splitter|Express splitter/ja|超高速分配器}} |
| | | 40.0 |
| | | [[Logistics 3 (research)/ja|物流学3]] |
| | | {{Icon|Time|9}} + {{Icon|Iron plate|31.5}} + {{Icon|Lubricant|20}} |
| | |- |
| |} | | |} |
|
| |
|
| | (1) 地下搬送ベルトと分配器のみ。ノーマル搬送ベルトはゲーム開始時から利用可能。 |
|
| |
|
| A '''train station''' is a combination of at least one [[train stop/ja|train stop/ja]] plus a [[storage/ja|storage/ja]] and/or distribution system, used to fill or empty [[cargo wagon/ja|cargo wagon/ja]]s and/or [[fluid wagon/ja|fluid wagon/ja]]s, load [[fuel/ja|fuel/ja]] into the [[Locomotive|locomotive(s)/ja|]], load ammunition into [[artillery wagon/ja|artillery wagon/ja]]s, or repair trains.
| | ベルト階級にかかわらず、ぎっしり詰まった搬送ベルトは6~8アイテムを保持できる。詳細は[[Transport_belts/Physics/ja|搬送ベルトの物理]]参照。 |
|
| |
|
| '''Don't mix up ''train stations'' with ''train stops''.''' A train station is a concept, whereas a [[train stop/ja|train stop/ja]] is an item.
| | == ベルトの階級(Tier) == |
| | |
| [[Inserter/ja|Inserter/ja]]s placed next to train tracks are used to load/unload trains at train stops. Inserters are the only way to automatically get items out of and into cargo and artillery wagons; pumps are the only way to automatically get fluids into and out of fluid wagons.
| |
|
| |
|
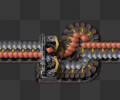
| | [[File:Transport_belts_speed.gif|300px|thumb|top|3種のベルトとその速度(上から順に: 通常ベルト、高速ベルト、超高速ベルト)]] |
| | 3種類の階級のベルトが使える。[[transport belt/ja|搬送ベルト]]は黄色くて一番遅いが、同時に一番製造コストが安い。次の階級は赤い[[fast transport belt/ja|高速搬送ベルト]]で、通常の2倍速。[[express transport belt/ja|超高速搬送ベルト]]は最も階級が高く、青色で通常の3倍、もしくは赤ベルトの1.5倍。 |
| {{clear}} | | {{clear}} |
|
| |
|
| == Signals == | | == ベルト機構 == |
| The two types of signals in Factorio:
| |
| {| class="wikitable"
| |
| | {{Imagelink|Rail signal}} || {{Imagelink|Rail chain signal}}
| |
| |}
| |
| | |
| Understanding rail signals can be difficult. Several terms critical to understanding them are below:
| |
| *Rail segment
| |
| : A piece of track (one item).
| |
| *Segment
| |
| : A single path of continuous track without intersections or switches. This becomes important when signals are employed. The player may mouse over a segment to see its number. It's number is unique within the world, however does not start from 0 or 1.
| |
| *Block
| |
| : A set of segments defined by rail signals. By default every connected segment belongs to one block, no matter whether a train can drive on it or not, and even if it can be driven only in one direction (e.g. at a switch, both segments of the switch belong to the same block). The blocks are shown as colored lines on the rails when the player holds a rail or rail chain signal.
| |
| | |
| Rail signals are used to employ multiple trains automatically. Note that driving a train manually ignores most of the rules described here; other automatic trains will follow signaling indicted by the player's movement dynamically, however it will sometimes be not possible to avoid a collision for automatic trains if the player ignores red/yellow signals. Always beware automatic trains and give them the right of way.
| |
| | |
| '''See [https://forums.factorio.com/viewtopic.php?f=18&t=3811#p28310 this forum post]''' for a good explanation about blocks.
| |
| | |
| === Basic Signaling Rules ===
| |
| * There can only be one train in a block at any time. A train spanning multiple blocks occupies them all.
| |
| * A red signal means that the following block is occupied by a train.
| |
| * A yellow signal means that a train is approaching and already has the approval to enter the following block.
| |
| * [[Rail signal/ja|Rail signal/ja]]s separate a new block and reflect its state: green - free, yellow - reserved, red - occupied
| |
| * [[Rail chain signal/ja|Rail chain signal/ja]]s separate a new block and reflect the state of the next [[Rail signal/ja|Rail signal/ja]](s): see above, blue - at least one of the paths is blocked, but not all
| |
| * A train can only pass a signal on the right of the track, or if there is a signal on both sides on the same rail segment. Of course, manual driving overrides this.
| |
| | |
| {{clear}}
| |
| | |
| == Deadlocks ==
| |
| A deadlock or gridlock can happen when every train is locked by another. In nearly every case two or more trains are standing so that every train blocks (by minimum) one other train.
| |
| | |
| === Deadlock occurrence ===
| |
| Deadlocks occur when two or more trains are prevented from continuing through an intersection, due to an unsolvable signal conflict. There are a few different types of deadlocks:
| |
| | |
| # Temporary - These are caused by a temporary hiccup in a train's path, such as a loading train being in the way, or created by closing a signal with the [[circuit network/ja|circuit network/ja]]. These often resolve themselves.
| |
| # Semi-permanent - These are the result of a problem with pathing, often created by a fuel-less train or broken rail, and may require player interaction to resolve, or (in the case of broken rails) may be corrected automatically by construction robots.
| |
| # Permanent - This type is the worst, and cannot be resolved automatically, often requiring the player to manually drive several trains to get them out of the intersection. These often are caused by incorrect signal placement or unreachable stations.
| |
| | |
| It's important to remember that deadlocks can happen by chance, and by mistake of the player. Sometimes even perfectly signaled rails have issues. The rate of deadlocks is inversely proportional to the quality of signaling, however.
| |
| | |
| === Factors that influence the deadlock chance ===
| |
| * Train length (shorter trains will have a lower chance with the same rail/signal layout, due to having less effect on the rails they're on.)
| |
| * Size of the blocks: More space for the blocks means lower chance of deadlock.
| |
| * Track layout: Some layouts have a higher chance of locking than others.
| |
| * Quantity of trains - More trains trying to use an intersection will result in higher chance of deadlock.
| |
| * The chance is also much higher if trains need to wait often in areas with rail-crossings.
| |
| | |
| Knowing the factors, how can deadlocks be reduced?
| |
| | |
| * Don't use 4-way junctions or roundabouts (circles) to create junctions.
| |
| * Use better 3-way junctions. See [http://www.factorioforums.com/forum/viewtopic.php?f=18&t=9044 A Detailed Look at a Bidirectional Three-way Train Intersection]
| |
| * Use roundabouts only for changing direction of train, and never for high traffic intersections.
| |
| * Build more tracks around junctions. Don't have one junction be the only way to reach a place, add redundancy. This keeps a small problem a small problem.
| |
| | |
| == Automated transport ==
| |
| [[File:train-schedule-gui.png|thumb|300px|The scheduale tab in the train GUI: 1 - switch between automatic and manual driving mode; 2 - add new train station; 3 - delete selected station; 4 - send train to selected station; 5 - add wait condition for selected station; 6 - delete selected wait condition; 7 - change logical mode of selected wait condition/ja|]]
| |
|
| |
|
| Trains set on "Automatic" choose their destination stop and route on departure, and after waiting at a chain signal for five seconds, and when their destination stop disables itself by circuit condition. They choose the shortest route using a [[Railway/Train_path_finding|path finding algorithm/ja|]] that will get them to an enabled train stop with the right name, taking penalties for any apparent-at-the-time delays into account. If no such train stop exists they will skip the stop and go on to the next.
| | === ベルトの合流・分岐 === |
|
| |
|
| This section covers items used to make trains automatically transport items between stations. The player should be familiar with creating a rail system.
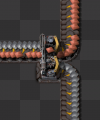
| | どの階級のベルトも、アイテムが載るレーンを2つ持つ。一種類の素材を2つ流すことも、2つの異なる素材を同じベルトに流すこともできる。混合ベルトは鉱石の精錬や、[[high tech science pack/ja|ハイテクサイエンスパック]]のように多くの異なる原料を要求するアイテムを製造するのに便利。混合ベルトは分配器フィルタで分離できる。地下ベルトは片方を通さないので、地下ベルトを用いて分離することもできる。 |
|
| |
|
| First, the player has to setup a rail system with at least two train stops, which are placed in the right-hand side of the expected train arrival direction. By hovering over the train stop with the mouse you see the positions of the vehicles for better setting up the train station (including (un)loading machinery, refueling/repair installations).
| | [[File:Transport_belts_2_lanes.gif|top]] [[File:Transport_belts_unmerge.gif|300px|top]] |
|
| |
|
| When you set up the train schedule (see below) and fuel the train, you can start the train on it's schedule by switching from manual to automatic driving mode.
| | 合流/分離はよく[[splitter/ja|分配器]]で行われる。2番めのgifに見られる小技については、'''[[Belt_transport_system#ベルトレーン分岐|地下ベルト]]'''節に詳しい。 |
|
| |
|
| === Train schedule === | | === レーンバランシング === |
| The player can set up a list of train stations in the upper window. The train will route to stops in the given order, if it's at the end it will continue with the first. Currently, it's not possible to make a one-time schedule. Stations can be added by clicking button 2 (see picture). A pop-up appears with a list of all stop names. If you select one, another pop-up appears for you to select a wait condition.
| |
|
| |
|
| Wait conditions are used to tell the train when to leave the station. There are 7 types of wait conditions:
| | [[inserters/ja|インサータ]]のベルトへのアイテムの置き方が原因で、レーンが偏ってしまうことがある。スループットを維持するには、レーンバランシングが不可欠だ。以下のgifでは2つのやり方を示す。前者は、最初に1レーンのみが使われている場合のみ機能する。原理についての詳細は、[[Balancer mechanics/ja#レーンバランサ]]を見よ。 |
| * '''Time passed'''
| |
| * '''Inventory full''' - All inventories of the train are full.
| |
| * '''Inventory empty''' - Same as above, but empty.
| |
| * '''Item count''' - The train (all cargoes summed) contains a specific amount of a certain item.
| |
| * '''Circuit condition''' - The train stop is connectable to the [[Circuit network/ja|Circuit network/ja]], so the signals can used for wait conditions.
| |
| * '''Inactivity''' - No items were added or removed for the specified amount of seconds.
| |
| * '''Fluid count''' - The train (all fluid wagons summed) contains a specific amount of a certain fluid.
| |
|
| |
|
| Hereafter the word "term" is used to describe ''one'' type of wait condition, and the words "wait condition" are used to describe the whole set of terms (it turns a bit into maths).
| | [[File:Transport_belts_balance1.gif|top]] [[File:Transport_belts_balance2.gif|top]] |
|
| |
|
| If you add more than one term, you can change the connection of those using the logical operators AND and OR (button 7). An AND condition will result in true if all terms are true. An OR condition will return true if at least one of the terms is true.
| | === ベルトスループット === |
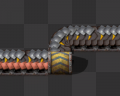
| | [[File:Stack inserters fill express belt.gif|frame|right|[[stack inserter/ja|スタックインサータ]]4つで超高速ベルトを満載できる。左の2つはスタックサイズ12、右の2つはスタックサイズ7。]] |
| | スループットの最大化は、ベルトを効率化するために重要である。そのため、いくつかの定義を導入しよう。 |
|
| |
|
| When mixing AND and OR terms, the logic is grouped by the OR terms. When evaluating the wait condition, the first term is evaluated along with all AND terms immediately following up to but excluding the next occurring OR term. If they all evaluate true, the wait condition evaluates true. Otherwise, evaluation continues with that next occurring OR term and all AND terms immediately following it, up to the next OR term. This continues until either an OR group evaluates true and the wait condition is satisfied, or all terms have been checked.
| | ; 速度(Speed) |
| | : ベルトがどれほど速く動くか。 |
| | ; 密度(Density) |
| | : アイテムがどれほどぎっちりベルトに載せられているか。 |
| | ; スループット(Throughput) |
| | : 速度×密度。所与の時間において、どれほど多くのアイテムが通過するかを表す。 |
|
| |
|
| ==== Examples ====
| | では、スループットを拡張しうる3つの可能性を見ていこう。 |
| <div class="toccolours mw-collapsible mw-collapsed" style="width:800px">
| |
| Expand for examples
| |
| <div class="mw-collapsible-content">
| |
| Wait until full, up to 30 seconds:
| |
|
| |
|
| <pre>
| | ; 密度の増加 |
| Full cargo inventory
| | :しばしば、アイテムの間隙に他のアイテムが入れられるほど大きくはないギャップが生じる。しかし、掘削機、インサータ、ベルトのサイドローディングではベルト上のアイテムを一時的に押し込めることで、そうした隙間にもアイテムを無理やり詰め込むことができる。押し込められた隙間は、ベルト前方が再び動き始めたときに通常のサイズまで拡張される。 |
| OR 30 seconds passed
| | ; 速度の増加 |
| </pre>
| | :工場内のベルトがすでに最大の密度だとしても、よりよいベルトにアップグレードして速度を改善できる可能性がある。まず最初にしなければならないのはボトルネックを探すことで、たいていすぐ見つかる。アイテムが高速に(もしくは全く)動かない、もしくは最大密度で停止しているような部分があり、そしてこの「進んでは止まる」状態が突如として解消される箇所もあるだろう。そこがボトルネックだ。大概の場合、こここそがベルト最適化を必要とする場所だ。 |
| | ; ベルトの増加 |
| | :さらなる並列ベルトの追加によってもスループットを向上できる。単純な話、スループットが必要なアイテムを運ぶベルトはたくさん置こう。 |
|
| |
|
| Wait until cargo full, ''or'' circuit condition Oil > 3000:
| | === ベルト便利ワザ === |
|
| |
|
| <pre>
| | 敵の襲撃に防御が間に合うためには、高速に移動できることが重要だ。ベルト上を走ると、ベルトの速度に応じて[[player/ja|プレイヤー]]の移動速度が早まったり遅くなったりする。だから、[[defense/ja|防衛拠点]]に向けてベルトを張り巡らせておくと良い。 |
| Full cargo inventory
| |
| OR Circuit condition - Oil > 3000
| |
| </pre>
| |
|
| |
|
| Wait until empty, ''and'' 30 seconds passed, ''and'' 5 seconds of inactivity:
| | 一方で、プレイヤーのみがベルト上を移動できるわけではない。バイターやスピッターも移動できる。これを悪用して防衛を強化できる。まず、超高速搬送ベルトを壁の前に設置しておくことで、バイターが防壁にたどり着くまでの時間を引き伸ばせる。次に、スピッターを壁の近くに移動できる。こうすれば、より多くのタレットが一度に1体のスピッターを攻撃できる。 |
|
| |
|
| <pre>
| | ほかの便利な利用法としては、搬送ベルトに[[car/ja|自動車]]を載せることもできる。自動車はインベントリを持ち、[[inserters/ja|インサータ]]で積み込める。つまり、ベルト上を動く箱として利用できる。これにはいくつかのアドバンテージがあり、第一にこの自動車回転寿司のスループットは極めて高い。第二に、インサータスタックサイズボーナスが適用されるので、インサータがより効率的になる。 |
| Empty cargo inventory
| |
| AND 30 seconds passed
| |
| AND 5 seconds of inactivity
| |
| </pre>
| |
|
| |
|
| Wait until iron ore is low, ''or'' copper ore is low ''and'' at least 30 seconds passed:
| | == 分配器(Splitter) == |
|
| |
|
| <pre>
| | [[Splitters/ja|分配器]]は別の形でアイテムを操作する。分配器は2x1の大きさで、2つまでの入力ベルトからやってきたアイテムを2つまでの出力ベルトに1:1の比で分配する。資源を2本のベルトに分けたり、複数のベルトをバランシングしたりするのに用いられる。 |
| Cargo: Iron ore < 500
| |
| AND 30 seconds passed
| |
| OR Cargo: Copper ore < 500
| |
| AND 30 seconds passed
| |
| </pre>
| |
|
| |
|
| Factorio's wait condition logic is read as disjunctive normal form ([https://en.wikipedia.org/wiki/Disjunctive_normal_form DNF]), and so this last example is processed as (note the parenthesis):
| | === 機構 === |
|
| |
|
| <pre>((Cargo: Iron ore < 500 AND 30 seconds passed) OR (Cargo: Copper ore < 500 AND 30 seconds passed))</pre>
| | 分配器の挙動は一見単純だ。しかし実のところ、事はそれほど単純でもない。分配器には驚くほど多くの活用法がある。 |
|
| |
|
| Which is the same as this:
| | * 分配器は入出力ベルトを2つずつ持つ。1本のベルトからアイテムを受け取った場合、2本の出力に均等に分配する。 |
| | * もし片方の出力が完全に詰まっていて、均等に分配できない場合、すべての入力を空いている方の出力ベルトに流す。 |
| | * 分配器は、2本の入力に対し1本の出力しか持たないこともできる。 |
| | * 分配器はアイテムのレーンを保存する。右レーンのアイテムを左レーンに移動することはなく、逆もまた然り。 |
| | * 分配器は片方の入出力を優先できる。分配器をクリックしてGUIを開くことで、優先度を設定できる。 |
| | * 分配器の出力ベルト1本を1種類のアイテムにフィルタリングできる。そのアイテムのみがその出力に流れ、それ以外はもう片方に流れるようになる。フィルタが設定されていると、その側の出力ベルトが優先される。 |
|
| |
|
| <pre>((Cargo: Iron ore < 500 OR Cargo: Copper ore < 500) AND 30 seconds passed)</pre>
| | ベルトを結合/分割するには、分配器が入力ベルトと同じ速さでなければならず、さもなくば分配器がボトルネックと化す。 |
|
| |
|
| Unfortunately, there is no way to write that shorter form in the current UI.
| | ==== 優先度 ==== |
| </div></div>
| | 分配器の入力側も出力側も、左右どちらかを優先できる。 |
|
| |
|
| === Troubleshooting ===
| | 入力優先度が設定された分配器は、その側の入力を先に利用しようとし、優先入力ベルトが空いているときのみもう片方を利用する。 |
|
| |
|
| Below are some things to verify if a rail system or train is not working.
| | 同様に、出力優先度が設定された分配器もすべての入力をその側に流そうとし、優先出力ベルトが詰まっているときのみもう片方に出力する。 |
|
| |
|
| * Is the train fueled? Ensure that the locomotive has [[fuel/ja|fuel/ja]] of some kind.
| | ==== フィルタ ==== |
| * Misplaced or non-functional switches? Ensure that the train can plan a path through the switches.
| | 分配器のフィルタスロットに特定のアイテムが設定されている場合、出力優先度のスライダーはフィルタ用になる。設定された種別のアイテムはすべてその出力に流され、他のアイテムは全てもう一方に流される。入力優先度はフィルタと独立して設定できる。 |
| * Another train on the same [[Railway#Segment|segment/ja|]] or [[Railway#Block|block/ja|]]? Make sure the path of the train is unobstructed.
| |
| * Train stops placed correctly? Make sure that the yellow arrows when hovering on the stop point towards the end or exit of the stop.
| |
| * Is the train allowed to enter signals from the right direction? Are the signals set correctly?
| |
| * If a track is supposed to be two-way, the rail signals should be opposite each other. You can verify they match up by hovering the cursor over one. For a matched pair, it will show the other.
| |
|
| |
|
| ==== No path ==== | | === バランシング === |
| When trains cannot reach the target, a "no path" symbol pops up over the locomotive. Check:
| |
| * Can the train reach its current destination by '''only driving forward'''? Build turning slopes or place a locomotive at both ends of a train!
| |
| * Are the train stops standing in the right direction? Train stops must be on the right hand side of the track.
| |
| * If you use rail signals, check that the signals are all allowing traffic in the correct direction.
| |
| * Check for interruptions in the train tracks, drive to the station manually to check there are no rail parts missing. Especially near junctions these can be hard to spot if missing.
| |
|
| |
|
| If you are still having problems, consider:
| | {{Main|Balancer mechanics/ja|l1=バランシング機構}} |
| * Driving the train manually, and as you pass each switch, try switching to automatic. When it works, you will know the rough area of the problem.
| |
| [http://imgur.com/a/Nq2Yk A pictorial summary of typical problems].
| |
|
| |
|
| <!-- These tutorials are no longer included because they are outdated. However, this section can be put back into the article when there are newer or in-wiki tutorials
| | 分配器は、複数本のベルトや複数個のベルトレーンを均等に分配するためにも利用できる。 |
|
| |
|
| == User tips and tricks == | | === ベルトレーン操作 === |
| This section contains further links to in-depth knowledge. As a general advisory, tips given in this section detail the more intricate mechanics in the game and can be dangerous to the experience of players who wish to discover better methods on their own. '''''Be warned that much of the info below could be outdated/incorrect.'''''
| | <gallery mode="slideshow"> |
| | File:Swap_belt_lanes.png|レーンごとに異なるアイテムが載ったベルトのレーンを入れ替えている。 |
| | File:Splitter_seperate_belt_lanes.png|異なるアイテムが載ったレーンを分割する。 |
| | </gallery> |
|
| |
|
| === Tutorials === | | == 地下搬送ベルト(Underground belt) == |
| ==== Videos ====
| |
| We recommend viewing some videos of how to build a simple railway, which makes the basic steps very simple.
| |
|
| |
|
| * [https://www.youtube.com/watch?v=mXr7y02ZG00 Rail Signaling - Easy Rules for Placing Signals]
| | Underground belts can be used to cross different flows of items without interfering. They move items like a [[Transport belts/ja|通常のベルト]]. |
| * [http://www.factorioforums.com/forum/viewtopic.php?f=54&t=6984 Factorio Tutorial: Signals and Multi-train Networks] by Gepwin (read the whole article!)
| |
| * [http://www.factorioforums.com/forum/viewtopic.php?f=8&t=5451 Factorio Traintorial, all about trains] by Gepwin.
| |
| * ''v0.10, English [http://www.youtube.com/watch?v=XSGYSbEPpbM Rail basics tutorial] by MangledPork Gaming.
| |
| ** And the second part of the tutorial [http://www.youtube.com/watch?v=k6wxl4FdSuQ Factorio Rail Tutorial Part 2: Signals]
| |
|
| |
|
| * ''[http://www.reddit.com/r/factorio/comments/26igal/train_signal_tutorial/ A train-signal tutorial with pictures]. | | * Underground belts can cross any number of entities and all types of ground, like water and grass. (as long as the input and output endpoints are on land) |
| * v0.8, English [http://www.youtube.com/watch?v=RmyOdxi5hR4 Inzainia Plays: Factorio ver 0.8.0 EP:8 (Trains, Trains, Trains!!!)] | | * Underground belts can cross other underground entities (any number of underground belts or underground pipes). They won't be mixed. |
| * v0.6, German [http://www.youtube.com/watch?v=idOaZpX8lnA Silver's Factorio Basic Train Tutorial]
| | * For the connection only the endpoints (entry-side and exit-side) are relevant. |
| | * The maximum distance underground is 8 [[tile/ja|tile]]s with [[express underground belt/ja|超高速地下搬送ベルト]]s. |
| | * An underground belt pair of that bridges a gap of 4 tiles stores up to 44 items. An express underground belt pair at max length stores up to 72 items. |
| | * The half of the underground belt tile with a belt can accept input from the side. The other half (with a tunnel entrance) blocks incoming items. |
|
| |
|
| -->
| | === ベルトレーン分岐 === |
| | <gallery mode="slideshow"> |
| | File:Block belt lane.png|This is built by placing one underground belt and then using R to reverse its direction. This converts the underground belt entrance to an exit (and vice versa). |
| | File:Transport belts unmerge.gif|This can also be used to split the lanes of a belt onto seperate belts instead of using a splitter filter. |
|
| |
|
| == Achievements ==
| | </gallery> |
| {{Achievement|trans-factorio-express}}
| |
|
| |
|
| == Connection to [http://www.openttd.org/ OpenTTD] == | | == 関連項目 == |
| Factorio's railway system works basically exactly like [http://wiki.openttd.org/Signals#Block_signals≈ the block signals in Open Traffic Tycoon Deluxe]. Players who have ever played that game will find some elements of it in Factorio. If not, they can learn from the OpenTTD documentation.
| | * [[Splitters/ja|分配器]] |
| | * [[Transport belts/ja|搬送ベルト]] |
| | * [[Underground belts/ja|地下搬送ベルト]] |
|
| |
|
| == See also ==
| | <nowiki>{{C|Belt transport system}}</nowiki> |
| * [[Locomotive/ja|Locomotive/ja]]
| |
| * [[Cargo wagon/ja|Cargo wagon/ja]]
| |


