User:Kcsixgap/Circuit network cookbook/zh: Difference between revisions
mNo edit summary |
→简单的灯箱电路: removed link to duplicate file |
||
| (One intermediate revision by the same user not shown) | |||
| Line 13: | Line 13: | ||
* 如果箱子里的空桶少于10个,灯就会亮起来 | * 如果箱子里的空桶少于10个,灯就会亮起来 | ||
{{clear}} | {{clear}} | ||
===设置灯亮起的条件=== | ===设置灯亮起的条件=== | ||
Latest revision as of 12:27, 16 February 2021
前言
这个页面提供了有关电路网络信号的设计例子,有简单的也有复杂的,各位可以随意使用、组合以及修改。它们以尽可能容易被理解的方式来设计。要在不打开运算器的情况下查看运算器的设置,您必须在“设置”->“交互”->“细节显现”中,勾选“细节显现模式下显示运算器信号设置”。
简单的灯箱电路
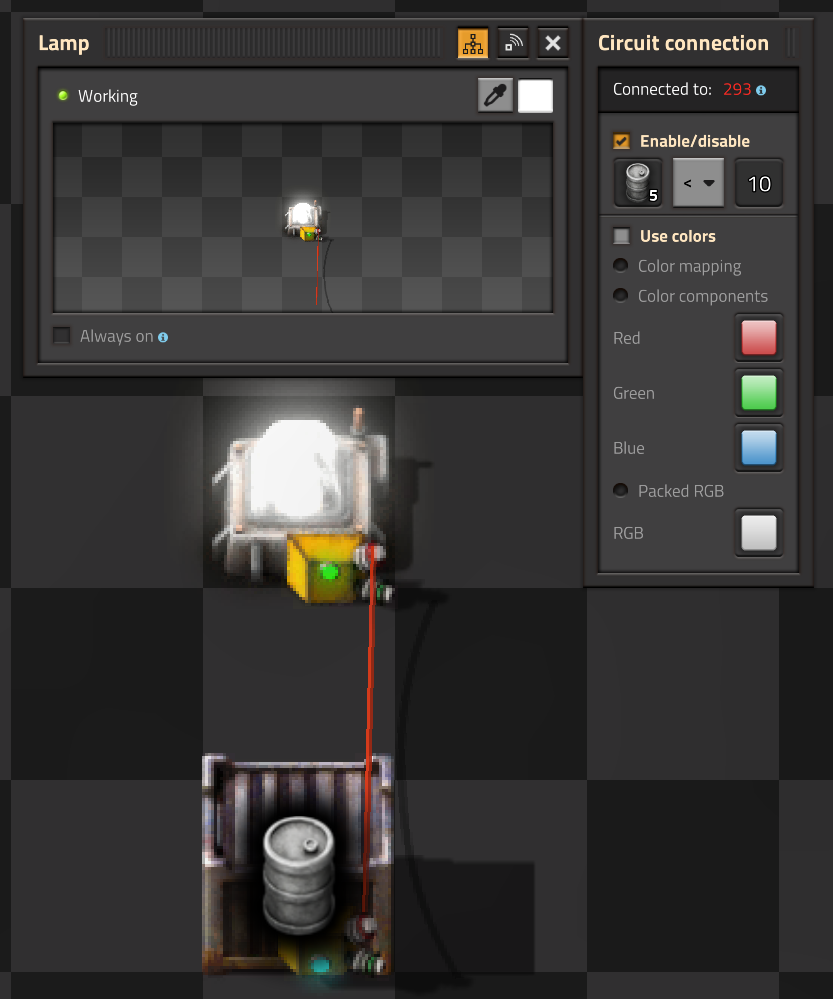
这是电路网络最简单的用途。灯会根据箱子中货物的数量来亮起或者熄灭。
建立电路连接
- 这盏灯与箱子相连
- 如果箱子里的空桶少于10个,灯就会亮起来
设置灯亮起的条件
- 打开灯 (用左键点击)
- 将输入设置为桶
- 将操作符设置为<(小于)
- 设置常量:
- 左键点击常量框
- 移动滑条直到显示10,或者直接编辑数值框
- 点击设置
如果箱子是空的,或者里面有你设置数量的物品,它就有可能会亮起来,具体取决于你设置的条件。
这个小电路有个缺点,灯是白色的,在晚上很难和其它普通的灯区分开来。
石油设置
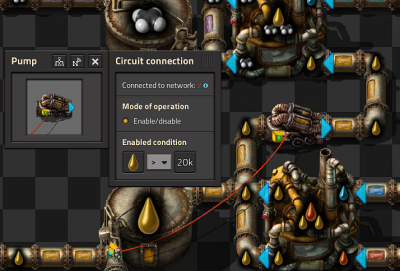
轻油裂解
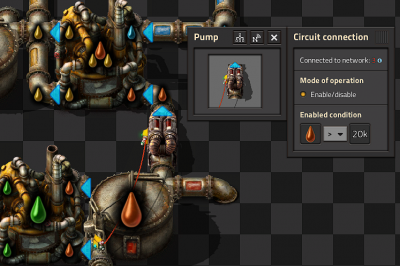
重油裂解
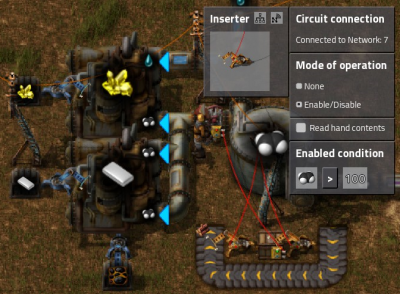
- 同上个电路一样,只不过这个电路变成了重油裂解,您可以根据需要扩展电路,让重油裂解为轻油,或者润滑油等等
- 管道泵的启动条件被设置为重油 > 2000
石油气在生成塑料和硫酸之间均匀分配
- 这个电路将至少100石油气充入到储液罐中,然后排出到小于50并且再度充入循环
- 为了实现这个目标我们需要做以下努力
- 首先管道泵通过红线缆连接到木箱,管道泵的启用条件设置为原木 > 0
- 两个电力机械臂都通过红线缆连接到储液罐
- 左边的电力机械臂启用条件是石油气 > 100
- 右边的电力机械臂启用条件是石油气 < 50
- 你需要将一个原木放进箱子里来让这个电路正常工作
- 你也可以使用判断运算器来做到这一点
Lights
Conditional Lights
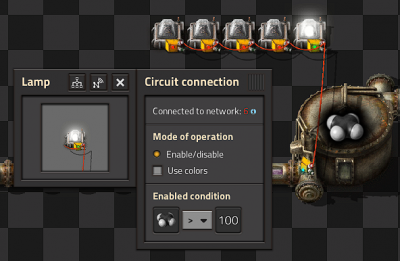
- In this circuit we connect a series of lamps to a Storage tank.
- By setting different conditions on each lamp we can build an indicator strip.
- The Enabled condition of the first lamp is Petroleum gas > 100.
- The others light up when gas is greater than 200, 300, 400 and 500 respectively.
In this scenario you can connect the storage tank to the lamps directly.
Colored Lights
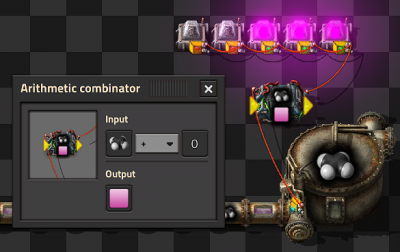
- To light a lamp with a color rather than white, you need an intermediate device like an Arithmetic combinator that can send a color signal.
Instead of directly connect the the Lamp and the Storage tank you need:
1 Add the Arithmetic combinator.
2 Connect the Storage tank with the input of the Arithmetic combinator.
3 Connect the output of the Arithmetic combinator with the lamp.
4 Set up the Arithmetic combinator:
4.1 Setting the input to Petroleum Gas + 0 (the constant 0 not the signal 0)
4.2 Set the output to the Pink signal (on the bottom row of the last tab of signals.)
5 Set up the lamp:
5.1 Select the "Use colors" check box on the lamp.
5.2 Set the condition to the Pink signal, and what value you want (i.e. > 100)
Misc
Multiple Storages
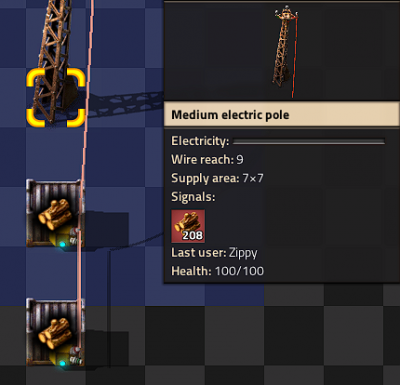
- If you connect multiple chests to a pole, the pole displays the sum of items in all the chests.
- This also works with Storage tanks and roboports.
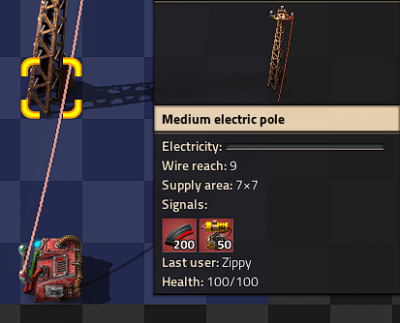
Constant combinator
- With a constant combinator you can generate any signals you may need.
- In this example we have generated a signal of 50 Laser turrets and 200 Piercing round magazine.
- Constant combinators are not of much use on their own but we shall use them later.
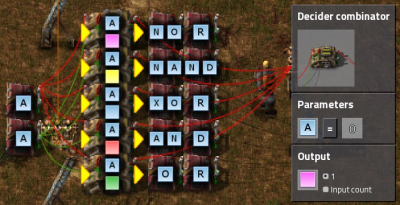
Logic gates
- In each case the two inputs can be connected with the same color wire or different colors. The inputs are powered by two Constant combinators each of them output an A signal with value 1 for true and nothing or false.
- You can use Decider combinators to make all of the common logic gates.
- The output for each should be set to 1 and the signal of your choice.
- Use the following settings to create different gates:
   NOT  A=0
   NOR  A=0
   NAND A<2
   XOR  A=1
   AND  A=2
   OR   A>0
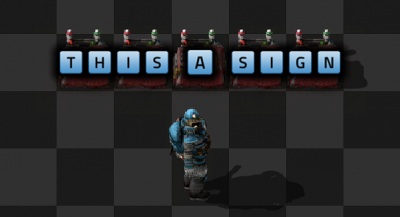
Constant combinator signs
- You can use Constant combinators to make signs, just set the letter signals in the combinator, each combinator can display 2 characters side by side.
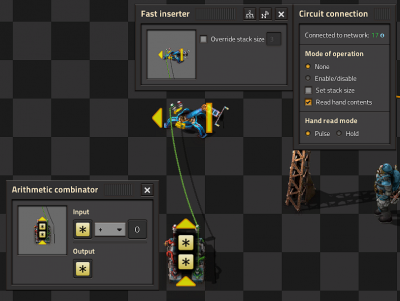
Memory Cell / Counter
- Basic memory cell that counts all the items moved by the inserter
- The Fast inserter is connected to BOTH ends of the arithmetic combinator.
- If the Fast inserter hasn't picked anything up this tick the input to the Arithmetic combinator is the same as and output and hence the values are persisted.
- When the Fast inserter does pick something up its value is added to the output from the previous tick thus incrementing that item.
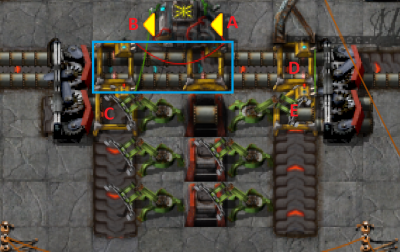
Automatic Belt-Cache
- Some intermediate products are huge in demand during peak-production only. To bypass the need of providing a huge amount of factories in order to cover that peaks, a cache-unit can be used. The unit stores items while the belt has backed up (so there's obviously no current demand downstream) and releases items as soon as the belt gets too empty.
- The blue area is 3 parts of Express belts. According to the wiki, each belt can hold up to 7.11 items. This means the feeding fast belt can not provide 7.11 items for the express belts as long as the belt is moving. (And while the belt is moving, we don't want to cache items, but let regular production run, or even release items from the cache.)
- This means, once the counters on the two express belts are 7.11 each, the belt has backed up, so we can start "caching" items into our storage array.
- For this purpose, the counters are connected to the arithmetic combinator (A) which multiples the input (*100) into green signals. So, if the belt has backed up, B shows ">1422" green signals.
- This is the activation condition for the Belt (C), which will redirect the input to the storage array.
- Since items should only be released if the belt starts to clear, the counter (D) is evaluated by the belt (E) which is only activated, if item-count on (D) is smaller than 6 (this number has to be adjusted to personal needs, when the cache should become "active" and release items)
- The layout can be extended to cache whatever amount of items is required. (Some balancing for the release-method would be required of course.)
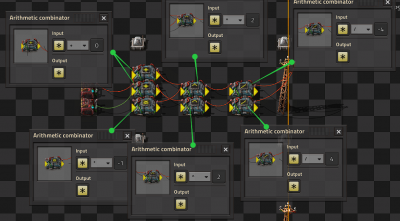
Multiplier and Dictionaries/Arrays
- Multiplying two signals together is simple and requires only a single combinator, however multiplying a set of signals is more complicated.
- A proof is shown below for the equation and why it works.
- A dictionary is a system that allows a value on a specific signal to be accessed. For example, A can contain many signals (either from a constant combinator or memory cell) and B can contain 1 of a specific signal (such as blue signal). What remains is the blue-signal value from A. This is because all the other signals are multiplied by 0.
- Arrays are similar to dictionaries, but instead of using a signal as a key, we use a number. Constant combinators are placed mapping each signal to a unique number (such as 1 yellow belt, 2 red belt, 3 blue belt, 4 burner inserter, etc). Then, use a combinator of "each = index OUTPUT 1 of each" and plug that in as the input to a dictionary.
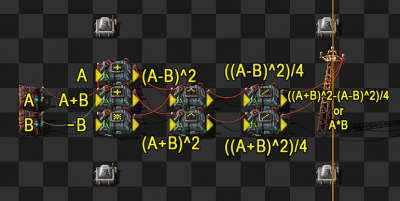
   ((A+B)^2 - (A-B)^2)/4 = AB
   (A+B)^2 - (A-B)^2 = 4AB
   (A^2 + 2AB + B^2) - (A^2 - 2AB + B^2) = 4AB
   4AB = 4AB
Inserters
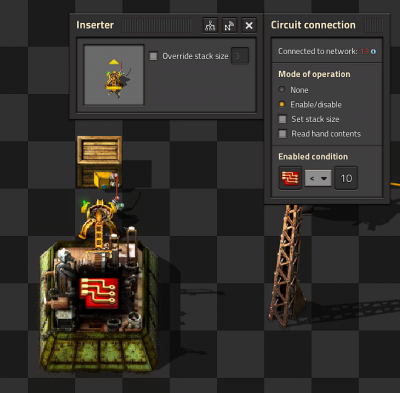
Limit items placed into a chest
- The Inserter is connected to the Wooden chest using a Red wire.
- The inserter's enabled condition is Advanced Circuit < 10.
- In reality this means the inserter may place more than 10 Advanced circuits in the chest because it could pick up to 3 at once due to stack size bonuses.
- This effect can be even greater with Stack inserters because of their large carrying capacity.
- This technique still gives far greater control than limiting the inventory on the chest.
Balanced chest insert
Goal: Load n chests with approximately the same number of items.
- Place n chests and n inserters.
- Place 1 Arithmetic combinator
- Set the combinator to take Each (yellow star) and divide by the negative number of chests. ie −n.
- Connect all chests to each other and to the input of the combinator using red wire.
- Connect all inserters to each other and to the output of the combinator using red wire.
- Connect each inserter to the box it inserts into with green wire.
- Set the enable condition on each inserter to be Everything (red star) < 0.
The combinator calculates the average number of items in the chests, and makes it negative. Each inserter gets the amount in the chest it is inserting to and adds the negative average, ie it calculates how many more than the average it has in its chest. Thus if that number is negative, it has less than the average in the chest and it enables.
Due to inserter stack bonus the count is not exact. If a precise count is needed, set the inserter stack size to 1.

Keeping outpost stocked with specified items
- This circuit keeps a Storage chest at an outpost stocked with customized levels of different items.
- For example you could keep an outpost stocked with 50 laser turrets and 200 piercing magazine rounds but not have to worry about it being over filled.
- The storage chest is attached to the input of the Arithmetic combinator (left side in the picture) with a Red wire.
- Another couple of Red wires join the output of the Arithmetic combinator (right side) to the constant combinator and to the stack filter inserter.
- The Arithmetic combinator multiplies each input value (from the storage chest) by -1.
- Finally the filter stack inserter's mode of operation is set to Set filters.
- So the input to the stack filter inserter is <Constant combinator> - <Storage chest contents> and the filter is set to filter the item of greatest demand.
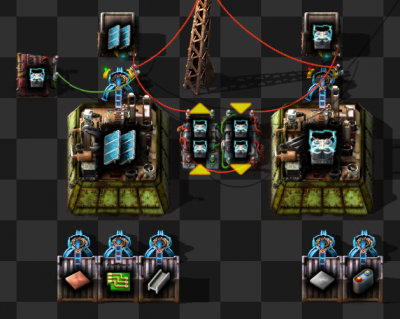
Balanced Solar panel / Accumulator Production
- This circuit balances production of Solar panels and Accumulators to a desired ratio in my case 24:20.
- The first Arithmetic combinator takes the number of accumulators in the chest and multiplies it by 24.
- The second Arithmetic combinator takes the output of the first combinator and divides it by 20.
- This gives us the number of accumulators that we can directly compare to the number of Solar panels in both inserters.
- If the number of accumulators is greater we enable the Solar panels inserter, if the number of Solar panels is greater we enable the accumulators inserter.
- However, if they are equal, neither machine does anything. So we add a single accumulator to one of the inserters using a constant combinator and a wire of the other color, therefore breaking the deadlock.
Sushi Belts
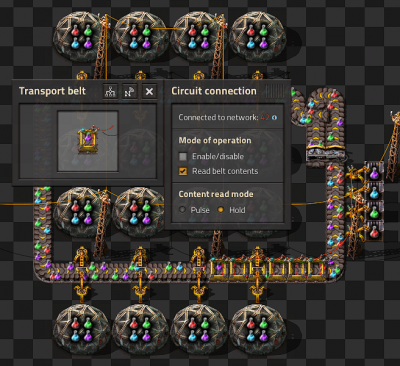
Reading Belt Design
- Six belts in a row are connected with Red wire and set to Read belts contents and Hold
- This Red wire is then connected to the inserters that insert onto the belt.
- Read hand contents is unselected for all inserters.
- Mode of operation is set to Enable/Disable on all inserters.
- The first inserter is enabled when Science pack 1 = 0
- The other inserters are set similarly for the other science packs.
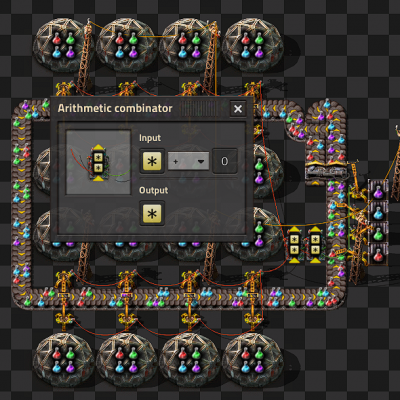
Memory Cell Design
- This circuit counts the number of items of each type on a looping belt by counting the numbers that are added and removed from the belt by inserters.
- Each inserter that takes items off the belt is connected together with Red wire and each of these inserters is set to Mode of operation none, Read hand content selected and Hand read mode pulse.
- These inserters are connected to the input of the left arithmetic combinator.
- The left Arithmetic combinator multiples each input by -1 and outputs it to each.
- The right Arithmetic combinator is a memory cell as above.
- The memory cell's input is connected to the inserters that are placing items on the belt and the output of the left Arithmetic combinator.
- The inserters that place items onto the belt have an enabled condition that is based on the number of items on the belt.
Splitters
(These recipes are redundant with the addition of priority splitter functionality in 0.16)
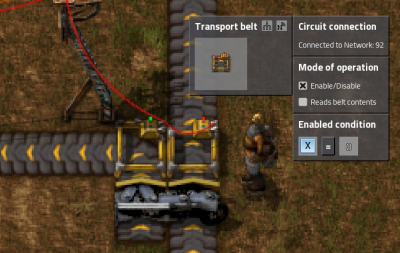
Conditional splitter
- This is the simplest circuit you can have for "controlling" a splitter.
- A signal X=1 is transmitted from off screen when the items need to be sent down the belt.
- The belt on the left is enabled when X=1.
- The belt on the right is enabled when X=0.
- The two belts are wired together and to a pole.
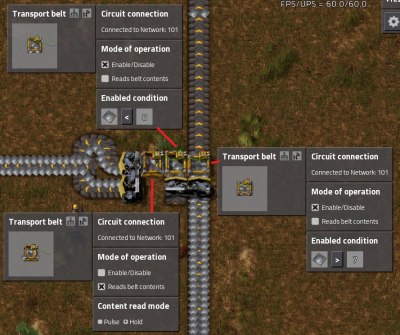
Priority Splitter
- This circuit prioritizes items to the belt going of the screen to the left but will send items straight on if the belt to the left is backed up.
- Its not perfect and will leak some items but its good enough for most applications.
- The balancer means it will work even if the supply or demand is uneven.
- It is critical that the belts are setup as in this picture otherwise it may not work.
Power
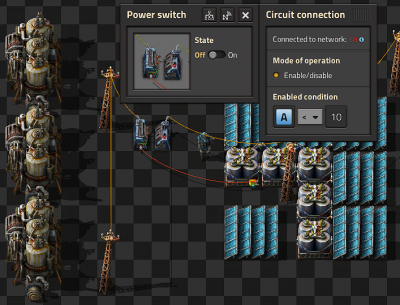
Backup steam power
- The steam engines are not directly connected to the power network. They are connected to the power network through a Power switch.
- The power switch is connected to one of the accumulators in the main network.
- The power switch turns on when A < 10. That is when the accumulators are less than 10% full.
Optimal usage of fuel for nuclear power
Unlike the normal steam power that adjusts fuel usage based on power usage, the nuclear reactors spend fuel in fixed units of time. To be exact, the consumption of 1 fuel cell takes exactly 200 seconds.
Combined with the fact that creating the nuclear fuel cells are time consuming and expensive to create, it is therefore beneficial to optimize their use to match the actual consumed power.
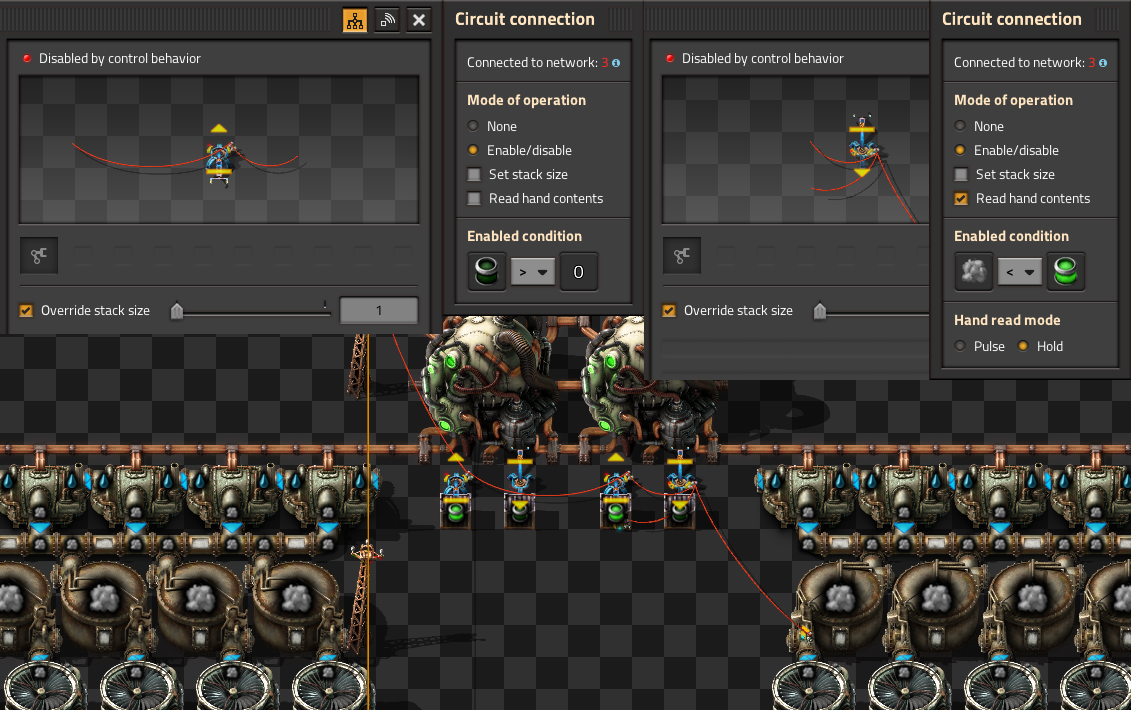
The above picture shows a setup with 4 reactors, that spend only 1 fuel cell each whenever steam runs low.
There are a few elements in this setup:
- Storage tank that provides the Steam signal. You should only read from one storage tank, and it should have pipe connections to all your other steam storage tanks.
- Chests containing Uranium fuel cells for the reactor.
- Output inserters that take Empty fuel cells from the reactor. This is connected to the storage tank to listen for the steam signal, and to the chests to listen for the uranium fuel cell signal. If the steam level is low and there are uranium fuel cells available, it removes the empty fuel cells from the reactor and sends an empty fuel cell signal (since "Read hand contents" is checked).
- Input inserters that put uranium fuel cells into the reactor. This is connected to the output inserters and listens for the empty fuel cell signal. The "Override stack size" is set to 1, so that it only inserts 1 fuel cell at a time.
Since this design uses empty fuel cells as a signal to fill the reactor, you need to manually insert 1 uranium fuel cell into the reactor to get it started.
Latches
RS latch - single decider version
This discussion on the Factorio forums starts with the common 2 decider RS latch version, but the thread goes on to explain why this single decider version is better. In the thread, the latch is described as an SR latch. However, when both inputs are true, the latch will reset, so it is an RS latch.
Backup steam example
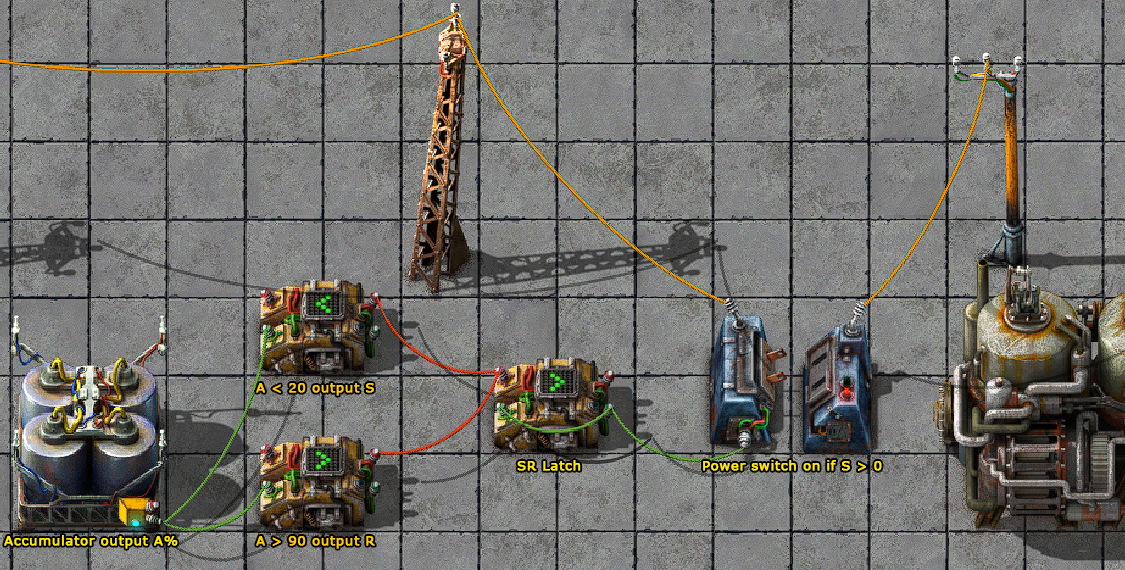
This example will turn on the steam generator when the Accumulator charge drops to 20%, but will "latch" (remember) the On state until the accumulator is charged to 90%.
Latching is used to introduce hysteresis and avoid the power switch rapidly cycling on and off (as the accumulator falls to 19%, charges to 20%, falls to 19% and so on).
Blueprint string for above backup steam example
0eNrFVk1vozAQ/SuVz1ABCaRBq5WqXntKjqsKOTBJR8IGGTtpFPHfd+w0HyU0G6pVewkxnnmemfdmzI4tSgO1QqlZumOYV7Jh6Z8da3AleWnf6W0NLGVrVNrQG49JLuyLvYU/Z63HUBbwxtKw9QZ4zs48o15P1CBObgXkWIDy80osUHJdqTOAUfviMZAaNcI+A7fYZtKIBSiK7YgjoEAjfCgh1wpzv65KoFPqqiHnStrzCdAPA49t6Rm1NrYOWjQY7QrY6FQZwcvyX1jJFajxEYrnuRGmdGW6DCe+jx1KcB9TDYl1raoyW8ArXyM5kFVldG10djObj6zdI0kKHp2Mdiy0PysFIM8pwYKldHyOKjeo3TI8y8Wup93tl7Yv3fiaOC6zjt6z9uk4VqDaR+rY7CvBO2ZGewUec1qiaobVxaE3mtseiwK7EjVXLsaU/SKPobWe7zHrLYVmpM6WqhIZSsJg6ZKXDQyiYkzF9Vhk9xUU3d3kNiaSQUwEB/l9Hw+uZg1YjGzYiPpA1+/vpKuHjk7fRNf7JrJTsZf05MLwoIFbzLvtOvlEFZNjKepqQ5poNqjz10s9jA6N+fk8Ohx/FMFXNXDqxeCC20F901vCJxN07UjVG9K4+x9YQp5M2LUZfbTpq+XDKRsNnG4cuULZcz089HZWD+D0a8Pz52bnNPgPzTj76dlJAnDfNenZp5fHSr4ACp/NZ3fPnHrkDt64qN31vwbVuFIn43GUjCdxHIVt+xcL2lBp
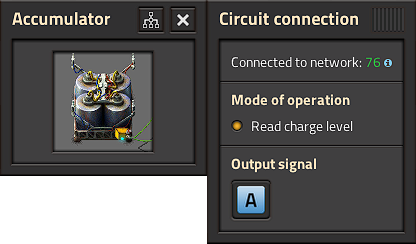
Accumulator outputs the current charge level as % on signal 
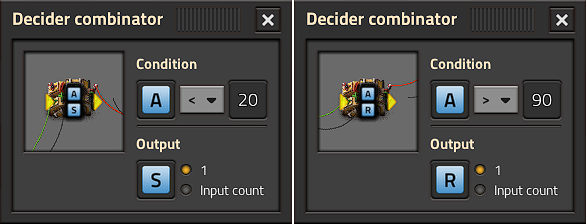
First decider outputs "Set" ( = 1) if Accumulator is less than 20%.
Second decider outputs "Reset" ( = 1) once Accumulator is more than 90% full.
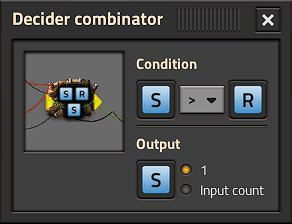
RS Latch configuration
The central decider and green feedback wire is the actual RS Latch.
It latches the Set signal  until the Reset signal
  is received (and vice-versa).
NB: the latch expects binary inputs ( &
&  must be 0 or 1) - this is why the previous two deciders are required.
When both inputs are true, the reset signal takes priority and the latch resets. This means it is an RS latch instead of an SR latch.
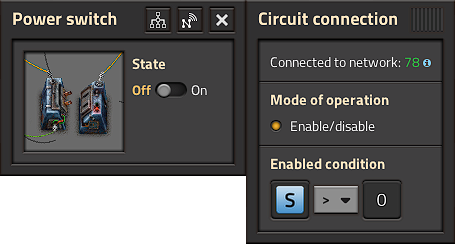
The Power switch isolates the generator from the rest of the factory until  = 1
= 1
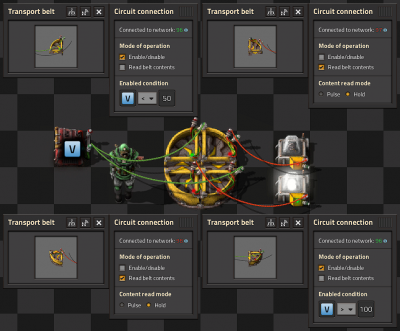
RS latch
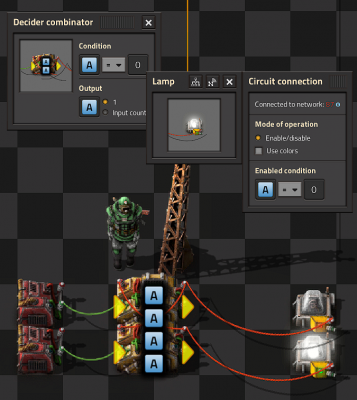
- This should be familiar to anyone with any background in electronics.
- The signal is set and reset with the constant combinators on the left by setting an A=1 signal.
- The latch "remembers" which one was last set and the light stays on until another signal is received.

Usage of RS latch
- Here is an example of how you could use an RS latch.
- The two extra Decider combinators provide the set and reset conditions.
- Petroleum gas < 50 and petroleum gas > 100.
Belt only latch
- This is the most compact latch I am aware of.
- To make it work you need to place 3 raw wood on the inside lane of the belt.
- I believe it will have higher latency than the combinator version but in most situations you will not notice the difference.
Displays

Numerical Display
- Each digit is driven by its own Green wire, that wire holds 15 signals one for each lamp used in the digit.
- Constant combinators are used to define which lamp should light up for each value.
- Blueprint string including decoder [1]
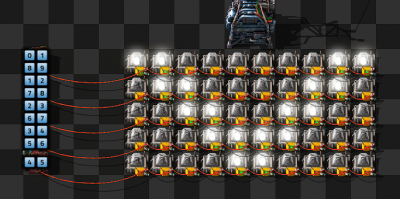
Black and White Grid Display
- Each row has its own Red wire connection and within that row each light has a numbered signal 0-9.
- We turn each light on by just setting or clearing the relevant signal.
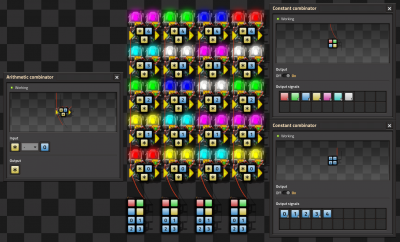
Multicolor Display by DaveMcW
- To understand how this works, you first need to understand how color lights choose which color to light up when there are multiple colored signals.
- The lamp will light up with the colored signal that is greater than zero and earliest in this list: Red, Green, Blue, Yellow, Pink, Cyan, White.
- We have a Red wire per column, that wire has each of the colored signals on it at different values and a numbered signal for each row.
- There is a Arithmetic combinator for each cell that subtracts the "row" value from each of the colored signals.
- And this enables us to choose the color for each cell.
- Simple!
