|
|
| (120 intermediate revisions by the same user not shown) |
| Line 5: |
Line 5: |
| Again, welcome, we hope you contribute as much high quality information as you can. :) [[User:Bilka|Bilka]] ([[User talk:Bilka|talk]]) - <span style="color:#FF0000">Admin</span> 10:58, 6 February 2018 (UTC) | | Again, welcome, we hope you contribute as much high quality information as you can. :) [[User:Bilka|Bilka]] ([[User talk:Bilka|talk]]) - <span style="color:#FF0000">Admin</span> 10:58, 6 February 2018 (UTC) |
|
| |
|
| == Na dziś koniec - a gdzieś to trzymać trzeba == | | == Linki == |
|
| |
|
| {{Languages}}
| | https://wiki.factorio.com/index.php?title=Special:AllPages&namespace=10 |
| ''Jeżeli chcesz poczytać o typowym, żółtym podajniku, wejdź: [[Inserter/pl]].''
| |
|
| |
|
| '''Podajniki''' to urządzenia, których używamy do przesuwania przedmiotów na niewielkie odległości. Po postawieniu, przenoszą w jedną stronę. Podajniki zabierają przedmioty z 'tyłu' siebie do przodu. Podajnikami można przenosić przedmioty z jednego taśmociągu na drugi, albo zabierać/podawać przedmioty z/do [[Storage/pl|magazynów]] lub {{L|Assembling machine}}.
| | https://wiki.factorio.com/Factorio:Editor_noticeboard |
| W Faktorio mamy 7 różnych typów podajników (opis poniżej), sześć z nich do działania potrzebuje elektryczności, jeden potrzebuje [[Fuel/pl|paliwa]]
| |
|
| |
|
| == Rodzaje podajników ==
| | https://wiki.factorio.com/Factorio:Wanted_pages/pl |
|
| |
|
| {| class="wikitable"
| | * [[:Category:Pages_with_broken_file_links|Pages with broken file links]] |
| | {{Imagelink|Burner inserter|Burner inserter}} || Jedyny podajnik zasilany paliwem. | | * [[Special:BrokenRedirects|Broken redirects]] |
| |-
| | * [[Special:DoubleRedirects|Double redirects]] |
| | {{Imagelink|Inserter|Inserter}} || Standardowy elektryczny podajnik.
| | * [[Special:UnusedFiles|Unused files]] |
| |-
| | * [[Factorio:Wanted pages|Wanted pages]] |
| | {{Imagelink|Long handed inserter|Long handed inserter}} || Długie ramię pozwala na przenoszenie przedmiotów na większe odległości.
| |
| |-
| |
| | {{Imagelink|Fast inserter|Fast inserter}} || Dużo szybszy niż standardowy podajnik.
| |
| |- | |
| | {{Imagelink|Filter inserter|Filter inserter}} || Rozwinięcie szybkiego podajnika o możliwość filtrowania przenoszonych przedmiotów.
| |
| |-
| |
| | {{Imagelink|Stack inserter|Stack inserter}} || Szybkością dorównuje szybkiemu podajnikowi, ale może przenieść dużo więcej przedmiotów 'na raz'.
| |
| |-
| |
| | {{imagelink|stack_filter_inserter|Stack filter inserter}} || Rozwinięcie podajnika masowego o możliwość filtrowania przenoszonych przedmiotów.
| |
| |- | |
| |} | |
|
| |
|
| ==Mechanika==
| | Templatesy |
| Podajniki '''robią''':
| | https://wiki.factorio.com/index.php?title=Special:AllPages&namespace=10 |
| * '''Podnoszą''' przedmioty z ziemi, z [[Transport belts/pl|taśmociągów]] lub z innych obiektów posiadających przestrzeń ładunkową ({{L|Chests}}, {{L|Furnace}} i {{L|Assembling machine}})
| |
| * '''Stawiają''' przedmioty na ziemi, na taśmociąg lub do obiektu mającego przestrzeń ładunkową.
| |
| * Podnoszą tyle przedmiotów ile pozwala im aktualna pojemność - pod warunkiem, że nie będą czekać zbyt długo na przedmioty.
| |
| * Działają wolniej przy niedoborze energii.
| |
|
| |
|
| Podajniki '''nie robią''':
| | <!-- <!-- <!-- <!-- <!-- <!-- <!-- --> --> --> --> --> --> --> |
| * Nie podniosą wszystkich przedmiotów, jeżeli nie będą mogły ich położyć w miejscu przeznaczenia.
| |
| * Nie podniesie przedmiotów, jeżeli obiekt docelowy jest pełny.
| |
| * Nie umieści więcej niż jednego przedmiotu na ziemi.
| |
| * Nie umieści przedmiotów w skrzynce ograniczonej limitem miejsca (sloty ekwipunku w skrzynce zaznaczone na czerwono).
| |
|
| |
|
| Podajniki działają różnie, w zależności od tego jakie i gdzie przenoszą przedmioty, aby nie zabierać wszystkich przedmiotów i się nie blokować wzajemnie - co później wpływa na efektywność maszyn obsługiwanych jednym taśmociągiem. Jeżeli dwa podajniki odbierają z tego samego miejsca - priorytet pobrania przedmiotu ma podajnik umieszczony jako pierwszy.
| | {{languages}} |
| | [[File:Pollution.png|400px|thumb|Example of in-game pollution (red squares) in the map]] |
|
| |
|
| === Limity wstawiania do obiektów ===
| | Pollution is represented as an abstract "cloud", updated [[Chunk|per chunk]] every game second (60 ticks) and visible on the map, when "alt-view" is on (default [[Keyboard bindings|Alt-Key]]). It appears as a red colored blocky cloud. |
| Podajniki przestaną wstawiać elementy do niektórych budynków, jeśli mają już wystarczającą ilość tego elementu. Na przykład, jeśli w piecu znajduje się 5 lub więcej elementów paliwa, podajnik nie włoży dodatkowego paliwa. Gdy paliwo spadnie poniżej 5 sztuk, podajnik dołoży paliwa, ale do limitu 5 sztuk.
| |
|
| |
|
| Ma to umożliwić wszystkim maszynom otrzymanie ich części przedmiotów. Wspólne limity wstawienia są przedstawione w poniższej tabeli:
| | It is produced by many buildings involved in processing items and spreads outwards at a steady rate. |
|
| |
|
| | The [[Enemies#Evolution|evolution factor]] is not increased by the spreading/absorbed pollution, but by the pollution produced by all the player's [[Pollution#Polluters|machinery]] at every tick. This means that no matter how hard the player tries to contain the pollution, [[enemies]] will still evolve at the same rate. They just won't attack the player as frequently. The pollution cloud is used to trigger biter attacks and determines the size of the attacks. |
|
| |
|
| {| class="wikitable"
| | Pollution settings can be changed via [[map generator|map generation]] settings, or can be disabled entirely. |
| ! Maszyna !! Rodzaj przedmiotu !! Limit wstawienia !! Komentarz
| |
| |-
| |
| | {{L|Boiler}}, {{L|Burner inserter}}, {{L|Furnace}} || {{L|Fuel}} || align="center" | 5
| |
| |-
| |
| | {{L|Gun turret}} || Magazynek || align="center" | 10
| |
| |-
| |
| | {{L|Artillery turret}} || {{L|Artillery shell}} || align="center" | 5
| |
| |-
| |
| | {{L|Assembling machine}}, {{L|Furnace}}, {{L|Centrifuge}}, {{L|Chemical plant}} oraz {{L|Oil refinery}} || Przedmioty wymagane w recepturze || Liczba składników potrzebna do wykonania przynajmniej dwóch przedmiotów (zgodnie z recepturą), ale nie więcej niż do wykonania 100 przedmiotów.
| |
| |-
| |
| | {{L|Lab}} || {{L|Science pack}} || Podwojona liczba pakietów potrzebnych do osiągnięcia jednego punktu badań
| |
| |}
| |
|
| |
|
| Może się zdarzyć, że podajnik przepełni budynek. Może to się stać w przypadku, gdy mamy zbadane dużo bonusów do ładowności podajników lub w przypadku używania więcej niż jednego podajnika do zasilenia jednej maszyny.
| | == Pollution spread == |
|
| |
|
| === Podajniki i taśmociągi ===
| | As soon as a chunk has reached 15.0 pollution it starts spreading in all four cardinal directions at a rate of 2% per [[game-second]] (60 ticks). |
|
| |
|
| {{L|Transport belts}} mają dwie linie poruszania się przedmiotów. Podajniki kładą przedmioty na taśmociągi tylko w jedno miejsce, tj.: na dalszą linię taśmociągu, a jeżeli podajnik jest ustawiony na wprost taśmociągu - na prawą linię (patrząc na początek taśmociągu)
| | For example, a chunk with 400.0 pollution and 4 adjacent chunks with 100.0 pollution each, raises the pollution in all adjacent chunks by 8.0 while reducing its own pollution by 32.0. But every one of the 4 surrounding spreads 2.0 pollution "back" to the center chunk, so it only loses 24.0 + [[Pollution#De-polluters|absorbed value]]. |
|
| |
|
| {|
| | == Pollution dissipation== |
| | style="width:320px;" | [[File:Inserter_dropoff_locations.gif]] || [[File:Inserter_pickup_locations.gif]]
| |
| |-
| |
| | style="width:320px;" | Podajnik kładzie przedmiot na dalszą linię taśmociągu. Jeżeli podajnik jest skierowany w stronę taśmociągu to kładzie przedmiot po prawej stronie, patrząc na początek taśmociągu. Jeżeli przedmiot ma być położony na łuku taśmociągu - zawsze jest kładziony na wewnętrzną stronę łuku.
| |
| | style="width:320px;" | Podajniki '''wolą''' pobierać przedmioty z bliższej linii. Jeżeli bliższa linia taśmociągu jest punta to pobiera z dalszej linii. Jeżeli taśmociąg jest położony na wprost podajnika, to podajnik '''wybiera''' lewą linię (patrząc z perspektywy taśmociągu). Jeżeli lewa linia jest pusta - pobiera przedmioty z prawej.
| |
| |}
| |
|
| |
|
| == Problemy z podajnikami ==
| | * Every [[chunk]] (32x32) of map slowly reduces the pollution it covers (See [[Pollution#Chunks]]). So the more the pollution spreads, the more is absorbed. |
| Podajniki mogą mieć problem z odebraniem przedmiotów:
| | * [[Tree]]s also absorb some pollution (See [[Pollution#Trees]]). |
| | * [[Enemies#Spawner|Spawners]] absorb a great amount of pollution, and use this to produce enemies. |
|
| |
|
| * Z {{L|Express transport belt}}, ponieważ przedmioty poruszają się za szybko.
| | == Native life == |
| * Z wejścia do {{L|Underground belt}}, ponieważ przedmiot jest krócej na 'powierzchni' niż w przypadku zwykłego taśmociągu.
| | Pollution attracts [[Enemies|biters]] to the Player's factory. Biters who find themselves in a polluted area will attempt to reach the source of pollution and destroy it. |
| * Z łuków taśmociągów, jeżeli przedmioty są wewnątrz łuku.
| |
|
| |
|
| == Premia pojemności podajników ==
| | Each [[Enemies|spawner]] absorbs 20 + 0.01 * [chunk's pollution] every game second (60 ticks) if the chunk's pollution is greater than 20. If there is 20 or less pollution in the chunk, the spawner absorbs all the pollution. |
|
| |
|
| Jeżeli podajnik przenosi przedmioty z ekwipunku do ekwipunku (np.: z automatu montażowego do skrzyni) lub (od wersji v0.13) z ekwipunku do taśmociągu może przenieść więcej niż jeden przedmiot na raz. Aby to osiągnąć należy zbadać {{L|Inserter capacity bonus (research)}}.
| | Higher pollution values decrease the time it takes for biters to join the attack force. After a certain amount of pollution is absorbed the spawner sends one of its biters/spitters to a rendezvous point. Every 1 to 10 minutes (random) the mustered biters launch an attack. If not all biters have arrived at the rendezvous point by that time, they will wait up to an additional 2 minutes for stragglers. |
|
| |
|
| == Zużycie energii elektrycznej ==
| | Required pollution to add an additional biter/spitter to the attack wave: |
| * Jeżeli podajniki się nie poruszają nadal pobierają energię elektryczną (oprócz {{L|Burner inserter}}). Nazywa się to energią spoczynkową.
| | {| class="wikitable" style="text-align:right;" |
| * Ilość zużywanej energii elektrycznej jest taka sama dla każdego ruchu.
| | ! style="width: 100px;" | Pollution |
| * {{L|Burner inserter}} nie zużywa paliwa, jeśli się nie porusza, ale zużywa stosunkowo więcej energii w czasie ruchu. Ta właściwość może się przydać, jeżeli podajnik nie musi się poruszać zbyt często.
| | ! style="width: 130px;" | Type |
| | | |- |
| ==Inserter Speed==
| | | 200 || Small biter |
| | | |- |
| {| class="wikitable" | | | 1,000 || Medium biter |
| ! Podajnik
| | |- |
| ! Prędkość obrotu (obrotów na [[Game-tick]])<br/>Extension-speed ([[Tile]]s per Tick)
| | | 4,000 || Big biter |
| ! Zwroty na [[Game-second]]<br/>Tiles per Game-second
| | |- |
| ! Game-second na jeden pełny obrót<br/>Game-seconds per Tile
| | | 20,000 || Behemoth biter |
| ! Ticks na cały obrót<br/>Ticks per Tile | | |- |
| |- align="center"
| | | 200 || Small spitter |
| | align="left"| {{Imagelink|Burner inserter|Burner inserter}} || 0.01<br/>0.0214 || 0.6<br/>1.284 || 1.667<br/>0.833 || 102<br/>76
| | |- |
| |- align="center" | | | 600 || Medium spitter |
| | align="left"| {{Imagelink|Inserter|Inserter}} || 0.014<br/>0.03 || 0.84<br/>1.8 || 1.191<br/>0.56 || 72<br/>54 | | |- |
| |- align="center" | | | 1,500 || Big spitter |
| | align="left"| {{Imagelink|Long handed inserter|Long handed inserter}} || 0.02<br/>0.0457 || 1.2<br/>2.742 || 0.833<br/>0.416 || 52<br/>36 | | |- |
| |- align="center" | | | 10,000 || Behemoth spitter |
| | align="left"| {{Imagelink|Fast inserter|Fast inserter}}<br/>{{Imagelink|Stack inserter|Stack inserter}}<br/>{{imagelink|Stack_filter_inserter|Stack filter inserter}} || 0.04<br/>0.07 || 2.4<br/>4.2 || 0.417<br/>0.238 || 26<br/>24 | |
| |- | | |- |
| |} | | |} |
|
| |
|
| ===Prędkość obrotu===
| | With 1350 absorbed pollution at the time of attack the following wave consists of 6 small biters and 1 medium biter OR 6 small spitters and 2 medium spitters depending on the spawner's type and [[Enemies#Spawn_chances_by_evolution_factor|evolution factor]]. |
| Konwencja: 2π rad = 100% obrotu = '''1 obrót''' (lub jeden pełny ruch).
| |
|
| |
|
| Uwaga: Podajnik nie zawsze musi wykonywać pełnego obrotu. Podczas pobierania przedmiotów z taśmociągów podajnik jest nieco szybszy pobierając przedmioty z bliższej linii taśmociągu.
| | == Modules == |
| | | [[Module]]s that list "+x% pollution" increase pollution multiplier, not a flat pollution rate. Final pollution value is (pollution multiplier * energy usage multiplier * base pollution), meaning heavily boosted buildings are likely to account for most of the pollution produced in a factory. |
| ===Extension Speed - nie rozumiem co to jest===
| |
| The extension-speed is normally not visible (only when compared to other inserters), but there are measurable speed differences when taking - for example - from the near or the far side of a belt. Also Some mods can alter the pickup and drop locations of inserters, making this stat more relevant.
| |
| | |
| ==Inserter Throughput==
| |
| | |
| The following is based on [https://docs.google.com/spreadsheets/d/1OzlP2v6P1OGxK1xCFr77aqVfNNEaEKHlA89aSVmqBGw/edit?usp=sharing experimental data] gathered in version 0.15.
| |
| | |
| Inserter throughput between chests and other [[stack|stacks]] is a simple function of stack size and arm speed:
| |
| | |
| <blockquote>
| |
| ''n'' = Stack size
| |
| | |
| ''t_arm'' = Time to move the arm back and forth
| |
| | |
| Time per item = ''t_arm'' / ''n''
| |
| | |
| Throughput (items/sec) = 1 / Time per item = ''n'' / ''t_arm''
| |
| </blockquote>
| |
| | |
| When moving items to or from belts, the time to pick up or put down items also becomes a factor:
| |
| | |
| <blockquote>
| |
| ''t_item'' = Time to pick up or put down one item
| |
| | |
| ''t_cycle'' = Time to complete an arm cycle = ''t_arm'' + ''n''*''t_item''
| |
| | |
| Time per item = ''t_cycle'' / ''n'' = ''t_item'' + ''t_arm'' / ''n''
| |
| | |
| Throughput (items/sec) = 1 / (''t_item'' + ''t_arm'' / ''n'')
| |
| </blockquote>
| |
| | |
| '''Note:''' [https://forums.factorio.com/viewtopic.php?t=9141#p280529 Before 0.15.14], inserters were 1-4% less efficient when moving items from south to north.
| |
| | |
| ===Chest to chest===
| |
|
| |
|
| | == Production/Absorption == |
| | These tables contain information about the levels of pollution produced/absorbed by items in the game. |
| | === Polluters === |
| {| class="wikitable" | | {| class="wikitable" |
| ! rowspan=2 | Type
| | | '''Object''' || '''Pollution per KW per game second (60 ticks)''' || '''Pollution per game second at full power''' |
| ! rowspan=2 | Arm cycles per second
| | |- |
| ! colspan=6 | Items/second at [[inserter capacity bonus (research)|capacity bonus]] level (stack size)
| | | {{Imagelink|Stone furnace}} || 0.01/KW || 1.8 |
| | |- |
| | | {{Imagelink|Steel furnace}} || 0.02/KW || 3.6 |
| |- | | |- |
| ! colspan=2 | No capacity bonus
| | | {{Imagelink|Electric furnace}} || 0.005/KW || 0.9 |
| ! colspan=2 | Capacity bonus 2
| | |- |
| ! colspan=2 | Capacity bonus 7
| | | {{Imagelink|Burner mining drill}} || 0.03333/KW || 10 |
| |- align="center" | | |- |
| | align="left"| {{Imagelink|Burner inserter|Burner inserter}} || 0.59 || 0.59 || (1) || 1.18 || (2) || 1.76 || (3)
| | | {{Imagelink|Electric mining drill}} || 0.1/KW || 9 |
| |- align="center" | | |- |
| | align="left"| {{Imagelink|Inserter|Inserter}} || 0.83 || 0.83 || (1) || 1.67 || (2) || 2.50 || (3)
| | | {{imagelink|Pumpjack}} || 0.1/KW || 9 |
| |- align="center" | | |- |
| | align="left"| {{Imagelink|Long handed inserter|Long handed inserter}} || 1.15 || 1.15 || (1) || 2.31 || (2) || 3.46 || (3)
| | | {{Imagelink|Assembling machine 1}} || 0.03333/KW || 3 |
| |- align="center" | | |- |
| | align="left"| {{Imagelink|Fast inserter|Fast inserter}}<br/>{{Imagelink|Filter inserter|Filter inserter}} || 2.31 || 2.31 || (1) || 4.62 || (2) || 6.93 || (3)
| | | {{Imagelink|Assembling machine 2}} || 0.016/KW || 2.4 |
| |- align="center" | | |- |
| | align="left"| {{Imagelink|Stack inserter|Stack inserter}}<br/>{{imagelink|stack_filter_inserter|Stack filter inserter}} || 2.31 || 4.62 || (2) || 9.23 || (4) || 27.70 || (12)
| | | {{Imagelink|Assembling machine 3}} || 0.00857/KW || 1.8 |
| | |- |
| | | {{Imagelink|Pump}} || 0.004/KW || 0.12 |
| | |- |
| | | {{imagelink|Boiler}} || 0.01538/KW || 27.6923 |
| | |- |
| | | {{Imagelink|Oil refinery}} || 0.00857/KW || 3.6 |
| | |- |
| | | {{Imagelink|Chemical plant}} || 0.00857/KW || 1.8 |
| | |- |
| | | {{Imagelink|Centrifuge}} || 0.016/KW || 5.6 |
| |- | | |- |
| |} | | |} |
|
| |
|
| ===Chest to belt=== | | Fire on the ground and burning trees produce 0.005 pollution per tick. |
| | |
| | === De-polluters === |
|
| |
|
| Throughput going from chest to belt depends on how full the belt is and how the items are spaced, i.e. if spaces are large enough to fill with items. Underground entrances and exits also makes it easier for the inserter to put down an item.
| | ==== Spawner ==== |
| | If a chunk's pollution is greater than 20, each enemy spawner absorbs 20 + 0.01 * [chunk's pollution] every game second (60 ticks), otherwise it absorbs the chunk's total pollution. |
|
| |
|
| In these measurements inserters move items onto an empty perpendicular belt. Values are given for the stack sizes at three different [[inserter capacity bonus (research)|capacity bonus]] levels.
| | ==== Chunks ==== |
| | Every chunk has a natural absorption rate per tick which is determined by the weighted average of its floor tiles. |
|
| |
|
| | Following numbers are the pollution reduction for a full chunk (32x32 tiles) composed of the same floor tiles per tick. |
| {| class="wikitable" | | {| class="wikitable" |
| ! rowspan=3 | Type | | ! Tile !! Pollution per tick !! Pollution per second |
| ! colspan=12 | Items/second at [[inserter capacity bonus (research)|capacity bonus]] level (stack size)
| | |- |
| | |Grass 1-4 || -0.00045|| -0.027 |
| |- | | |- |
| ! colspan=4 | No capacity bonus
| | |Dirt 1|| -0.0004|| -0.024 |
| ! colspan=4 | Capacity bonus 2
| |
| ! colspan=4 | Capacity bonus 7
| |
| |- | | |- |
| ! [[File:Transport belt.png|link=Transport belt]] || [[File:Fast transport belt.png|link=Fast transport belt]] || [[File:Express transport belt.png|link=Express transport belt]] ||
| | |Dirt 2-7 || -0.00045|| -0.027 |
| ! [[File:Transport belt.png|link=Transport belt]] || [[File:Fast transport belt.png|link=Fast transport belt]] || [[File:Express transport belt.png|link=Express transport belt]] ||
| | |- |
| ! [[File:Transport belt.png|link=Transport belt]] || [[File:Fast transport belt.png|link=Fast transport belt]] || [[File:Express transport belt.png|link=Express transport belt]] ||
| | |Dry dirt || -0.00039|| -0.0234 |
| |- align="center" | | |- |
| | align="left"| {{Imagelink|Burner inserter|Burner inserter}} || 0.59 || 0.59 || 0.59 || (1) || 1.10 || 1.13 || 1.14 || (2) || 1.53 || 1.62 || 1.67 || (3) | | |Sand 1-3 || -0.00039|| -0.0234 |
| |- align="center" | | |- |
| | align="left"| {{Imagelink|Inserter|Inserter}} || 0.83 || 0.83 || 0.83 || (1) || 1.52 || 1.58 || 1.60 || (2) || 2.05 || 2.22 || 2.31 || (3) | | |Red desert 0 || -0.00045|| -0.027 |
| |- align="center" | | |- |
| | align="left"| {{Imagelink|Long handed inserter|Long handed inserter}} || 1.15 || 1.15 || 1.15 || (1) || 2.03 || 2.14 || 2.18 || (2) || 2.65 || 2.95 || 3.10 || (3) | | |Red desert 1-3 || -0.0004|| -0.024 |
| |- align="center" | | |- |
| | align="left"| {{Imagelink|Fast inserter|Fast inserter}}<br/>{{Imagelink|Filter inserter|Filter inserter}} || 2.31 || 2.31 || 2.31 || (1) || 3.64 || 4.00 || 4.14 || (2) || 4.29 || 5.14 || 5.63 || (3) | | |Water, Green water, Deep water, Deep green water || -0.0003 || -0.018 |
| |- align="center" | | |- |
| | align="left"| {{Imagelink|Stack inserter|Stack inserter}}<br/>{{imagelink|stack_filter_inserter|Stack filter inserter}} || 3.64 || 4.00 || 4.14 || (2) || 4.71 || 6.15 || 6.86 || (4) || 5.90 || 9.60 || 12.20 || (12) | | |Path tiles (Stone bricks, concrete etc) || 0.0 || 0.0 |
| | |- |
| | |Special tiles (Lab tiles, out of map, tutorial grid) || -0.0006 || -0.036 |
| |- | | |- |
| |} | | |} |
|
| |
|
| To calculate the throughput for [[Stack inserter]] and [[Stack filter inserter]] at any capacity level, you can use these linearly fitted factors with the belt/chest throughput formula above:
| | ==== Trees ==== |
| | Every single tree absorbs a small amount of pollution in its chunk per tick if the total pollution in that chunk is above 3500 units. By absorbing pollution, trees lose their leaves for every 500 pollution absorbed. The less dense the leaves, the slower the tree absorbs pollution. |
|
| |
|
| {| class="wikitable" | | {| class="wikitable" |
| ! rowspan=2 | Type | | ! Object !! Stage !! Pollution per tick !! Pollution per second |
| ! colspan=2 | {{Imagelink|Transport belt|Transport belt}}
| | |- |
| ! colspan=2 | {{Imagelink|Fast transport belt|Fast transport belt}}
| | | rowspan="4" | [[File:Green tree.png|120px]] Tree, red tree, brown tree || 0 (Max leaf density) || -0.001 || -0.06 |
| ! colspan=2 | {{Imagelink|Express transport belt|Express transport belt}}
| | |- |
| | | 1 || -0.00067 || -0.04 |
| | |- |
| | | 2 || -0.00033 || -0.02 |
| |- | | |- |
| ! ''t_item'' || ''t_arm''
| | | 3 (Min leaf density) || 0 || 0 |
| ! ''t_item'' || ''t_arm''
| |
| ! ''t_item'' || ''t_arm''
| |
| |- align="center"
| |
| | align="left"| {{Imagelink|Stack inserter|Stack inserter}}<br/>{{imagelink|stack_filter_inserter|Stack filter inserter}} || 0.142 || 0.292 || 0.073 || 0.360 || 0.049 || 0.384
| |
| |- | | |- |
| |} | | | [[File:Dead dry hairy tree.png|120px]] Dead dry hairy tree || No stages || -0.0001 || -0.006 |
| | | |- |
| See the [https://docs.google.com/spreadsheets/d/1OzlP2v6P1OGxK1xCFr77aqVfNNEaEKHlA89aSVmqBGw/edit?usp=sharing source spreadsheet] for the corresponding factors for the other inserter types. Their errors are generally well below 1%.
| | | [[File:Dead grey trunk.png|120px]] Dead grey trunk || No stages || -0.0001 || -0.006 |
| | |
| ===Belt to chest===
| |
| | |
| When picking items from a belt, many more factors come into play besides belt fullness:
| |
| | |
| * How fast the items move (i.e. if they are queued up on the belt or move at belt speed).
| |
| * Whether the belt is perpendicular to the inserter or approaches it head on.
| |
| * Whether items are on the near or far lane of a perpendicular belt.
| |
| * Whether the belt turns or not, and whether the items are in the inner or outer side of the bend.
| |
| * If the belt is an underground entrance or exit. This shortens the time items are visible to the inserter for pickup.
| |
| * All sorts of intricate timing factors between the inserter and the items on the belt, since the game simulates the arm homing in on every item.
| |
| | |
| The test setup used below is with an inserter taking items from a perpendicular belt with items on the far lane only. The belt is fully compressed and timings are both for items that move at full speed and queued up as much as possible. Values are given for the stack sizes at three different [[inserter capacity bonus (research)|capacity bonus]] levels.
| |
| | |
| {| class="wikitable"
| |
| ! rowspan=4 | Type
| |
| ! colspan=15 | Items/second at [[inserter capacity bonus (research)|capacity bonus]] level (stack size)
| |
| |- | | |- |
| ! colspan=5 | No capacity bonus
| | | [[File:Dead tree desert.png|120px]] Dead tree - desert|| No stages || -0.0001 || -0.006 |
| ! colspan=5 | Capacity bonus 2
| |
| ! colspan=5 | Capacity bonus 7
| |
| |- | | |- |
| ! colspan=3 | Items at<br/>belt speed
| | | [[File:Dry hairy tree.png|120px]] Dry hairy tree || No stages || -0.0001 || -0.006 |
| ! rowspan=2 | Items<br/>queued<br/>up
| |
| ! rowspan=2 |
| |
| ! colspan=3 | Items at<br/>belt speed
| |
| ! rowspan=2 | Items<br/>queued<br/>up
| |
| ! rowspan=2 |
| |
| ! colspan=3 | Items at<br/>belt speed
| |
| ! rowspan=2 | Items<br/>queued<br/>up
| |
| ! rowspan=2 |
| |
| |- | | |- |
| ! [[File:Transport belt.png|link=Transport belt]] || [[File:Fast transport belt.png|link=Fast transport belt]] || [[File:Express transport belt.png|link=Express transport belt]]
| | | [[File:Dry tree.png|120px]] Dry tree || No stages || -0.0001 || -0.006 |
| ! [[File:Transport belt.png|link=Transport belt]] || [[File:Fast transport belt.png|link=Fast transport belt]] || [[File:Express transport belt.png|link=Express transport belt]]
| |
| ! [[File:Transport belt.png|link=Transport belt]] || [[File:Fast transport belt.png|link=Fast transport belt]] || [[File:Express transport belt.png|link=Express transport belt]]
| |
| |- align="center" | |
| | align="left"| {{Imagelink|Burner inserter|Burner inserter}} || '''0.56''' || '''0.56''' || 0.51 || 0.65 || (1) || '''1.11''' || 1.07 || 0.98 || 1.18 || (2) || 1.43 || '''1.54''' || 1.43 || 1.75 || (3)
| |
| |- align="center" | |
| | align="left"| {{Imagelink|Inserter|Inserter}} || '''0.83''' || 0.74 || 0.77 || 0.90 || (1) || '''1.57''' || 1.48 || 1.45 || 1.62 || (2) || 2.00 || '''2.11''' || 2.07 || 2.40 || (3)
| |
| |- align="center"
| |
| | align="left"| {{Imagelink|Long handed inserter|Long handed inserter}} || '''1.16''' || 1.11 || 1.11 || 1.22 || (1) || 2.22 || '''2.22''' || 2.11 || 2.31 || (2) || 3.08 || 3.08 || '''3.16''' || 3.33 || (3)
| |
| |- align="center"
| |
| | align="left"| {{Imagelink|Fast inserter|Fast inserter}}<br/>{{Imagelink|Filter inserter|Filter inserter}} || '''2.22''' || '''2.22''' || 2.14 || 2.40 || (1) || '''4.17''' || 3.81 || 4.00 || 4.29 || (2) || '''5.71''' || 5.45 || 5.46 || 6.21 || (3)
| |
| |- align="center"
| |
| | align="left"| {{Imagelink|Stack inserter|Stack inserter}}<br/>{{imagelink|stack_filter_inserter|Stack filter inserter}} || '''4.17''' || 3.81 || 4.00 || 4.29 || (2) || '''6.67''' || '''6.67''' || 6.15 || 6.67 /<br/>7.50 /<br/>7.74 * || (4) || 6.67 || 10.00 || '''12.00''' || 6.67 /<br/>11.61 /<br/>13.58 * || (12)
| |
| |- | | |- |
| |} | | |} |
|
| |
|
| <nowiki>*)</nowiki> Throughput for basic/fast/express belt.
| | == Achievements == |
| | Pollution is directly connected to the following achievement: |
| | {{Achievement|it-stinks-and-they-dont-like-it}} |
| | |
| | == History == |
|
| |
|
| Since there are many more factors involved, these measurements exhibit a more complex pattern than chest-to-belt.
| | {{history|0.13.2| |
| | * Optimized rendering of huge pollution clouds on the map.}} |
|
| |
|
| * Boldface cells show for which belt each inserter has the best throughput on each bonus level when items move at belt speed. Higher speed belts mean that inserters have to work harder to catch the fast moving items. The effect is most noticeable for slower inserters and smaller stack sizes.
| | {{history|0.13.0| |
| * When items are queued up the belt type hardly matters, so there is only a single column for that. The exceptions are the stack inserters - for basic transport belts it's the belt that sets the limit for stack sizes above 4, and there is also a notable difference between fast and express belts. | | * Large amounts of pollution is created when burning fires. |
| | * Pollution creation of the productivity module was reduced drastically. |
| | * Optimized pollution rendering on map and minimap. |
| | }} |
|
| |
|
| Here are linearly fitted factors to get the [[Stack inserter]] and [[Stack filter inserter]] throughput at any capacity level, by using the belt/chest throughput formula above:
| | {{history|0.12.0| |
| | * [[Tree]]s degenerate slowly when exposed to pollution at high levels. }} |
|
| |
|
| {| class="wikitable"
| | {{history|0.8.0| |
| ! rowspan=2 | Type
| | * Added option to turn off pollution visibility even when detailed info is on. }} |
| ! colspan=2 | {{Imagelink|Transport belt|Transport belt}}
| |
| ! colspan=2 | {{Imagelink|Fast transport belt|Fast transport belt}}
| |
| ! colspan=2 | {{Imagelink|Express transport belt|Express transport belt}}
| |
| |-
| |
| ! ''t_item'' || ''t_arm''
| |
| ! ''t_item'' || ''t_arm''
| |
| ! ''t_item'' || ''t_arm''
| |
| |- align="center"
| |
| | align="left"| {{Imagelink|Stack inserter|Stack inserter}}<br/>{{imagelink|stack_filter_inserter|Stack filter inserter}} || 0.045* || 0.403* || 0.063 || 0.387 || 0.049 || 0.416
| |
| |-
| |
| |}
| |
|
| |
|
| <nowiki>*)</nowiki> Since the belt is the limiting factor above stack size 4, these figures are only accurate up to that size. More than that and the throughput is fixed at 6.67 items per second.
| | {{history|0.7.1| |
| | * Speed modules no longer produce extra pollution. |
| | * Added missing pollution descriptions. |
| | * Pollution is only shown on the minimap with alt mode on. |
| | }} |
|
| |
|
| ==See Also==
| | {{history|0.7.0| |
| * [[Electric system]]
| | * Introduced concept of pollution.}} |
| * [[Belt transport system]]
| |
| * [[Inserter capacity bonus (research)]]: Inserter moves more than an item per turn. | |
|
| |
|
| {{C|Inserters}}
| | == See also == |
| | * [[Crafting]] |
| | * [[Module]]s |
| | * [[Enemies]] |
Welcome to the Official Factorio Wiki! Now that you have an account, there are a few key places on this Wiki that will be helpful in your efforts to improve it.
First and foremost, please be sure to read and understand the rules of this Wiki. If you have any questions or concerns with these rules, please don't hesitate to ask an Admin.
Secondly, if you're new to editing Wikis and are unfamiliar with MediaWiki's formatting, please be sure to read the help pages. In addition to the help provided by MW, we also provide a style guide that we enforce.
If you're unsure where to begin, please see the editor noticeboard, where information on the current objectives and projects of the Wiki may be found.
Again, welcome, we hope you contribute as much high quality information as you can. :) Bilka (talk) - Admin 10:58, 6 February 2018 (UTC)
Linki
https://wiki.factorio.com/index.php?title=Special:AllPages&namespace=10
https://wiki.factorio.com/Factorio:Editor_noticeboard
https://wiki.factorio.com/Factorio:Wanted_pages/pl
Templatesy
https://wiki.factorio.com/index.php?title=Special:AllPages&namespace=10
--> --> --> --> --> -->
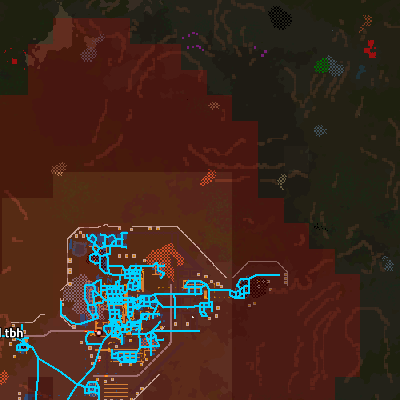
Example of in-game pollution (red squares) in the map
Pollution is represented as an abstract "cloud", updated per chunk every game second (60 ticks) and visible on the map, when "alt-view" is on (default Alt-Key). It appears as a red colored blocky cloud.
It is produced by many buildings involved in processing items and spreads outwards at a steady rate.
The evolution factor is not increased by the spreading/absorbed pollution, but by the pollution produced by all the player's machinery at every tick. This means that no matter how hard the player tries to contain the pollution, enemies will still evolve at the same rate. They just won't attack the player as frequently. The pollution cloud is used to trigger biter attacks and determines the size of the attacks.
Pollution settings can be changed via map generation settings, or can be disabled entirely.
Pollution spread
As soon as a chunk has reached 15.0 pollution it starts spreading in all four cardinal directions at a rate of 2% per game-second (60 ticks).
For example, a chunk with 400.0 pollution and 4 adjacent chunks with 100.0 pollution each, raises the pollution in all adjacent chunks by 8.0 while reducing its own pollution by 32.0. But every one of the 4 surrounding spreads 2.0 pollution "back" to the center chunk, so it only loses 24.0 + absorbed value.
Pollution dissipation
- Every chunk (32x32) of map slowly reduces the pollution it covers (See Pollution#Chunks). So the more the pollution spreads, the more is absorbed.
- Trees also absorb some pollution (See Pollution#Trees).
- Spawners absorb a great amount of pollution, and use this to produce enemies.
Native life
Pollution attracts biters to the Player's factory. Biters who find themselves in a polluted area will attempt to reach the source of pollution and destroy it.
Each spawner absorbs 20 + 0.01 * [chunk's pollution] every game second (60 ticks) if the chunk's pollution is greater than 20. If there is 20 or less pollution in the chunk, the spawner absorbs all the pollution.
Higher pollution values decrease the time it takes for biters to join the attack force. After a certain amount of pollution is absorbed the spawner sends one of its biters/spitters to a rendezvous point. Every 1 to 10 minutes (random) the mustered biters launch an attack. If not all biters have arrived at the rendezvous point by that time, they will wait up to an additional 2 minutes for stragglers.
Required pollution to add an additional biter/spitter to the attack wave:
| Pollution
|
Type
|
| 200 |
Small biter
|
| 1,000 |
Medium biter
|
| 4,000 |
Big biter
|
| 20,000 |
Behemoth biter
|
| 200 |
Small spitter
|
| 600 |
Medium spitter
|
| 1,500 |
Big spitter
|
| 10,000 |
Behemoth spitter
|
With 1350 absorbed pollution at the time of attack the following wave consists of 6 small biters and 1 medium biter OR 6 small spitters and 2 medium spitters depending on the spawner's type and evolution factor.
Modules
Modules that list "+x% pollution" increase pollution multiplier, not a flat pollution rate. Final pollution value is (pollution multiplier * energy usage multiplier * base pollution), meaning heavily boosted buildings are likely to account for most of the pollution produced in a factory.
Production/Absorption
These tables contain information about the levels of pollution produced/absorbed by items in the game.
Polluters
Fire on the ground and burning trees produce 0.005 pollution per tick.
De-polluters
Spawner
If a chunk's pollution is greater than 20, each enemy spawner absorbs 20 + 0.01 * [chunk's pollution] every game second (60 ticks), otherwise it absorbs the chunk's total pollution.
Chunks
Every chunk has a natural absorption rate per tick which is determined by the weighted average of its floor tiles.
Following numbers are the pollution reduction for a full chunk (32x32 tiles) composed of the same floor tiles per tick.
| Tile |
Pollution per tick |
Pollution per second
|
| Grass 1-4 |
-0.00045 |
-0.027
|
| Dirt 1 |
-0.0004 |
-0.024
|
| Dirt 2-7 |
-0.00045 |
-0.027
|
| Dry dirt |
-0.00039 |
-0.0234
|
| Sand 1-3 |
-0.00039 |
-0.0234
|
| Red desert 0 |
-0.00045 |
-0.027
|
| Red desert 1-3 |
-0.0004 |
-0.024
|
| Water, Green water, Deep water, Deep green water |
-0.0003 |
-0.018
|
| Path tiles (Stone bricks, concrete etc) |
0.0 |
0.0
|
| Special tiles (Lab tiles, out of map, tutorial grid) |
-0.0006 |
-0.036
|
Trees
Every single tree absorbs a small amount of pollution in its chunk per tick if the total pollution in that chunk is above 3500 units. By absorbing pollution, trees lose their leaves for every 500 pollution absorbed. The less dense the leaves, the slower the tree absorbs pollution.
| Object |
Stage |
Pollution per tick |
Pollution per second
|
 Tree, red tree, brown tree Tree, red tree, brown tree |
0 (Max leaf density) |
-0.001 |
-0.06
|
| 1 |
-0.00067 |
-0.04
|
| 2 |
-0.00033 |
-0.02
|
| 3 (Min leaf density) |
0 |
0
|
 Dead dry hairy tree Dead dry hairy tree |
No stages |
-0.0001 |
-0.006
|
 Dead grey trunk Dead grey trunk |
No stages |
-0.0001 |
-0.006
|
 Dead tree - desert Dead tree - desert |
No stages |
-0.0001 |
-0.006
|
 Dry hairy tree Dry hairy tree |
No stages |
-0.0001 |
-0.006
|
 Dry tree Dry tree |
No stages |
-0.0001 |
-0.006
|
Achievements
Pollution is directly connected to the following achievement:
History
- 0.13.2:
- Optimized rendering of huge pollution clouds on the map.
- 0.13.0:
- Large amounts of pollution is created when burning fires.
- Pollution creation of the productivity module was reduced drastically.
- Optimized pollution rendering on map and minimap.
- 0.12.0:
- Trees degenerate slowly when exposed to pollution at high levels.
- 0.8.0:
- Added option to turn off pollution visibility even when detailed info is on.
- 0.7.1:
- Speed modules no longer produce extra pollution.
- Added missing pollution descriptions.
- Pollution is only shown on the minimap with alt mode on.
- 0.7.0:
- Introduced concept of pollution.
See also

 Tree, red tree, brown tree
 Dead dry hairy tree
 Dead grey trunk
 Dead tree - desert
 Dry hairy tree
 Dry tree