![]()
![]()
![]()
Tutorial:Train signals: Difference between revisions
(First batch of images) |
No edit summary |
||
| Line 17: | Line 17: | ||
== Chain Signals == | == Chain Signals == | ||
Using signals prevents trains from crashing into each other but brings with itself other potential issues. Every train will wait until the block in front of it is cleared | Using signals prevents trains from crashing into each other but brings with itself other potential issues. Every train will wait until the block in front of it is cleared, so trains are waiting for other trains. This becomes a problem if a waiting train happens to stand on an intersection because other trains will have to wait even if they are not going in the same direction. These trains may in turn cause other trains to wait, resulting in a slowdown of the entire system. Traffic systems should avoid having trains waiting directly on intersections. | ||
TODO: Image of train on intersection and waiting trains. | TODO: Image of train on intersection and waiting trains. | ||
| Line 77: | Line 77: | ||
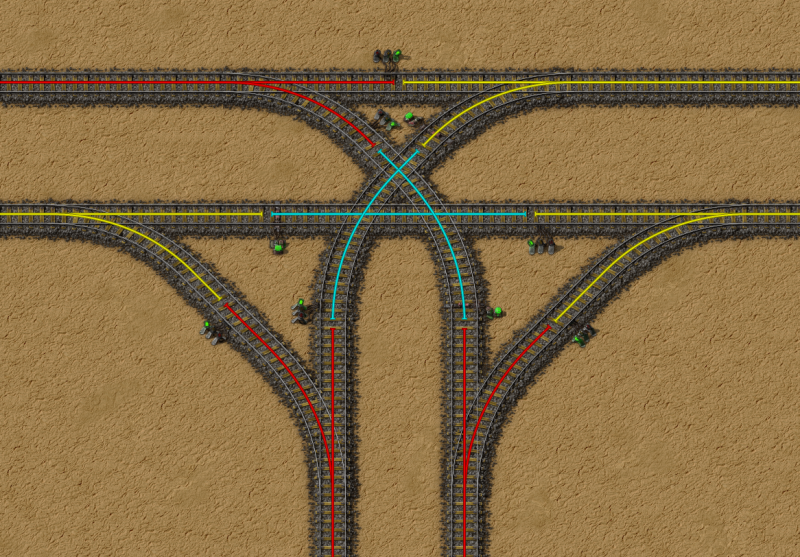
=== T-junction === | === T-junction === | ||
This is the most common variation of the 3-way | This is the most common variation of the 3-way junction. Rail signals have been placed inside the junction to ensure that more than one train can enter the junction in some cases. For example for one train going left to right and one going right to left, the trains will pass through different blocks: the first will go through the left yellow, the blue and the lower right yellow block; the second will use the upper yellow and upper red blocks. Because they use different blocks, they can use the junction simultaneously. While this is not strictly necessary for a junction to work, it will allow better throughput at a low cost. | ||
<gallery mode="nolines" widths= | <gallery mode="nolines" widths=800px heights=800px> | ||
File:T_junction_9.png|{{BlueprintString|bp-string=0eNqVmOtuqkAUhd9lfmPDHuYCvkrTnFglLYmiAWyOMbz7gaJN4WzjWv9Enc81sy9rO1fzvj+Xp6aqO7O+mmp7rFuzfr2atvqoN/vxve5yKs3aVF15MImpN4fxqdlUe9Mnpqp35V+zlv4tMWXdVV1VTuu/Hy5/6vPhvWyGL8xWrm70xJyO7bDmWI8/NHBW8uITcxleFC9+wO+qptxOn9s++Y9qf6htN3A/PrvVtzCFGyZs/hya4VAHQx0OtTDU49AUhoYf6PbcfJW7R8hbnOKcmCnECMvMYZU5zMQDX8BMPO7jwYNQPO4iWIwyNURBI8KVhCeSwIVE7ByuIyJEcBnhqSQBZeIpL3AdEdUucCERfUngSiI6qE3JFHVzZtSYwlbnAioa1LJeF5Zep3VRm82x289NVT+Gpw/hqmYHdv1bSxEA6TGk3IkaAzUj0XWp5xjpocEC2ZnTUwNCLeixAaBmKT03IFRhbR6BWtbnEWjGGj0CdWwrQaCe7HkIM5C2jDAjacsIMydtGWEWYE8StZ1ok5NLSacHZDphnR6BWtbpEWjGOj0CdWx/ss/tyHnKPsPdPtOlfapJQI579vlo4iI2RXhOaE426YVSrzELkgnMUD4FZ6j79u2we40jXBMBZkZvmUTKfumboZ2Gzji19vm04x14kMVNaLYUqp6Bpy4JohqaQLqwUymR+SscgczLOXvUVRXYqcdHh67VWUjJAwuatCDc/nSIJaXkKoW8INAhjpQiqYrxnJaR8pZMl6LrX3eoifkqm3bqv3m0Npcijbbv/wGVhQXf}} | File:T_junction_9.png|{{BlueprintString|bp-string=0eNqVmOtuqkAUhd9lfmPDHuYCvkrTnFglLYmiAWyOMbz7gaJN4WzjWv9Enc81sy9rO1fzvj+Xp6aqO7O+mmp7rFuzfr2atvqoN/vxve5yKs3aVF15MImpN4fxqdlUe9Mnpqp35V+zlv4tMWXdVV1VTuu/Hy5/6vPhvWyGL8xWrm70xJyO7bDmWI8/NHBW8uITcxleFC9+wO+qptxOn9s++Y9qf6htN3A/PrvVtzCFGyZs/hya4VAHQx0OtTDU49AUhoYf6PbcfJW7R8hbnOKcmCnECMvMYZU5zMQDX8BMPO7jwYNQPO4iWIwyNURBI8KVhCeSwIVE7ByuIyJEcBnhqSQBZeIpL3AdEdUucCERfUngSiI6qE3JFHVzZtSYwlbnAioa1LJeF5Zep3VRm82x289NVT+Gpw/hqmYHdv1bSxEA6TGk3IkaAzUj0XWp5xjpocEC2ZnTUwNCLeixAaBmKT03IFRhbR6BWtbnEWjGGj0CdWwrQaCe7HkIM5C2jDAjacsIMydtGWEWYE8StZ1ok5NLSacHZDphnR6BWtbpEWjGOj0CdWx/ss/tyHnKPsPdPtOlfapJQI579vlo4iI2RXhOaE426YVSrzELkgnMUD4FZ6j79u2we40jXBMBZkZvmUTKfumboZ2Gzji19vm04x14kMVNaLYUqp6Bpy4JohqaQLqwUymR+SscgczLOXvUVRXYqcdHh67VWUjJAwuatCDc/nSIJaXkKoW8INAhjpQiqYrxnJaR8pZMl6LrX3eoifkqm3bqv3m0Npcijbbv/wGVhQXf}} | ||
Revision as of 23:56, 8 July 2018
This tutorial explains why and when signals are used and how deadlocks can be avoided. Examples of frequent use cases are shown. It is suggested to follow the tutorial with the game open so the examples can be tried out ingame.
Regular Signals
Whenever there is more than one train on a track, there is the possibility that trains can crash into one another. To prevent trains from doing this, we place signals at intervals along the track and at crossings. A regular signal protects the rail block behind it, up to the next signal or the end of the track. Signals ensure that only one train can be in any block. Whenever a second train would enter a block that already has a train in it, the train will wait at the signal leading into the block instead. Rail blocks are shown with colors when a player has a signal in hand.

A regular signal is green when there is no train on the block behind it. When a train enters the block, all signals going into the block will turn red. When a train is in the process of entering the block, the signal turns yellow.
Signals are placed on the right side of the track. Trains are only allowed to go past signals that are on the right hand side from direction of travel. A train in automatic mode will not drive on a track if it would pass a signal on the left side unless there is also a signal on the right side at that signal.
TODO: Image of signal direction
Chain Signals
Using signals prevents trains from crashing into each other but brings with itself other potential issues. Every train will wait until the block in front of it is cleared, so trains are waiting for other trains. This becomes a problem if a waiting train happens to stand on an intersection because other trains will have to wait even if they are not going in the same direction. These trains may in turn cause other trains to wait, resulting in a slowdown of the entire system. Traffic systems should avoid having trains waiting directly on intersections.
TODO: Image of train on intersection and waiting trains.
Chain signals ensure that trains cannot wait on intersections.

The most important rule is that a train cannot wait for an extended period of time in a block after a chain signal, whereas it can wait in a block after a regular signal. Since trains should not wait on crossings, this leads to the commonly stated rule:
Use chain signals on and before crossings and use regular signals at the exits of crossings.
Whenever a waiting train would block another train that is going on a different track, a chain signal should be used to prevent the train from waiting.

To determine if a train is allowed to drive through a chain signal, consider the path the train will take from that signal up to the next regular signal or until it reaches the station, whichever comes first. The train is only allowed to go through if all rail blocks on this path are free. If the train goes through, it will reserve all blocks on this path and allow other trains to pass through a block only after it leaves the block. A chain signal which leads to a block that has only one outgoing signal will always have the same color as that signal. If a rail line splits up, it can happen that one outgoing signal is red and the other is green. In that case the chain signal leading into the block will turn blue to indicate that some paths are free while others are not.

If the rail network contains many chain signals it is possible that a very large number of blocks is reserved when a train drives by a chain signal. This would restrict other trains, reducing throughput in general. Hence it is often suggested to use regular signals whenever possible and chain signals only where they are necessary.
Deadlocks
Using signals can lead to trains waiting for other trains. As a consequence, there might be a chain of trains, each waiting for the next, with the last waiting for the first. This situation is called a deadlock, because the trains will wait forever or until the situation is resolved manually. It should be avoided and resolved as soon as possible because every train going through the area will get stuck.
TODO: Image of deadlock from bad signalling
The most frequent causes of deadlocks are 1) trains waiting on intersections and 2) a rail network that does not allow enough space for trains. We have already talked about the first point.
TODO: Image of deadlock from too many trains
The deadlock in the image happened because there was a circle in the network which was used by more trains than can fit into the circle. Another example occurs when a station does not have enough space for all trains going there so the trains will wait on the main line - see the example waiting area below.
Splitting Rail Blocks
Long uninterrupted rail tracks should have signals at regular intervals because this allows more trains to move on the track simultaneously leading to higher throughput. Crossings should be separated from normal rails with signals. Inside crossings, signals should be used so that multiple trains can pass through the crossing without slowing down - for example trains going in opposite directions should not have to slow down for one another, so they need to pass through different blocks inside an intersection.
Signal Spacing

The image shows a deadlock between two T-junctions. It happened because while a train was waiting at the intersection, its tail end was still in the last intersection. The junctions when taken individually are signalled correctly, however they are too close to each other. One interpretation is that they form a single big intersection. There are two ways to fix this: the regular signals between the two junctions could be turned into chain signals or the junctions could be moved further away from each other.
After an exit signal of a junction, the next signal must be at least far enough away to fit the longest train in the rail system between the signals.
Examples
The most common way to build a rail system is using two parallel rails, one for each direction. The examples mostly follow this architecture.
Single split off
Stations should never be on a main rail line as trains waiting there would block other trains for extended periods of time. So usually a single line is split off from the main line to make a station there. There are two variations, one for trains that can only go in one direction and one for trains with locomotives in both directions.
TODO: Image
The signals in all the examples are done according to the 'chain before, regular after' rule.
T-junction
This is the most common variation of the 3-way junction. Rail signals have been placed inside the junction to ensure that more than one train can enter the junction in some cases. For example for one train going left to right and one going right to left, the trains will pass through different blocks: the first will go through the left yellow, the blue and the lower right yellow block; the second will use the upper yellow and upper red blocks. Because they use different blocks, they can use the junction simultaneously. While this is not strictly necessary for a junction to work, it will allow better throughput at a low cost.
 Copy blueprint string

Waiting Area
Roundabouts
4-way junctions
TODO: Examples. Forum post for 4-way crossing throughput. Regular signals on crossings.