|
|
| (62 intermediate revisions by 8 users not shown) |
| Line 1: |
Line 1: |
| {{Languages}} | | {{Languages}} |
|
| |
| Balancers are used to evenly distribute items over multiple belts or multiple belt lanes. | | Balancers are used to evenly distribute items over multiple belts or multiple belt lanes. |
|
| |
|
| Belt balancers are usually used to balance multiple belts before or after train stations to ensure even loading of buffer chests and train wagons. They are also usually used to even out production by placing them in front of large machine arrays with multiple input belts. Belt balancers do not balance the individual belt lanes!
| | Balancers that are input balanced take evenly from all input belts/belt lanes. Balancers that are output balanced distribute evenly to all output belts/belt lanes. Ideally, a balancer should be input and output balanced. |
| | |
| Lane balancers are usually placed after production to ensure that a belt is fully compressed or before consumption to ensure that both lanes of the belt are evenly drained.
| |
| | |
| == Lane Balancers ==
| |
| === Input Unbalanced, Output Balanced ===
| |
| | |
| These balancers evenly distribute the items onto the output lanes but do not "pull" evenly from the input lanes when the output is backed up. They are input unbalanced.
| |
| | |
| The last two balancers are a special case, they only work when there are items on only one side of the input belt.
| |
| | |
| <gallery mode="packed" heights=200px>
| |
| File:Transport_belts_balance2.gif
| |
| File:Corner-lane_balancer.png
| |
| File:Transport_belts_balance1.gif
| |
| File:One_lane-corner-lane_balancer.png
| |
| </gallery>
| |
| | |
| === Input and Output Balanced ===
| |
| | |
| These balancers evenly distribute the items onto the output lanes and "pull" evenly from the input lanes when the output is backed up. They are input and output balanced.
| |
| | |
| <gallery mode="packed-hover" heights=180px>
| |
| File:Input_balanced-lane_balancer-1belt.png|1 Belt
| |
| File:Input_balanced-lane_balancer-2belt.png|2 Belts
| |
| File:Input_balanced-lane_balancer-4belt-smaller.png|4 Belts v.1
| |
| File:Input_balanced-lane_balancer-4belt.png|4 Belts v.2
| |
| </gallery>
| |
| | |
| == Belt Balancers ==
| |
| These belt balancers are all tested to be input balanced and output balanced. Throughput under full load is 100% and min throughput with blocked in- and outputs is also tested, it is noted when that is under 100%. Tests are done using [https://forums.factorio.com/viewtopic.php?f=69&t=34182 this handy tool] by d4rkpl4y3r on the Factorio Forums. When there are multiple versions of balancers that have the same stats but different sizes, the balancer with the smallest footprint is shown.
| |
| | |
| | |
| <div class="toccolours mw-collapsible mw-collapsed" style="width:800px">
| |
| 1 belt → x belts
| |
| <div class="mw-collapsible-content">
| |
| | |
| <gallery mode="packed" heights=180px>
| |
| File:1to2_balancer.png|'''1 to 2'''
| |
| File:1to3_balancer.png|'''1 to 3'''
| |
| File:1to4_balancer.png|'''1 to 4'''
| |
| File:1to5_balancer.png|'''1 to 5'''
| |
| File:1to6_balancer.png|'''1 to 6'''
| |
| File:1to7_balancer.png|'''1 to 7'''
| |
| File:1to8_balancer.png|'''1 to 8'''
| |
| File:1to16_balancer.png|'''1 to 16'''
| |
| </gallery>
| |
| | |
| </div></div>
| |
| | |
| | |
| <div class="toccolours mw-collapsible mw-collapsed" style="width:800px">
| |
| 2 belts → x belts
| |
| <div class="mw-collapsible-content">
| |
| | |
| <gallery mode="packed" heights=180px>
| |
| File:2to1_balancer.png|'''2 to 1'''
| |
| File:2to2_balancer.png|'''2 to 2'''
| |
| File:2to3_balancer_a.png|'''2 to 3''': Throughput can go down to 75%.
| |
| File:2to3_balancer_b.png|'''2 to 3''': Throughput can go down to 75%.
| |
| File:2to4_balancer.png|'''2 to 4'''
| |
| File:2to5_balancer_b.png|'''2 to 5''': Throughput can go down to 50%.
| |
| File:2to5_balancer.png|'''2 to 5''': Throughput can go down to 50%.
| |
| File:2to6_balancer.png|'''2 to 6''': Throughput can go down to 50%.
| |
| File:2to7_balancer.png|'''2 to 7''': Throughput can go down to 50%.
| |
| File:2to8_balancer.png|'''2 to 8''': Throughput can go down to 50%.
| |
| File:2to16_balancer.png|'''2 to 16''': Throughput can go down to 50%.
| |
| </gallery>
| |
| </div></div>
| |
| | |
| | |
| <div class="toccolours mw-collapsible mw-collapsed" style="width:800px">
| |
| 3 belts → x belts
| |
| <div class="mw-collapsible-content">
| |
| | |
| <gallery mode="packed" heights=180px>
| |
| File:3to1_balancer.png|'''3 to 1''': Throughput can go down to 50%.
| |
| File:3to2_balancer.png|'''3 to 2''': Throughput can go down to 75%.
| |
| File:3to3_balancer.png|'''3 to 3''': Throughput can go down to 50%.
| |
| File:3to4_balancer.png|'''3 to 4''': Throughput can go down to 83%.
| |
| File:3to5_balancer.png|'''3 to 5''': Throughput can go down to 50%.
| |
| File:3to6_balancer.png|'''3 to 6''': Throughput can go down to 50%.
| |
| File:3to7_balancer.png|'''3 to 7''': Throughput can go down to 50%.
| |
| File:3to8_balancer.png|'''3 to 8''': Throughput can go down to 50%.
| |
| </gallery>
| |
| </div></div>
| |
| | |
| | |
| <div class="toccolours mw-collapsible mw-collapsed" style="width:800px">
| |
| 4 belts → x belts
| |
| <div class="mw-collapsible-content">
| |
| | |
| <gallery mode="packed" heights=180px>
| |
| File:4to1_balancer.png|'''4 to 1'''
| |
| File:4to2_balancer.png|'''4 to 2''': Throughput can go down to 50%.
| |
| File:4to3_balancer.png|'''4 to 3''': Throughput can go down to 83%.
| |
| File:4to4_balancer.png|'''4 to 4''': Throughput can go down to 50%.
| |
| File:4to5_balancer.png|'''4 to 5''': Throughput can go down to 62.5%.
| |
| File:4to6_balancer.png|'''4 to 6''': Throughput can go down to 50%.
| |
| File:4to7_balancer.png|'''4 to 7''': Throughput can go down to 50%.
| |
| File:4to8_balancer.png|'''4 to 8''': Throughput can go down to 50%.
| |
| </gallery>
| |
| </div></div>
| |
| | |
| | |
| <div class="toccolours mw-collapsible mw-collapsed" style="width:800px">
| |
| 5 belts → x belts
| |
| <div class="mw-collapsible-content">
| |
| | |
| <gallery mode="packed" heights=180px>
| |
| File:5to1_balancer.png|'''5 to 1''': Throughput can go down to 50%.
| |
| File:5to2_balancer.png|'''5 to 2''': Throughput can go down to 50%.
| |
| File:5to3_balancer.png|'''5 to 3''': Throughput can go down to 50%.
| |
| File:5to4_balancer.png|'''5 to 4''': Throughput can go down to 62.5%.
| |
| File:5to5_balancer.png|'''5 to 5''': Throughput can go down to 62.4%.
| |
| File:5to6_balancer.png|'''5 to 6''': Throughput can go down to 50%.
| |
| File:5to7_balancer.png|'''5 to 7''': Throughput can go down to 62.4%.
| |
| File:5to8_balancer.png|'''5 to 8''': Throughput can go down to 62.5%.
| |
| </gallery>
| |
| </div></div>
| |
| | |
| | |
| <div class="toccolours mw-collapsible mw-collapsed" style="width:800px">
| |
| 6 belts → x belts
| |
| <div class="mw-collapsible-content">
| |
| | |
| <gallery mode="packed" heights=180px>
| |
| File:6to1_balancer.png|'''6 to 1''': Throughput can go down to 50%.
| |
| File:6to2_balancer.png|'''6 to 2''': Throughput can go down to 50%.
| |
| File:6to3_balancer.png|'''6 to 3''': Throughput can go down to 50%.
| |
| File:6to4_balancer.png|'''6 to 4''': Throughput can go down to 50%.
| |
| File:6to5_balancer.png|'''6 to 5''': Throughput can go down to 50%.
| |
| File:6to6_balancer.png|'''6 to 6''': Throughput can go down to 50%.
| |
| File:6to7_balancer.png|'''6 to 7''': Throughput can go down to 50%.
| |
| File:6to8_balancer.png|'''6 to 8''': Throughput can go down to 50%.
| |
| </gallery>
| |
| </div></div>
| |
| | |
| | |
| <div class="toccolours mw-collapsible mw-collapsed" style="width:800px">
| |
| 7 belts → x belts
| |
| <div class="mw-collapsible-content">
| |
| | |
| <gallery mode="packed" heights=180px>
| |
| File:7to1_balancer.png|'''7 to 1''': Throughput can go down to 50%.
| |
| File:7to2_balancer.png|'''7 to 2''': Throughput can go down to 50%.
| |
| File:7to3_balancer.png|'''7 to 3''': Throughput can go down to 50%.
| |
| File:7to4_balancer.png|'''7 to 4''': Throughput can go down to 50%.
| |
| File:7to5_balancer.png|'''7 to 5''': Throughput can go down to 62.5%.
| |
| File:7to6_balancer.png|'''7 to 6''': Throughput can go down to 50%.
| |
| File:7to7_balancer.png|'''7 to 7''': Throughput can go down to 50%.
| |
| File:7to8_balancer.png|'''7 to 8''': Throughput can go down to 70%.
| |
| </gallery>
| |
| </div></div>
| |
| | |
| | |
| <div class="toccolours mw-collapsible mw-collapsed" style="width:800px">
| |
| 8 belts → x belts
| |
| <div class="mw-collapsible-content">
| |
| | |
| <gallery mode="packed" heights=180px>
| |
| File:8to1_balancer.png|'''8 to 1'''
| |
| File:8to2_balancer.png|'''8 to 2''': Throughput can go down to 50%.
| |
| File:8to3_balancer.png|'''8 to 3''': Throughput can go down to 50%.
| |
| File:8to4_balancer.png|'''8 to 4''': Throughput can go down to 50%.
| |
| File:8to5_balancer.png|'''8 to 5''': Throughput can go down to 62.5%.
| |
| File:8to6_balancer.png|'''8 to 6''': Throughput can go down to 50%.
| |
| File:8to7_balancer.png|'''8 to 7''': Throughput can go down to 70%.
| |
| File:8to8_balancer.png|'''8 to 8''': Throughput can go down to 50%.
| |
| </gallery>
| |
| </div></div>
| |
| | |
| <!--
| |
| | |
| === Belt balance ===
| |
| | |
| Due to how items are placed onto belts by [[inserters]], their lanes can sometimes become unbalanced. In order to
| |
| maintain throughput, balancing the lanes may be necessary. The gifs below show how to do this:
| |
|
| |
|
| == Splitters == | | == Belt balancers == |
|
| |
|
| [[Splitters]] are another form of item manipulation. Splitters are a 2x1 tile that split incoming [[Item]]s on belts | | [[File:Balancer_Mechanics1.png|thumb|200px|right|1 full input belt gets split into two 50% full belts which get split into 4 belts that are each 25% full.]] |
| from one input to two outputs, in a 50/50 ratio. They are used to divide resources between two belts, or balance | | Belt balancers utilize the mechanic that splitters output items in a 1:1 ratio onto both their output belts. That means that a splitter can be used to put an equal amount of items on two belts. Since the process can be repeated infinitely, balancers with 2<sup>n</sup> output belts are easy to create. |
| multiple belts.
| | {{clear}} |
| | [[File:Balancer_Mechanics2b.png|thumb|450px|right|First the belts A and B go through a splitter so that the output belts contain an equal amount of items from each input belt (AB). The same is done with belts C and D. Then the mixed belts AB and CD go through splitters so that their output belts contain items from each input belt (ABCD)!]] |
| | Balancers also use the mechanic that splitters take an equal amount of items from both input belts. That means that a splitter connected to two input belts will evenly distribute those items onto the the two output belts. To balance belts it has to be made sure that the output belts contain an equal number of items from each input belt. |
| | {{clear}} |
|
| |
|
| == Mechanics of splitters == | | === Throughput === |
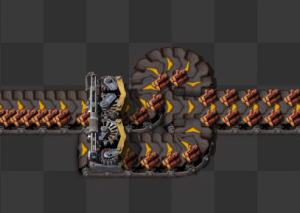
| | [[File:4to4_balancer_throughput_limit_demo.gif|right|262px]] |
| | Balancers that are '''throughput limited''' may not be able to provide maximum output if one or more outputs are blocked. To be '''throughput ''un''limited''', a balancer must fulfil the following conditions: |
| | #100% throughput under full load. |
| | #Any arbitrary amount of input belts should be able to go to any arbitrary amount of output belts. |
|
| |
|
| The behavior of splitters looks simple at first glance. But they are not that simple. Splitters have an astonishing amount of uses. | | Balancers often do not fulfill the second condition because of internal bottlenecks. The gif on the right shows a 4 → 4 balancer being fed by two belts, but only outputting one belt which means that its throughput in that arrangement is 50%. The bottleneck in this balancer is that the two middle belts only get input from one splitter. So, if only one side of that splitter gets input, as can be seen in the gif, it can only output one belt even though the side of the splitter is fed by a splitters which gets two full belts of input. In this particular case, the bottleneck can be fixed by feeding the two middle output belts with more splitters. This is done by adding two more splitters at the end of the balancer, as it can be seen here: [[File:4to4_balancer.png|center|125px]] |
|
| |
|
| * Splitters have two input belts, and two output belts. If the splitter receives items on one belt, it will split the
| | However most balancers' bottlenecks can't be solved as easily. A guaranteed method to achieve throughput unlimited balancers is to place two balancers back to back that fulfil the first condition for throughput unlimited balancers (100% throughput under full load). The resulting balancer is usually larger than a balancer that was initially designed to be throughput unlimited. This is the case because they use more splitters than the minimum required amount of splitters for a throughput unlimited balancer. For n → n balancers where n is a power of two numbers, <code>n×log<sub>2</sub>(n)−n÷2</code> can be used to calculate how many splitters are needed. This formula is based on the number of nodes in a [[WIKIPEDIA:Clos_network#Bene%C5%A1_network_(m_=_n_=_2)|Beneš network]], which is essentially the same as a throughput unlimited balancer — it allows any input to reach any output. |
| input evenly between it's two sides. | |
|
| |
|
| * If one of the outputs is fully backed-up and the splitter cannot split evenly, it will put all input on it's other
| | === Universal balancers === |
| output.
| | Many balancers fail to balance properly once an output backs up or if an output is not used. In essence this means that an n-n balancer is not a functional n-(n-1) balancer. Sometimes this can be fixed by looping the unused output back around the balancer and distributing it among the inputs. Other times, this is not an option. Universal balancers solve this issue by having the back-looping built in. These balancers can balance evenly between any inputs and any outputs. Universal balancers can be throughput limited. If a universal balancer is throughput limited, the bottleneck may be in the loops or the balancer itself. A throughput limited universal balancer may only have the capacity for a few unused outputs. When more than the number of allowed outputs backs up, the universal balancer behaves like a normal balancer, and may not balance properly. {{clear}} |
|
| |
|
| * Splitters can also take two inputs and one output.
| | == Lane balancers == |
| | [[File:Lane_balancer_mechanics.png|thumb|right|This output balanced lane balancer distributes the items evenly among the output lanes, achieving output balance.]] |
| | Lane balancers may be output balanced or input balanced. Input balanced lane balancers draw evenly from each side of the input belt, while output balanced lane balancers output evenly onto each lane of the output belt. {{clear}} |
|
| |
|
| The output will be an even mix of both the inputs. This can be
| | == See also == |
| used to efficiently merge two belts together. When it does this, the items will not be shuffled.
| | * [[Belt transport system]] |
| | ** [[Splitters]] |
| | ** [[Transport belts]] |
| | ** [[Underground belts]] |
| | == Further reading == |
| | * [https://forums.factorio.com/34182 Command line belt balancer analyzer] |
| | * [https://forums.factorio.com/viewtopic.php?p=344279#p344279 Fractal (2<sup>n</sup>) balancer generation tool] |
| | * [https://forums.factorio.com/61424 Belt Balancers - how they work and how to make them] |
| | * [https://forums.factorio.com/63462 Finding balance: A guide to belt balancers] |
|
| |
|
| -->
| | {{C|Belt transport system{{!}}#Balancer mechanics}} |
| == References ==
| |
| * [https://forums.factorio.com/viewtopic.php?f=69&t=34182 Command line belt balancer analyzer]
| |
| * [https://mods.factorio.com/mods/DaveMcW/blueprint-string Blueprint String Mod]
| |
| * [https://www.reddit.com/r/factorio/comments/4gj8x4/my_take_on_4_belt_lane_balancers/ Collection of lane balancers]
| |
| * [https://www.reddit.com/r/factorio/comments/5njgy4/yet_another_belt_balancer_compendium/ Best collection of belt balancers, most of them are used here.]
| |
| * [https://www.reddit.com/r/factorio/comments/3fq3cc/count_perfect_n_to_m_belt_balancers/ Collection of belt balancers, most of these contain a lot of unnecessary splitters]
| |
| * [https://www.reddit.com/r/factorio/comments/4d3per/belt_balancer_compendium/ Another collection of belt balancers, some of these are not input balanced]
| |
Balancers are used to evenly distribute items over multiple belts or multiple belt lanes.
Balancers that are input balanced take evenly from all input belts/belt lanes. Balancers that are output balanced distribute evenly to all output belts/belt lanes. Ideally, a balancer should be input and output balanced.
Belt balancers
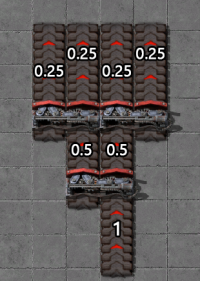
1 full input belt gets split into two 50% full belts which get split into 4 belts that are each 25% full.
Belt balancers utilize the mechanic that splitters output items in a 1:1 ratio onto both their output belts. That means that a splitter can be used to put an equal amount of items on two belts. Since the process can be repeated infinitely, balancers with 2n output belts are easy to create.

First the belts A and B go through a splitter so that the output belts contain an equal amount of items from each input belt (AB). The same is done with belts C and D. Then the mixed belts AB and CD go through splitters so that their output belts contain items from each input belt (ABCD)!
Balancers also use the mechanic that splitters take an equal amount of items from both input belts. That means that a splitter connected to two input belts will evenly distribute those items onto the the two output belts. To balance belts it has to be made sure that the output belts contain an equal number of items from each input belt.
Throughput
Balancers that are throughput limited may not be able to provide maximum output if one or more outputs are blocked. To be throughput unlimited, a balancer must fulfil the following conditions:
- 100% throughput under full load.
- Any arbitrary amount of input belts should be able to go to any arbitrary amount of output belts.
Balancers often do not fulfill the second condition because of internal bottlenecks. The gif on the right shows a 4 → 4 balancer being fed by two belts, but only outputting one belt which means that its throughput in that arrangement is 50%. The bottleneck in this balancer is that the two middle belts only get input from one splitter. So, if only one side of that splitter gets input, as can be seen in the gif, it can only output one belt even though the side of the splitter is fed by a splitters which gets two full belts of input. In this particular case, the bottleneck can be fixed by feeding the two middle output belts with more splitters. This is done by adding two more splitters at the end of the balancer, as it can be seen here:
However most balancers' bottlenecks can't be solved as easily. A guaranteed method to achieve throughput unlimited balancers is to place two balancers back to back that fulfil the first condition for throughput unlimited balancers (100% throughput under full load). The resulting balancer is usually larger than a balancer that was initially designed to be throughput unlimited. This is the case because they use more splitters than the minimum required amount of splitters for a throughput unlimited balancer. For n → n balancers where n is a power of two numbers, n×log2(n)−n÷2 can be used to calculate how many splitters are needed. This formula is based on the number of nodes in a Beneš network, which is essentially the same as a throughput unlimited balancer — it allows any input to reach any output.
Universal balancers
Many balancers fail to balance properly once an output backs up or if an output is not used. In essence this means that an n-n balancer is not a functional n-(n-1) balancer. Sometimes this can be fixed by looping the unused output back around the balancer and distributing it among the inputs. Other times, this is not an option. Universal balancers solve this issue by having the back-looping built in. These balancers can balance evenly between any inputs and any outputs. Universal balancers can be throughput limited. If a universal balancer is throughput limited, the bottleneck may be in the loops or the balancer itself. A throughput limited universal balancer may only have the capacity for a few unused outputs. When more than the number of allowed outputs backs up, the universal balancer behaves like a normal balancer, and may not balance properly.
Lane balancers
This output balanced lane balancer distributes the items evenly among the output lanes, achieving output balance.
Lane balancers may be output balanced or input balanced. Input balanced lane balancers draw evenly from each side of the input belt, while output balanced lane balancers output evenly onto each lane of the output belt.
See also
Further reading


