![]()
![]()
![]()
![]()
![]()
![]()
Balancer mechanics: Difference between revisions
(added all remaining 1-8 to 1-8 balancers) |
(Surround galleries in collapsible html, fix spelling) |
||
| Line 3: | Line 3: | ||
Balancers are used to evenly distribute items over multiple belts or multiple belt lanes. | Balancers are used to evenly distribute items over multiple belts or multiple belt lanes. | ||
Belt balancers are usually used to balance | Belt balancers are usually used to balance multiple belts before or after train stations to ensure even loading of buffer chests and train wagons. They are also usually used to even out production by placing them in front of large machine arrays with multiple input belts. Belt balancers do not balance the individual belt lanes! | ||
Lane balancers are usually placed after production to ensure that a belt is fully compressed or before consumption to ensure that both lanes of the belt are evenly drained. | Lane balancers are usually placed after production to ensure that a belt is fully compressed or before consumption to ensure that both lanes of the belt are evenly drained. | ||
== Lane Balancers == | == Lane Balancers == | ||
=== Input Unbalanced, Output Balanced === | === Input Unbalanced, Output Balanced === | ||
| Line 33: | Line 33: | ||
== Belt Balancers == | == Belt Balancers == | ||
These belt balancers are all tested to be input balanced and output balanced. Throughput under full load is 100% and min throughput with blocked in- and outputs is also tested, it is | These belt balancers are all tested to be input balanced and output balanced. Throughput under full load is 100% and min throughput with blocked in- and outputs is also tested, it is noted when that is under 100%. Tests are done using [https://forums.factorio.com/viewtopic.php?f=69&t=34182 this handy tool] by d4rkpl4y3r on the Factorio Forums. When there are multiple versions of balancers that have the same stats but different sizes, the balancer with the smallest footprint is shown. | ||
== | <div class="toccolours mw-collapsible mw-collapsed" style="width:800px"> | ||
1 belt → x belts | |||
<div class="mw-collapsible-content"> | |||
<gallery mode="packed" heights=180px> | <gallery mode="packed" heights=180px> | ||
| Line 50: | Line 51: | ||
</gallery> | </gallery> | ||
</div></div> | |||
<div class="toccolours mw-collapsible mw-collapsed" style="width:800px"> | |||
2 belts → x belts | |||
<div class="mw-collapsible-content"> | |||
<gallery mode="packed" heights=180px> | <gallery mode="packed" heights=180px> | ||
| Line 67: | Line 71: | ||
File:2to16_balancer.png|'''2 to 16''': Throughput can go down to 50%. | File:2to16_balancer.png|'''2 to 16''': Throughput can go down to 50%. | ||
</gallery> | </gallery> | ||
</div></div> | |||
== | <div class="toccolours mw-collapsible mw-collapsed" style="width:800px"> | ||
3 belts → x belts | |||
<div class="mw-collapsible-content"> | |||
<gallery mode="packed" heights=180px> | <gallery mode="packed" heights=180px> | ||
| Line 82: | Line 88: | ||
File:3to8_balancer.png|'''3 to 8''': Throughput can go down to 50%. | File:3to8_balancer.png|'''3 to 8''': Throughput can go down to 50%. | ||
</gallery> | </gallery> | ||
</div></div> | |||
== | <div class="toccolours mw-collapsible mw-collapsed" style="width:800px"> | ||
4 belts → x belts | |||
<div class="mw-collapsible-content"> | |||
<gallery mode="packed" heights=180px> | <gallery mode="packed" heights=180px> | ||
| Line 97: | Line 105: | ||
File:4to8_balancer.png|'''4 to 8''': Throughput can go down to 50%. | File:4to8_balancer.png|'''4 to 8''': Throughput can go down to 50%. | ||
</gallery> | </gallery> | ||
</div></div> | |||
== | <div class="toccolours mw-collapsible mw-collapsed" style="width:800px"> | ||
5 belts → x belts | |||
<div class="mw-collapsible-content"> | |||
<gallery mode="packed" heights=180px> | <gallery mode="packed" heights=180px> | ||
| Line 112: | Line 122: | ||
File:5to8_balancer.png|'''5 to 8''': Throughput can go down to 62.5%. | File:5to8_balancer.png|'''5 to 8''': Throughput can go down to 62.5%. | ||
</gallery> | </gallery> | ||
</div></div> | |||
== | <div class="toccolours mw-collapsible mw-collapsed" style="width:800px"> | ||
6 belts → x belts | |||
<div class="mw-collapsible-content"> | |||
<gallery mode="packed" heights=180px> | <gallery mode="packed" heights=180px> | ||
| Line 127: | Line 139: | ||
File:6to8_balancer.png|'''6 to 8''': Throughput can go down to 50%. | File:6to8_balancer.png|'''6 to 8''': Throughput can go down to 50%. | ||
</gallery> | </gallery> | ||
</div></div> | |||
== | <div class="toccolours mw-collapsible mw-collapsed" style="width:800px"> | ||
7 belts → x belts | |||
<div class="mw-collapsible-content"> | |||
<gallery mode="packed" heights=180px> | <gallery mode="packed" heights=180px> | ||
| Line 142: | Line 156: | ||
File:7to8_balancer.png|'''7 to 8''': Throughput can go down to 70%. | File:7to8_balancer.png|'''7 to 8''': Throughput can go down to 70%. | ||
</gallery> | </gallery> | ||
</div></div> | |||
== | <div class="toccolours mw-collapsible mw-collapsed" style="width:800px"> | ||
8 belts → x belts | |||
<div class="mw-collapsible-content"> | |||
<gallery mode="packed" heights=180px> | <gallery mode="packed" heights=180px> | ||
| Line 157: | Line 173: | ||
File:8to8_balancer.png|'''8 to 8''': Throughput can go down to 50%. | File:8to8_balancer.png|'''8 to 8''': Throughput can go down to 50%. | ||
</gallery> | </gallery> | ||
</div></div> | |||
<!-- | <!-- | ||
| Line 182: | Line 198: | ||
output. | output. | ||
* Splitters can also take two inputs and one output. | * Splitters can also take two inputs and one output. | ||
The output will be an even mix of both the inputs. This can be | The output will be an even mix of both the inputs. This can be | ||
Revision as of 21:48, 28 January 2017
Balancers are used to evenly distribute items over multiple belts or multiple belt lanes.
Belt balancers are usually used to balance multiple belts before or after train stations to ensure even loading of buffer chests and train wagons. They are also usually used to even out production by placing them in front of large machine arrays with multiple input belts. Belt balancers do not balance the individual belt lanes!
Lane balancers are usually placed after production to ensure that a belt is fully compressed or before consumption to ensure that both lanes of the belt are evenly drained.
Lane Balancers
Input Unbalanced, Output Balanced
These balancers evenly distribute the items onto the output lanes but do not "pull" evenly from the input lanes when the output is backed up. They are input unbalanced.
The last two balancers are a special case, they only work when there are items on only one side of the input belt.
- Corner-lane balancer.png
- One lane-corner-lane balancer.png


Input and Output Balanced
These balancers evenly distribute the items onto the output lanes and "pull" evenly from the input lanes when the output is backed up. They are input and output balanced.
- Input balanced-lane balancer-1belt.png
1 Belt
- Input balanced-lane balancer-2belt.png
2 Belts
- Input balanced-lane balancer-4belt-smaller.png
4 Belts v.1
- Input balanced-lane balancer-4belt.png
4 Belts v.2
Belt Balancers
These belt balancers are all tested to be input balanced and output balanced. Throughput under full load is 100% and min throughput with blocked in- and outputs is also tested, it is noted when that is under 100%. Tests are done using this handy tool by d4rkpl4y3r on the Factorio Forums. When there are multiple versions of balancers that have the same stats but different sizes, the balancer with the smallest footprint is shown.
1 belt → x belts
- 1to2 balancer.png
1 to 2
- 1to3 balancer.png
1 to 3
- 1to4 balancer.png
1 to 4
- 1to5 balancer.png
1 to 5
- 1to6 balancer.png
1 to 6
- 1to7 balancer.png
1 to 7
- 1to8 balancer.png
1 to 8
- 1to16 balancer.png
1 to 16
2 belts → x belts
- 2to1 balancer.png
2 to 1
- 2to2 balancer.png
2 to 2
- 2to3 balancer a.png
2 to 3: Throughput can go down to 75%.
- 2to3 balancer b.png
2 to 3: Throughput can go down to 75%.
- 2to4 balancer.png
2 to 4
- 2to5 balancer b.png
2 to 5: Throughput can go down to 50%.
- 2to5 balancer.png
2 to 5: Throughput can go down to 50%.
- 2to6 balancer.png
2 to 6: Throughput can go down to 50%.
- 2to7 balancer.png
2 to 7: Throughput can go down to 50%.
- 2to8 balancer.png
2 to 8: Throughput can go down to 50%.
- 2to16 balancer.png
2 to 16: Throughput can go down to 50%.
3 belts → x belts
- 3to1 balancer.png
3 to 1: Throughput can go down to 50%.
- 3to2 balancer.png
3 to 2: Throughput can go down to 75%.
- 3to3 balancer.png
3 to 3: Throughput can go down to 50%.
- 3to4 balancer.png
3 to 4: Throughput can go down to 83%.
- 3to5 balancer.png
3 to 5: Throughput can go down to 50%.
- 3to6 balancer.png
3 to 6: Throughput can go down to 50%.
- 3to7 balancer.png
3 to 7: Throughput can go down to 50%.
- 3to8 balancer.png
3 to 8: Throughput can go down to 50%.
4 belts → x belts
- 4to1 balancer.png
4 to 1
- 4to2 balancer.png
4 to 2: Throughput can go down to 50%.
- 4to3 balancer.png
4 to 3: Throughput can go down to 83%.
4 to 4: Throughput can go down to 50%.
- 4to5 balancer.png
4 to 5: Throughput can go down to 62.5%.
- 4to6 balancer.png
4 to 6: Throughput can go down to 50%.
- 4to7 balancer.png
4 to 7: Throughput can go down to 50%.
- 4to8 balancer.png
4 to 8: Throughput can go down to 50%.

5 belts → x belts
- 5to1 balancer.png
5 to 1: Throughput can go down to 50%.
- 5to2 balancer.png
5 to 2: Throughput can go down to 50%.
- 5to3 balancer.png
5 to 3: Throughput can go down to 50%.
- 5to4 balancer.png
5 to 4: Throughput can go down to 62.5%.
- 5to5 balancer.png
5 to 5: Throughput can go down to 62.4%.
- 5to6 balancer.png
5 to 6: Throughput can go down to 50%.
- 5to7 balancer.png
5 to 7: Throughput can go down to 62.4%.
- 5to8 balancer.png
5 to 8: Throughput can go down to 62.5%.
6 belts → x belts
- 6to1 balancer.png
6 to 1: Throughput can go down to 50%.
- 6to2 balancer.png
6 to 2: Throughput can go down to 50%.
- 6to3 balancer.png
6 to 3: Throughput can go down to 50%.
- 6to4 balancer.png
6 to 4: Throughput can go down to 50%.
- 6to5 balancer.png
6 to 5: Throughput can go down to 50%.
- 6to6 balancer.png
6 to 6: Throughput can go down to 50%.
- 6to7 balancer.png
6 to 7: Throughput can go down to 50%.
- 6to8 balancer.png
6 to 8: Throughput can go down to 50%.
7 belts → x belts
- 7to1 balancer.png
7 to 1: Throughput can go down to 50%.
- 7to2 balancer.png
7 to 2: Throughput can go down to 50%.
- 7to3 balancer.png
7 to 3: Throughput can go down to 50%.
- 7to4 balancer.png
7 to 4: Throughput can go down to 50%.
- 7to5 balancer.png
7 to 5: Throughput can go down to 62.5%.
- 7to6 balancer.png
7 to 6: Throughput can go down to 50%.
- 7to7 balancer.png
7 to 7: Throughput can go down to 50%.
- 7to8 balancer.png
7 to 8: Throughput can go down to 70%.
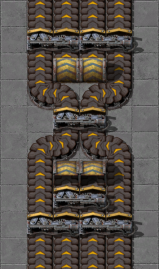
8 belts → x belts
- 8to1 balancer.png
8 to 1
- 8to2 balancer.png
8 to 2: Throughput can go down to 50%.
- 8to3 balancer.png
8 to 3: Throughput can go down to 50%.
- 8to4 balancer.png
8 to 4: Throughput can go down to 50%.
- 8to5 balancer.png
8 to 5: Throughput can go down to 62.5%.
- 8to6 balancer.png
8 to 6: Throughput can go down to 50%.
- 8to7 balancer.png
8 to 7: Throughput can go down to 70%.
- 8to8 balancer.png
8 to 8: Throughput can go down to 50%.
References
- Command line belt balancer analyzer
- Blueprint String Mod
- Collection of lane balancers
- Best collection of belt balancers, most of them are used here.
- Collection of belt balancers, most of these contain a lot of unnecessary splitters
- Another collection of belt balancers, some of these are not input balanced