User:Fried biter/workspace: Difference between revisions
Fried biter (talk | contribs) m ([WIP] translation ongoing) |
(disabled categories) |
||
| (36 intermediate revisions by one other user not shown) | |||
| Line 3: | Line 3: | ||
---- | ---- | ||
{{Languages}} | {{Languages}} | ||
'''ベルト輸送システム(Belt transport system)'''は、アイテムを異なる場所の間で輸送するために[[player/ja|プレイヤー]]が最初に触れることとなるシステム。[[Railway/ja|列車]]、[[Logistic network/ja|物流ロボット]]と並んで、Factorioにおけるアイテム輸送システムを構成している。 | |||
(訳注:0.16現在、"transport"は搬送ベルトについてのみ「搬送」と訳され、それ以外に於いては「輸送」と訳されている。以下では固有名詞以外は「輸送」に統一する) | |||
ベルトは特にアイテムの搬送に用いられ、エネルギーを使わずに稼働する。ベルトは他の動くエンティティ、例えば[[player/ja|プレイヤー]]、[[vehicle/ja|乗り物]]や[[enemies/ja|バイター]]とも干渉でき、動きを速めたり遅めたりする。 | |||
== 搬送ベルトの種類 == | |||
以下はFactorioで利用できる搬送ベルト全てのチャート。 | |||
{| class="wikitable" | |||
! [[Transport belts/ja|搬送ベルト]] !! [[Underground belts/ja|地下搬送ベルト]] !! [[Splitters/ja|分配器]] !! 最大スループット(アイテム毎[[game-second/ja|秒]]) !! 必要研究 !! 原材料(ベルト1つあたり) | |||
|- | |||
| {{Imagelink|Transport belt|Transport belt/ja|搬送ベルト}} | |||
| {{Imagelink|Underground belt|Underground belt/ja|地下搬送ベルト}} | |||
| {{Imagelink|Splitter|Splitter/ja|分配器}} | |||
| 13.333 | |||
| [[Logistics (research)/ja|物流学1]]<sup>1</sup> | |||
| {{Icon|Time|1}} + {{Icon|Iron plate|3}} | |||
|- | |||
| {{Imagelink|Fast transport belt|Fast transport belt/ja|高速搬送ベルト}} | |||
| {{Imagelink|Fast underground belt|Fast underground belt/ja|高速地下搬送ベルト}} | |||
| {{Imagelink|Fast splitter|Fast splitter/ja|高速分配器}} | |||
| 26.666 | |||
| [[Logistics 2 (research)/ja|物流学2]] | |||
| {{Icon|Time|3.5}} + {{Icon|Iron plate|11.5}} | |||
|- | |||
| {{Imagelink|Express transport belt|Express transport belt/ja|超高速搬送ベルト}} | |||
| {{Imagelink|Express underground belt|Express underground belt/ja|超高速地下搬送ベルト}} | |||
| {{Imagelink|Express splitter|Express splitter/ja|超高速分配器}} | |||
| 40.0 | |||
| [[Logistics 3 (research)/ja|物流学3]] | |||
| {{Icon|Time|9}} + {{Icon|Iron plate|31.5}} + {{Icon|Lubricant|20}} | |||
|- | |||
|} | |||
(1) 地下搬送ベルトと分配器のみ。ノーマル搬送ベルトはゲーム開始時から利用可能。 | |||
ベルト階級にかかわらず、ぎっしり詰まった搬送ベルトは6~8アイテムを保持できる。詳細は[[Transport_belts/Physics/ja|搬送ベルトの物理]]参照。 | |||
== ベルトの階級(Tier) == | |||
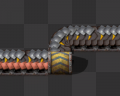
[[File: | [[File:Transport_belts_speed.gif|300px|thumb|top|3種のベルトとその速度(上から順に: 通常ベルト、高速ベルト、超高速ベルト)]] | ||
3種類の階級のベルトが使える。[[transport belt/ja|搬送ベルト]]は黄色くて一番遅いが、同時に一番製造コストが安い。次の階級は赤い[[fast transport belt/ja|高速搬送ベルト]]で、通常の2倍速。[[express transport belt/ja|超高速搬送ベルト]]は最も階級が高く、青色で通常の3倍、もしくは赤ベルトの1.5倍。 | |||
{{clear}} | |||
== ベルト機構 == | |||
== | === ベルトの合流・分岐 === | ||
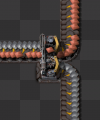
どの階級のベルトも、アイテムが載るレーンを2つ持つ。一種類の素材を2つ流すことも、2つの異なる素材を同じベルトに流すこともできる。混合ベルトは鉱石の精錬や、[[high tech science pack/ja|ハイテクサイエンスパック]]のように多くの異なる原料を要求するアイテムを製造するのに便利。混合ベルトは分配器フィルタで分離できる。地下ベルトは片方を通さないので、地下ベルトを用いて分離することもできる。 | |||
[[File: | [[File:Transport_belts_2_lanes.gif|top]] [[File:Transport_belts_unmerge.gif|300px|top]] | ||
合流/分離はよく[[splitter/ja|分配器]]で行われる。2番めのgifに見られる小技については、'''[[Belt_transport_system#ベルトレーン分岐|地下ベルト]]'''節に詳しい。 | |||
=== レーンバランシング === | |||
[[inserters/ja|インサータ]]のベルトへのアイテムの置き方が原因で、レーンが偏ってしまうことがある。スループットを維持するには、レーンバランシングが不可欠だ。以下のgifでは2つのやり方を示す。前者は、最初に1レーンのみが使われている場合のみ機能する。原理についての詳細は、[[Balancer mechanics/ja#レーンバランサ]]を見よ。 | |||
[[File: | [[File:Transport_belts_balance1.gif|top]] [[File:Transport_belts_balance2.gif|top]] | ||
=== ベルトスループット === | |||
[[File:Stack inserters fill express belt.gif|frame|right|[[stack inserter/ja|スタックインサータ]]4つで超高速ベルトを満載できる。左の2つはスタックサイズ12、右の2つはスタックサイズ7。]] | |||
スループットの最大化は、ベルトを効率化するために重要である。そのため、いくつかの定義を導入しよう。 | |||
; 速度(Speed) | |||
: ベルトがどれほど速く動くか。 | |||
; 密度(Density) | |||
: アイテムがどれほどぎっちりベルトに載せられているか。 | |||
; スループット(Throughput) | |||
: 速度×密度。所与の時間において、どれほど多くのアイテムが通過するかを表す。 | |||
では、スループットを拡張しうる3つの可能性を見ていこう。 | |||
; 密度の増加 | |||
:しばしば、アイテムの間隙に他のアイテムが入れられるほど大きくはないギャップが生じる。しかし、掘削機、インサータ、ベルトのサイドローディングではベルト上のアイテムを一時的に押し込めることで、そうした隙間にもアイテムを無理やり詰め込むことができる。押し込められた隙間は、ベルト前方が再び動き始めたときに通常のサイズまで拡張される。 | |||
; 速度の増加 | |||
:工場内のベルトがすでに最大の密度だとしても、よりよいベルトにアップグレードして速度を改善できる可能性がある。まず最初にしなければならないのはボトルネックを探すことで、たいていすぐ見つかる。アイテムが高速に(もしくは全く)動かない、もしくは最大密度で停止しているような部分があり、そしてこの「進んでは止まる」状態が突如として解消される箇所もあるだろう。そこがボトルネックだ。大概の場合、こここそがベルト最適化を必要とする場所だ。 | |||
; ベルトの増加 | |||
:さらなる並列ベルトの追加によってもスループットを向上できる。単純な話、スループットが必要なアイテムを運ぶベルトはたくさん置こう。 | |||
=== ベルト便利ワザ === | |||
敵の襲撃に防御が間に合うためには、高速に移動できることが重要だ。ベルト上を走ると、ベルトの速度に応じて[[player/ja|プレイヤー]]の移動速度が早まったり遅くなったりする。だから、[[defense/ja|防衛拠点]]に向けてベルトを張り巡らせておくと良い。 | |||
一方で、プレイヤーのみがベルト上を移動できるわけではない。バイターやスピッターも移動できる。これを悪用して防衛を強化できる。まず、超高速搬送ベルトを壁の前に設置しておくことで、バイターが防壁にたどり着くまでの時間を引き伸ばせる。次に、スピッターを壁の近くに移動できる。こうすれば、より多くのタレットが一度に1体のスピッターを攻撃できる。 | |||
ほかの便利な利用法としては、搬送ベルトに[[car/ja|自動車]]を載せることもできる。自動車はインベントリを持ち、[[inserters/ja|インサータ]]で積み込める。つまり、ベルト上を動く箱として利用できる。これにはいくつかのアドバンテージがあり、第一にこの自動車回転寿司のスループットは極めて高い。第二に、インサータスタックサイズボーナスが適用されるので、インサータがより効率的になる。 | |||
== 分配器(Splitter) == | |||
[[Splitters/ja|分配器]]は別の形でアイテムを操作する。分配器は2x1の大きさで、2つまでの入力ベルトからやってきたアイテムを2つまでの出力ベルトに1:1の比で分配する。資源を2本のベルトに分けたり、複数のベルトをバランシングしたりするのに用いられる。 | |||
== | === 機構 === | ||
分配器の挙動は一見単純だ。しかし実のところ、事はそれほど単純でもない。分配器には驚くほど多くの活用法がある。 | |||
* 分配器は入出力ベルトを2つずつ持つ。1本のベルトからアイテムを受け取った場合、2本の出力に均等に分配する。 | |||
* もし片方の出力が完全に詰まっていて、均等に分配できない場合、すべての入力を空いている方の出力ベルトに流す。 | |||
* 分配器は、2本の入力に対し1本の出力しか持たないこともできる。 | |||
* 分配器はアイテムのレーンを保存する。右レーンのアイテムを左レーンに移動することはなく、逆もまた然り。 | |||
* 分配器は片方の入出力を優先できる。分配器をクリックしてGUIを開くことで、優先度を設定できる。 | |||
* 分配器の出力ベルト1本を1種類のアイテムにフィルタリングできる。そのアイテムのみがその出力に流れ、それ以外はもう片方に流れるようになる。フィルタが設定されていると、その側の出力ベルトが優先される。 | |||
ベルトを結合/分割するには、分配器が入力ベルトと同じ速さでなければならず、さもなくば分配器がボトルネックと化す。 | |||
== | ==== 優先度 ==== | ||
分配器の入力側も出力側も、左右どちらかを優先できる。 | |||
入力優先度が設定された分配器は、その側の入力を先に利用しようとし、優先入力ベルトが空いているときのみもう片方を利用する。 | |||
同様に、出力優先度が設定された分配器もすべての入力をその側に流そうとし、優先出力ベルトが詰まっているときのみもう片方に出力する。 | |||
==== フィルタ ==== | |||
分配器のフィルタスロットに特定のアイテムが設定されている場合、出力優先度のスライダーはフィルタ用になる。設定された種別のアイテムはすべてその出力に流され、他のアイテムは全てもう一方に流される。入力優先度はフィルタと独立して設定できる。 | |||
=== | === バランシング === | ||
{{Main|Balancer mechanics/ja|l1=バランシング機構}} | |||
分配器は、複数本のベルトや複数個のベルトレーンを均等に分配するためにも利用できる。 | |||
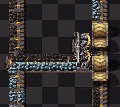
File: | === ベルトレーン操作 === | ||
<gallery mode="slideshow"> | |||
File:Swap_belt_lanes.png|レーンごとに異なるアイテムが載ったベルトのレーンを入れ替えている。 | |||
File:Splitter_seperate_belt_lanes.png|異なるアイテムが載ったレーンを分割する。 | |||
</gallery> | </gallery> | ||
== | == 地下搬送ベルト(Underground belt) == | ||
Underground belts can be used to cross different flows of items without interfering. They move items like a [[Transport belts/ja|通常のベルト]]. | |||
[[ | * Underground belts can cross any number of entities and all types of ground, like water and grass. (as long as the input and output endpoints are on land) | ||
* Underground belts can cross other underground entities (any number of underground belts or underground pipes). They won't be mixed. | |||
* For the connection only the endpoints (entry-side and exit-side) are relevant. | |||
* The maximum distance underground is 8 [[tile/ja|tile]]s with [[express underground belt/ja|超高速地下搬送ベルト]]s. | |||
* An underground belt pair of that bridges a gap of 4 tiles stores up to 44 items. An express underground belt pair at max length stores up to 72 items. | |||
* The half of the underground belt tile with a belt can accept input from the side. The other half (with a tunnel entrance) blocks incoming items. | |||
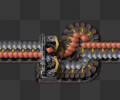
=== ベルトレーン分岐 === | |||
<gallery mode="slideshow"> | |||
File:Block belt lane.png|This is built by placing one underground belt and then using R to reverse its direction. This converts the underground belt entrance to an exit (and vice versa). | |||
File:Transport belts unmerge.gif|This can also be used to split the lanes of a belt onto seperate belts instead of using a splitter filter. | |||
</gallery> | |||
== 関連項目 == | == 関連項目 == | ||
* [[Splitters/ja|分配器]] | |||
* [[Transport belts/ja|搬送ベルト]] | |||
* [[Underground belts/ja|地下搬送ベルト]] | |||
<nowiki>{{C|Belt transport system}}</nowiki> | |||
Latest revision as of 16:19, 24 September 2023
作業場/workspace 日本語話者の方、マサカリ投げてくださると助かります
ベルト輸送システム(Belt transport system)は、アイテムを異なる場所の間で輸送するためにプレイヤーが最初に触れることとなるシステム。列車、物流ロボットと並んで、Factorioにおけるアイテム輸送システムを構成している。 (訳注:0.16現在、"transport"は搬送ベルトについてのみ「搬送」と訳され、それ以外に於いては「輸送」と訳されている。以下では固有名詞以外は「輸送」に統一する)
ベルトは特にアイテムの搬送に用いられ、エネルギーを使わずに稼働する。ベルトは他の動くエンティティ、例えばプレイヤー、乗り物やバイターとも干渉でき、動きを速めたり遅めたりする。
搬送ベルトの種類
以下はFactorioで利用できる搬送ベルト全てのチャート。
| 搬送ベルト | 地下搬送ベルト | 分配器 | 最大スループット(アイテム毎秒) | 必要研究 | 原材料(ベルト1つあたり) |
|---|---|---|---|---|---|
| 13.333 | 物流学11 | ||||
| 26.666 | 物流学2 | ||||
| 40.0 | 物流学3 |
(1) 地下搬送ベルトと分配器のみ。ノーマル搬送ベルトはゲーム開始時から利用可能。
ベルト階級にかかわらず、ぎっしり詰まった搬送ベルトは6~8アイテムを保持できる。詳細は搬送ベルトの物理参照。
ベルトの階級(Tier)
3種類の階級のベルトが使える。搬送ベルトは黄色くて一番遅いが、同時に一番製造コストが安い。次の階級は赤い高速搬送ベルトで、通常の2倍速。超高速搬送ベルトは最も階級が高く、青色で通常の3倍、もしくは赤ベルトの1.5倍。
ベルト機構
ベルトの合流・分岐
どの階級のベルトも、アイテムが載るレーンを2つ持つ。一種類の素材を2つ流すことも、2つの異なる素材を同じベルトに流すこともできる。混合ベルトは鉱石の精錬や、ハイテクサイエンスパックのように多くの異なる原料を要求するアイテムを製造するのに便利。混合ベルトは分配器フィルタで分離できる。地下ベルトは片方を通さないので、地下ベルトを用いて分離することもできる。


合流/分離はよく分配器で行われる。2番めのgifに見られる小技については、地下ベルト節に詳しい。
レーンバランシング
インサータのベルトへのアイテムの置き方が原因で、レーンが偏ってしまうことがある。スループットを維持するには、レーンバランシングが不可欠だ。以下のgifでは2つのやり方を示す。前者は、最初に1レーンのみが使われている場合のみ機能する。原理についての詳細は、Balancer mechanics/ja#レーンバランサを見よ。


ベルトスループット

スループットの最大化は、ベルトを効率化するために重要である。そのため、いくつかの定義を導入しよう。
- 速度(Speed)
- ベルトがどれほど速く動くか。
- 密度(Density)
- アイテムがどれほどぎっちりベルトに載せられているか。
- スループット(Throughput)
- 速度×密度。所与の時間において、どれほど多くのアイテムが通過するかを表す。
では、スループットを拡張しうる3つの可能性を見ていこう。
- 密度の増加
- しばしば、アイテムの間隙に他のアイテムが入れられるほど大きくはないギャップが生じる。しかし、掘削機、インサータ、ベルトのサイドローディングではベルト上のアイテムを一時的に押し込めることで、そうした隙間にもアイテムを無理やり詰め込むことができる。押し込められた隙間は、ベルト前方が再び動き始めたときに通常のサイズまで拡張される。
- 速度の増加
- 工場内のベルトがすでに最大の密度だとしても、よりよいベルトにアップグレードして速度を改善できる可能性がある。まず最初にしなければならないのはボトルネックを探すことで、たいていすぐ見つかる。アイテムが高速に(もしくは全く)動かない、もしくは最大密度で停止しているような部分があり、そしてこの「進んでは止まる」状態が突如として解消される箇所もあるだろう。そこがボトルネックだ。大概の場合、こここそがベルト最適化を必要とする場所だ。
- ベルトの増加
- さらなる並列ベルトの追加によってもスループットを向上できる。単純な話、スループットが必要なアイテムを運ぶベルトはたくさん置こう。
ベルト便利ワザ
敵の襲撃に防御が間に合うためには、高速に移動できることが重要だ。ベルト上を走ると、ベルトの速度に応じてプレイヤーの移動速度が早まったり遅くなったりする。だから、防衛拠点に向けてベルトを張り巡らせておくと良い。
一方で、プレイヤーのみがベルト上を移動できるわけではない。バイターやスピッターも移動できる。これを悪用して防衛を強化できる。まず、超高速搬送ベルトを壁の前に設置しておくことで、バイターが防壁にたどり着くまでの時間を引き伸ばせる。次に、スピッターを壁の近くに移動できる。こうすれば、より多くのタレットが一度に1体のスピッターを攻撃できる。
ほかの便利な利用法としては、搬送ベルトに自動車を載せることもできる。自動車はインベントリを持ち、インサータで積み込める。つまり、ベルト上を動く箱として利用できる。これにはいくつかのアドバンテージがあり、第一にこの自動車回転寿司のスループットは極めて高い。第二に、インサータスタックサイズボーナスが適用されるので、インサータがより効率的になる。
分配器(Splitter)
分配器は別の形でアイテムを操作する。分配器は2x1の大きさで、2つまでの入力ベルトからやってきたアイテムを2つまでの出力ベルトに1:1の比で分配する。資源を2本のベルトに分けたり、複数のベルトをバランシングしたりするのに用いられる。
機構
分配器の挙動は一見単純だ。しかし実のところ、事はそれほど単純でもない。分配器には驚くほど多くの活用法がある。
- 分配器は入出力ベルトを2つずつ持つ。1本のベルトからアイテムを受け取った場合、2本の出力に均等に分配する。
- もし片方の出力が完全に詰まっていて、均等に分配できない場合、すべての入力を空いている方の出力ベルトに流す。
- 分配器は、2本の入力に対し1本の出力しか持たないこともできる。
- 分配器はアイテムのレーンを保存する。右レーンのアイテムを左レーンに移動することはなく、逆もまた然り。
- 分配器は片方の入出力を優先できる。分配器をクリックしてGUIを開くことで、優先度を設定できる。
- 分配器の出力ベルト1本を1種類のアイテムにフィルタリングできる。そのアイテムのみがその出力に流れ、それ以外はもう片方に流れるようになる。フィルタが設定されていると、その側の出力ベルトが優先される。
ベルトを結合/分割するには、分配器が入力ベルトと同じ速さでなければならず、さもなくば分配器がボトルネックと化す。
優先度
分配器の入力側も出力側も、左右どちらかを優先できる。
入力優先度が設定された分配器は、その側の入力を先に利用しようとし、優先入力ベルトが空いているときのみもう片方を利用する。
同様に、出力優先度が設定された分配器もすべての入力をその側に流そうとし、優先出力ベルトが詰まっているときのみもう片方に出力する。
フィルタ
分配器のフィルタスロットに特定のアイテムが設定されている場合、出力優先度のスライダーはフィルタ用になる。設定された種別のアイテムはすべてその出力に流され、他のアイテムは全てもう一方に流される。入力優先度はフィルタと独立して設定できる。
バランシング
- Main article: Balancer mechanics/ja
分配器は、複数本のベルトや複数個のベルトレーンを均等に分配するためにも利用できる。
ベルトレーン操作
レーンごとに異なるアイテムが載ったベルトのレーンを入れ替えている。
異なるアイテムが載ったレーンを分割する。


地下搬送ベルト(Underground belt)
Underground belts can be used to cross different flows of items without interfering. They move items like a 通常のベルト.
- Underground belts can cross any number of entities and all types of ground, like water and grass. (as long as the input and output endpoints are on land)
- Underground belts can cross other underground entities (any number of underground belts or underground pipes). They won't be mixed.
- For the connection only the endpoints (entry-side and exit-side) are relevant.
- The maximum distance underground is 8 tiles with 超高速地下搬送ベルトs.
- An underground belt pair of that bridges a gap of 4 tiles stores up to 44 items. An express underground belt pair at max length stores up to 72 items.
- The half of the underground belt tile with a belt can accept input from the side. The other half (with a tunnel entrance) blocks incoming items.
ベルトレーン分岐
This is built by placing one underground belt and then using R to reverse its direction. This converts the underground belt entrance to an exit (and vice versa).
This can also be used to split the lanes of a belt onto seperate belts instead of using a splitter filter.

関連項目
{{C|Belt transport system}}